
The Address Format Override feature allows you to display custom checkout fields along with the default WooCommerce billing and shipping address fields.
By default, WooCommerce formats addresses based on predefined country-specific layouts and displays only the standard address fields and this address format may be different for each country
With this feature, you can override the default WooCommerce address format and include custom checkout fields created using the Checkout Field Editor plugin in the billing and shipping address display.
How to Use Address Format Override
Follow these steps to include custom fields in the address display:
- Go to WooCommerce -> Checkout Form -> Advanced Settings.
- Choose the custom billing fields that you want to include in the billing address display from Custom billing address keys drop-down list.
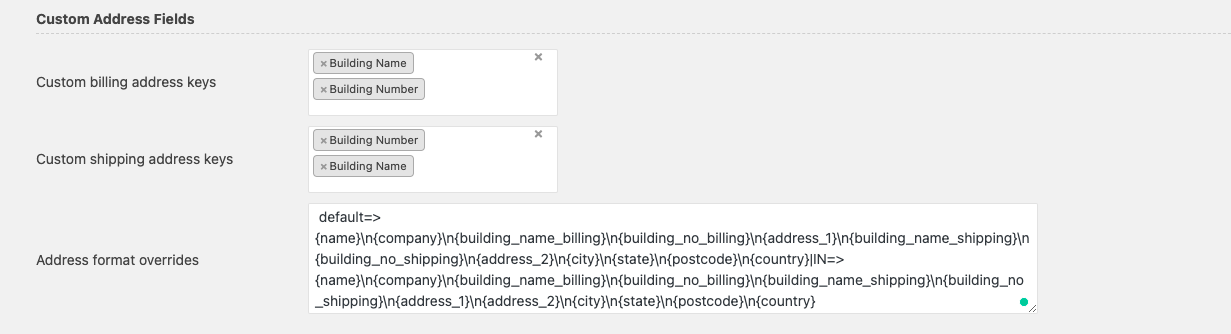
- Choose the custom shipping fields that you want to include in the shipping address display from Custom shipping address keys drop-down list.
- In the Address Format Overrides field, override the default WooCommerce address format to include the selected custom fields in the billing and shipping address display.

Since WooCommerce uses different address formats for different countries, you may need to configure a separate address format override for each country. Each country-specific format should be separated using the pipe symbol (|).. Certain countries have a default address format and should be overridden as follows:
default=> Enter the field name in braces {} followed by \n after each field that needs to be on a new line.
For Example:
default=>{name}\n{company}\n{address_1}\n{address_2}\n{city}\n{state}\n{postcode}\n{coun
try}\n{test_1}\n{test_2}\n{test_3}\n{test_4}|IN=>{name}\n{company}\n{address_1}\n{address_
2}\n{city}\n{state}\n{postcode}\n{country}\n{test_1}\n{test_2}\n{test_3}\n{test_4}
Some countries have a different way of displaying addresses that is distinct from the default display. These countries that don’t come under the default category need to be defined separately using their country codes as follows:
Country Code=> Enter the field name in braces {} followed by \n after each field that needs to be on a new line.
The only difference is that instead of Default, the actual country code must be specified. The address field can be defined like this for more than one country. Each set of definitions must be partitioned using the pipe symbol (|).
The countries codes which do not come under the default settings are listed in the below PDF
| Country Code | Country | Format |
| Default | Default | {name}\n{company}\n{address_1}\n{address_2}\n{city}\n{state}\n{postcode}\n{country} |
| AU | Australia | {name}\n{company}\n{address_1}\n{address_2}\n{city} {state}\n{postcode}\n{country} |
| AT | Austria | {company}\n{name}\n{address_1}\n{address_2}\n{postcode}\n{city}\n{country} |
| BE | Belgium | {company}\n{name}\n{address_1}\n{address_2}\n{postcode}\n{city}\n{country} |
| CA | Canada | {company}\n{name}\n{address_1}\n{address_2}\n{city} {state}\n{postcode}\n{country} |
| CH | Switzerland | {company}\n{name}\n{address_1}\n{address_2}\n{postcode}\n{city}\n{country} |
| CL | Chile | {company}\n{name}\n{address_1}\n{address_2}\n{state}\n{postcode}\n{city}\n{country} |
| CN | China | {country} {postcode}\n{state}, {city}, {address_2}, {address_1}\n{company}\n{name} |
| CZ | Czech Republic | {company}\n{name}\n{address_1}\n{address_2}\n{postcode}\n{city}\n{country} |
| DE | Germany | {company}\n{name}\n{address_1}\n{address_2}\n{postcode}\n{city}\n{country} |
| EE | Estonia | {company}\n{name}\n{address_1}\n{address_2}\n{postcode}\n{city}\n{country} |
| FI | Finland | {company}\n{name}\n{address_1}\n{address_2}\n{postcode}\n{city}\n{country} |
| DK | Denmark | {company}\n{name}\n{address_1}\n{address_2}\n{postcode}\n{city}\n{country} |
| FR | France | {company}\n{name}\n{address_1}\n{address_2}\n{postcode}\n{city_upper}\n{country} |
| HK | Hong Kong | {company}\n{first_name}\n{last_name_upper}\n{address_1}\n{address_2}\n{city_upper}\n{state_upper}\n{country} |
| HU | Hungary | {name}\n{company}\n{city}\n{address_1}\n{address_2}\n{postcode}\n{country} |
| IN | India | {company}\n{name}\n{address_1}\n{address_2}\n{city} – {postcode}\n{state}, {country} |
| IS | Iceland | {company}\n{name}\n{address_1}\n{address_2}\n{postcode}\n{city}\n{country} |
| IT | Italy | {company}\n{name}\n{address_1}\n{address_2}\n{postcode}\n{city}\n{state_upper}\n{country} |
| JP | Japan | {postcode}\n{state}{city}{address_1}\n{address_2}\n{company}\n{last_name} {first_name}\n{country} |
| TW | Taiwan | {company}\n{last_name} {first_name}\n{address_1}\n{address_2}\n{state}, {city} {postcode}\n{country} |
| LI | Liechtenstein | {company}\n{name}\n{address_1}\n{address_2}\n{postcode}\n{city}\n{country} |
| NL | Netherlands | {company}\n{name}\n{address_1}\n{address_2}\n{postcode}\n{city}\n{country} |
| NZ | New Zealand | {name}\n{company}\n{address_1}\n{address_2}\n{city}\n{postcode}\n{country} |
| NO | Norway | {company}\n{name}\n{address_1}\n{address_2}\n{postcode}\n{city}\n{country} |
| PL | Poland | {company}\n{name}\n{address_1}\n{address_2}\n{postcode}\n{city}\n{country} |
| PT | Portugal | {company}\n{name}\n{address_1}\n{address_2}\n{postcode}\n{city}\n{country} |
| SK | Slovakia | {company}\n{name}\n{address_1}\n{address_2}\n{postcode}\n{city}\n{country} |
| SI | Slovenia | {company}\n{name}\n{address_1}\n{address_2}\n{postcode}\n{city}\n{country} |
| ES | Spain | {name}\n{company}\n{address_1}\n{address_2}\n{postcode}\n{city}\n{state}\n{country} |
| SE | Sweden | {company}\n{name}\n{address_1}\n{address_2}\n{postcode}\n{city}\n{country} |
| TR | Turkey | {name}\n{company}\n{address_1}\n{address_2}\n{postcode} {city}\n{state}\n{country} |
| US | United States | {name}\n{company}\n{address_1}\n{address_2}\n{city}, {state_code}\n{postcode}\n{country} |
| VN | Vietnam | {name}\n{company}\n{address_1}\n{city}\n{country} |
- Once you have edited the address format override, click on Save changes button.
Use Case
Consider a scenario where you add custom checkout fields for:
- Building Name
- Building Number
for customers in the United States. By default, WooCommerce will not include these fields in the displayed address.
Using Address Format Override, you can:
- Include the Building Name and Building Number fields in the US address format
- Position them appropriately in the address layout
- Display them in order details, emails, invoices, and customer account pages
Add the following configuration inside the Address Format Overrides field:
default=>{name}\n{company}\n{building_name_billing}\n{building_no_billing}\n{address_1}\n{building_name_shipping}\n{building_no_shipping}\n{address_2}\n{city}\n{state}\n{postcode}\n{country}|US=>{name}\n{company}\n{building_name_billing}\n{building_no_billing}\n{building_name_shipping}\n{building_no_shipping}\n{address_1}\n{address_2}\n{city}\n{state}\n{postcode}\n{country}
This helps provide complete and accurate address information, especially for deliveries where building name or house number information is essential.
The screenshot below shows an example of how custom address fields appear in the billing and shipping address after configuring the Address Format Override feature.

Getting Started
Block Checkout Field Editor
Advanced Settings
For Developers
Compatible Plugin & Themes
Frequently Asked Questions
How