 Getting Started
 Advanced Settings
 For Developers
 Frequently Asked Questions
 Compatible Plugin & Themes
 How
HowWhen putting up an online store with the purpose of making it more lively and straightforward, many thoughts and ideas could come to mind. For one of these ideas to work, it must be possible to acquire accurate and genuine information on the clients, such as addresses and reviews of their experiences. Collecting this information is made simple by the use of custom fields.
Since these data have been listed as fields under a header named Sections, it is simple to categorise them. Additionally, by dividing fields into sections, it is possible to arrange the fields in accordance with a specific requirement. Although WooCommerce comes with default sections, there may be circumstances when additional sections are required to gather extra client data.
What are Sections?
Sections are used to divide the fields depending on several criteria. There are default sections in WooCommerce, including the sections for billing, shipping, and additional details sections. These default sections, however, cannot be altered or eliminated to satisfy needs. Instead, only the fields in that section may indeed be added or removed.
However, you might need to add more sections and additional fields to existing ones on your store’s website. This option to add a new section to the checkout form is therefore enabled. Using the Checkout Field Editor for WooCommerce (Pro) plugin, you can add several sections to the checkout form. The newly created section is editable, duplicatable, and removed as needed.
Using the plugin to add customised parts to the checkout page is necessary, which is what this article discusses.
How to Add a New Section to the Checkout Form?
To add a new section to the checkout form, follow the below steps.
- Navigate to Dashboard → WooCommerce → Checkout Form.
- Click on the Add New Section button.

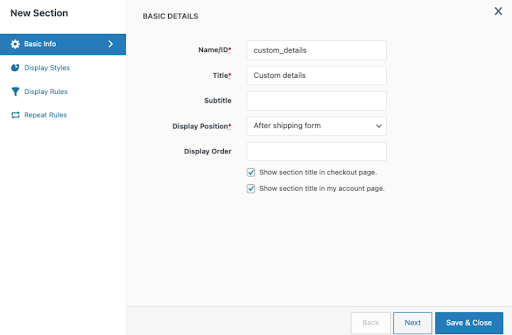
- A pop-up will come to fill in the basic details.
- Enter the Name and Title to be displayed.
The Name is the unique ID that gets stored in the backend. The Title gets displayed on the front end.
- The subtitle is the description of the section.
- Provide the Display Position.
The display position shows where the section should be on the checkout page. The display position can be changed according to the requirements of the user.
The below image shows the list of the Display position. A drop-down box shows the multiple options for displaying the custom section on the checkout page.
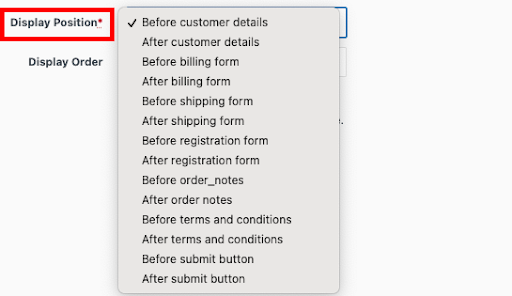
The display position can be set from the drop-down. In the example below, it is given as “After Shipping Form”.
- Choose the Display Order.
The display order shows the order in which the section will be displayed. It can be set after the default sections, before the default sections, or between them.
- Click Save & Close.
The backend will show as depicted below.
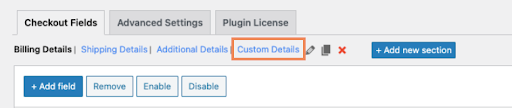
The added section can be edited, duplicated or deleted according to the requirements.
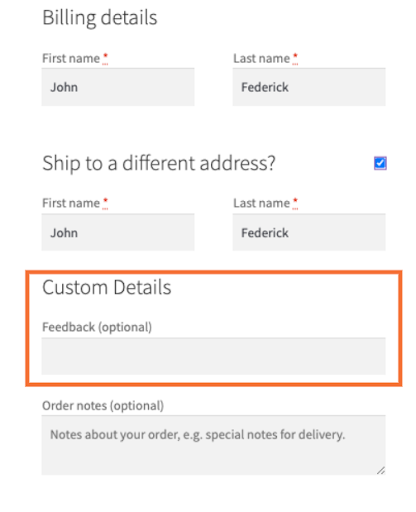
Create a custom field inside the section to show the created section title on the checkout page. Here in the example shown below, “Feedback” is added as the custom field to show the section.
The front end will show as,
Wrapping Up
Defining additional fields is made easier by adding new sections. The reader will have a comprehensive grasp of how to add custom sections to the checkout page using the plugin Checkout Field Editor for WooCommerce by reading and comprehending the article.