ThemeHigh
  • Plugins
  • Documentation
  • Support
  • Partners
  • Login
  • Getting Started
    • Overview...
    • Add/Edit Custom Fields
    • Set Display Rules
    • Set Repeat Rules
    • Price Fields & Types
    • User Meta Fields
    • Time Picker Settings
    • Why Your Checkout Fields Aren’...
    • Date Picker Settings
    • Display Custom Fields...
  • Advanced Settings
    • Include New Fields in Address Format?
    • Enable Address Autofill
    • Configure Locale Override Settings
    • Add Custom Fields to CSV Export
    • Display Custom Fields In PDF Invoices & Packing Slips
    • Zapier Support
    • Display Country & State Fields based on Conditional Rules
    • WPML Compatibility
    • Where do the Custom Fields get Saved or Displayed?
    • Backup & Import Settings
    • Enable Inline Validation...
    • WPML String Translations...
    • Custom Fields in WooCommerce Orders
    • Add a New Custom Validation Rule
    • Add a New Confirm Field Validator
    • Import/Export the Checkout Fields and Sections
  • For Developers
    • Hooks & References...
    • Display Rules: Use cases and mor...
    • Repeat Rules: More use cases and...
    • Based on Checkout Fields: Use ca...
    • Override HTML Content: Examples...
    • Compatibility with “WooCom...
  • Compatible Plugin & Themes
    • Plugins & Themes...
  • Frequently Asked Questions
    • Frequently Asked Questions...
  • How
    • How To Display Fields In Order D...
    • How To Customise The Shipping Se...
    • How To Add Custom Fields In The ...
    • How to Add Custom Price Fields o...
    • How To Add A New Section To The ...
    • How To Display Custom Fields In ...
    • How to Show/Hide Fields Based On...
    • How To Set Repeat Rules On The C...

Documentation/Checkout Field Editor for WooCommerce/How to Add a New Confirm Field Validator?

How to Add a New Confirm Field Validator?

Last updated on August 18, 2022

Confirm field validators come in handy while there is a particular field that is to be compared with another field to ensure they match. This feature helps to validate two fields for the same value (for example Email and Confirm Email) while placing an order. This validation is assigned to any particular field which will be verified and validated before placing the order.

To create confirm validators:

  1. Navigate to Advanced Settings tab (WooCommerce → Checkout Form → Advanced Settings)
  2. From the section Custom validators, create new Confirm field validators by providing all the required values.confirm-validator-new-cfe.png

    Example:

    Custom_field_validator_example.png

    Validator Name A unique name for the validation rule, which will be used internally to identify the validator.
    Validator Label The display name for the validation rule.
    Field Name The field in which the value has to be compared with.
    Validator Message The message to be displayed when the validation fails. Use %s to include the field name in the validation message.
  3. Click on the Save changes button.
  4. The newly created validators will be available to choose in the Validations drop-down. confirm-validator-select.png.confirm_validators_email.png
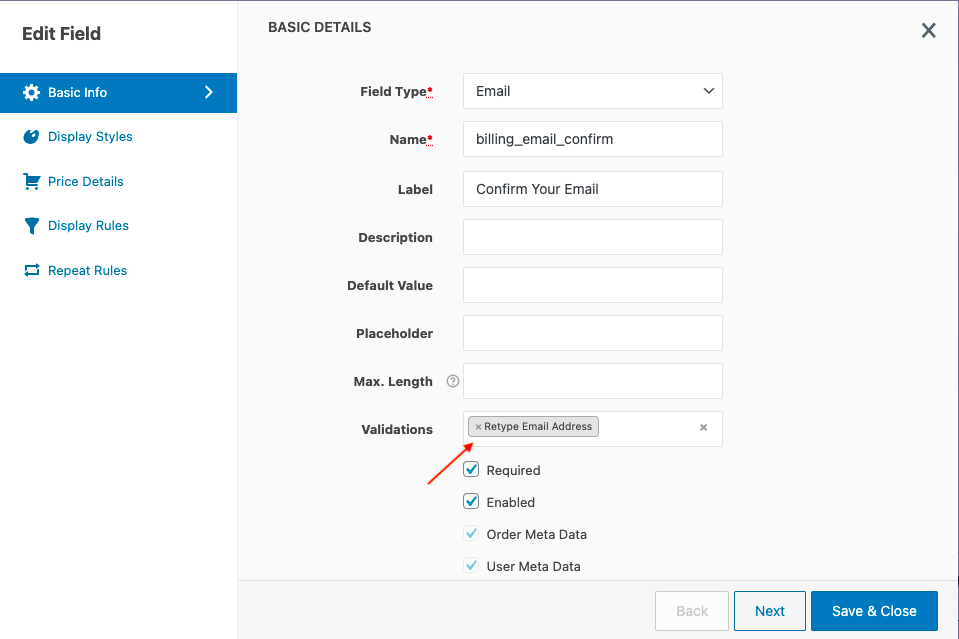
  5. Confirm field validators will trigger only when there is value in the confirmation field. So please mark the confirmation field as required.

This article posted in Advanced Settings, Checkout Field Editor for WooCommerce, Pro Documentation

Leave a Reply Cancel reply

Your email address will not be published. Required fields are marked *

ThemeHigh

We develop innovative WordPress plugins and themes for e-commerce and other WordPress websites.

Resources
  • Documentation
  • Support
  • Blog
  • Bestsellers
  • Affiliates
  • Partners
Policy Information
  • Terms & Conditions
  • Privacy Policy
  • Support Policy
  • Refunds Policy
  • Licenses
Security
Payment Options

© 2026 ThemeHigh. All rights reserved.

Terms and conditions, features, support, pricing, and service options subject to change without notice.