 Getting Started
 Advanced Settings
 For Developers
 Frequently Asked Questions
 Compatible Plugin & Themes
 How
HowHave you faced any issues in personalizing the checkout page through the addition of custom fields?
With the advent of technologies, online store owners have become highly competitive, dynamic and challenging, this has made it hard to sustain on the internet. As a result, many more possibilities are open for customers in choosing the best eCommerce store. Thus, setting up an attractive and custom-built store is of high importance.
Unsurprisingly, the Checkout page is one of the most significant sections in WooCommerce. The Checkout Page collects the eCommerce customers’ billing, shipping, and payment details.
What are Custom Fields?
Custom Fields are added to the checkout form to collect additional information. With the number of new fields added, the customer experience can be enhanced. For example, the shop owners can add multiple fields, edit, rearrange, and delete unwanted fields.
As a store owner, have you ever thought of creating additional checkout fields to tailor the customer needs and wants? If that is the case, our plugin, Checkout Field Editor for WooCommerce resolves the problem. Using our plugin, you can customise the checkout page by adding custom fields according to the requirements.
The Pro version of our plugin has 24 field types available for creating custom fields.
How to Add Custom Fields to the Checkout Page?
Follow the below steps to add the custom fields to the checkout page using the Pro version.
- Navigate to Dashboard > WooCommerce > Checkout Form.
- Click on Add Field.

- While clicking on the Add Field button, a pop-up will come up.
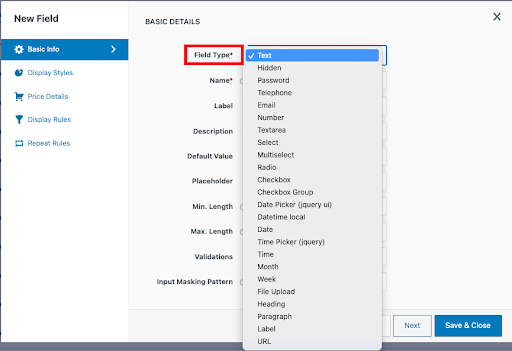
- Fill in the Basic Details.
- The basic details required for creating the custom fields are shown below.
Basic Details required in creating the Custom Fields
| Sl No | Basic details | Description |
| 1 | Field Type | It defines the type of field. There are 24 field types available for creating custom fields. Text, Select, Multiselect, Radio, Checkbox, and DatePicker (jquery ui) are some field types. |
| 2 | Name | Provide the Name for the field which will be stored in the database. The name must be unique. |
| 3 | Label | You can Label your field, which will be shown on the checkout page. |
| 4 | Description | This includes the explanation provided to the field. |
| 5 | Default value | This shows a predefined value displayed when the checkout form is processed. |
| 6 | Placeholder | This is a short hint showing the expected value of an input field. |
| 7 | Min Length | This shows the minimum number of characters expected in the input field. |
| 8 | Max Length | This shows the maximum number of characters expected in the input field. |
| 9 | Validators | This helps in validating the input field. For example, the “Number” field type is allowed when “phone numbers” is displayed. Thus, it shows invalid when the field uses other than numbers. |
| 10 | Required | This is checked and indicates the field as a mandatory field. |
| 11 | Enabled | The field is enabled to show on the checkout page. |
| 12 | Order Meta Data | Order Meta Data shows the fields that must be displayed on the checkout page after placing the order. Order Meta Data saves the customer value related to the order data such that the orders are specific. |
| 13 | User Meta Data | The User Meta Data includes the direct information related to the users, such as personal information, including permanent address, date of birth, email Id and other details. |
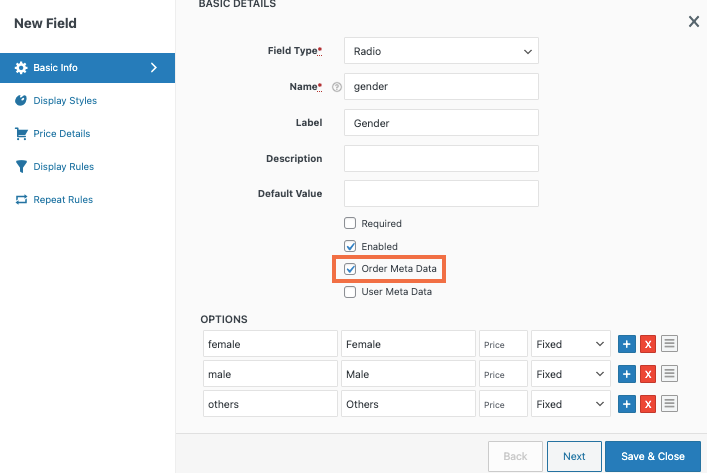
- After that, enable Order Meta Data.
- Click Save & Close.
Use Case – Gender as a custom field on the checkout page
For instance,
The custom field is created to add the Gender field as the use case as shown below. The field type is a “Radio” button for showing the Gender.
The Order Meta Data is enabled to display the custom field created on the checkout page after placing the order.
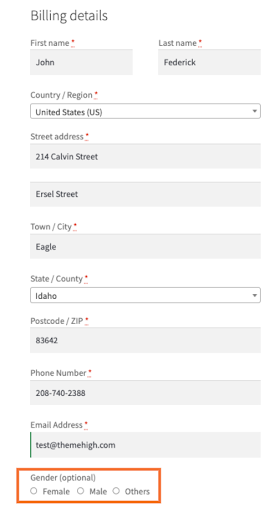
- Now, the Checkout Page will reflect the created custom field as shown below.
Final Thoughts
Customers can choose from a wide variety of options on a WooCommerce platform. You may already be aware and understand how crucial the checkout page is to draw in clients.
Thus, gathering more data from clients about their purchasing experiences will help the store perform better. When the checkout page is specifically designed, this is feasible.
You can use this article to add new custom fields to the checkout page. Our plugin, Checkout Field Editor for Woocommerce, makes this possible. By including numerous custom fields, the plugin will assist in customising the checkout page. This article also includes a use case to help readers understand the subject.