


A checkout page is the last and final destination of an e-commerce shopper’s shopping journey. This is where a customer enters his address and payment details and makes a final call on whether to complete the purchase or not. This might seem like a section that does not involve many complications, but in reality, the checkout page is one of the major culprits behind cart abandonment. How? The reasons are multitude, but one of the most important reasons is the complexity of the checkout process.
Users, no matter their age, always love simplified online experiences. The minute something seems too abstruse, people have a tendency to shy away from engaging, especially when money is involved. So that means customizing your checkout page to suit your customer’s needs is mandatory. You have two options to do this, one is using WooCommerce hooks, and the other is with plugins.
Customize Your Checkout Page Using Code Snippets
Let’s first see how you can modify your checkout page without relying on plugins. WooCommerce offers its users the convenience of customizing the checkout page the way they want with custom hooks. The different hooks in WooCommerce are:
- Woocommerce_default_address_fields – Any change done here will affect billing and shipping fields in the My Account and checkout pages.
- Woocommerce_shipping_fields – Affects only shipping fields
- Woocommerce_billing_fields – Affects only billing fields
- Woocommerce_checkout_fields – Affects only the checkout page fields
In this blog, we will be mainly looking at how to use the default address fields hook to customize the checkout page.
Add new fields
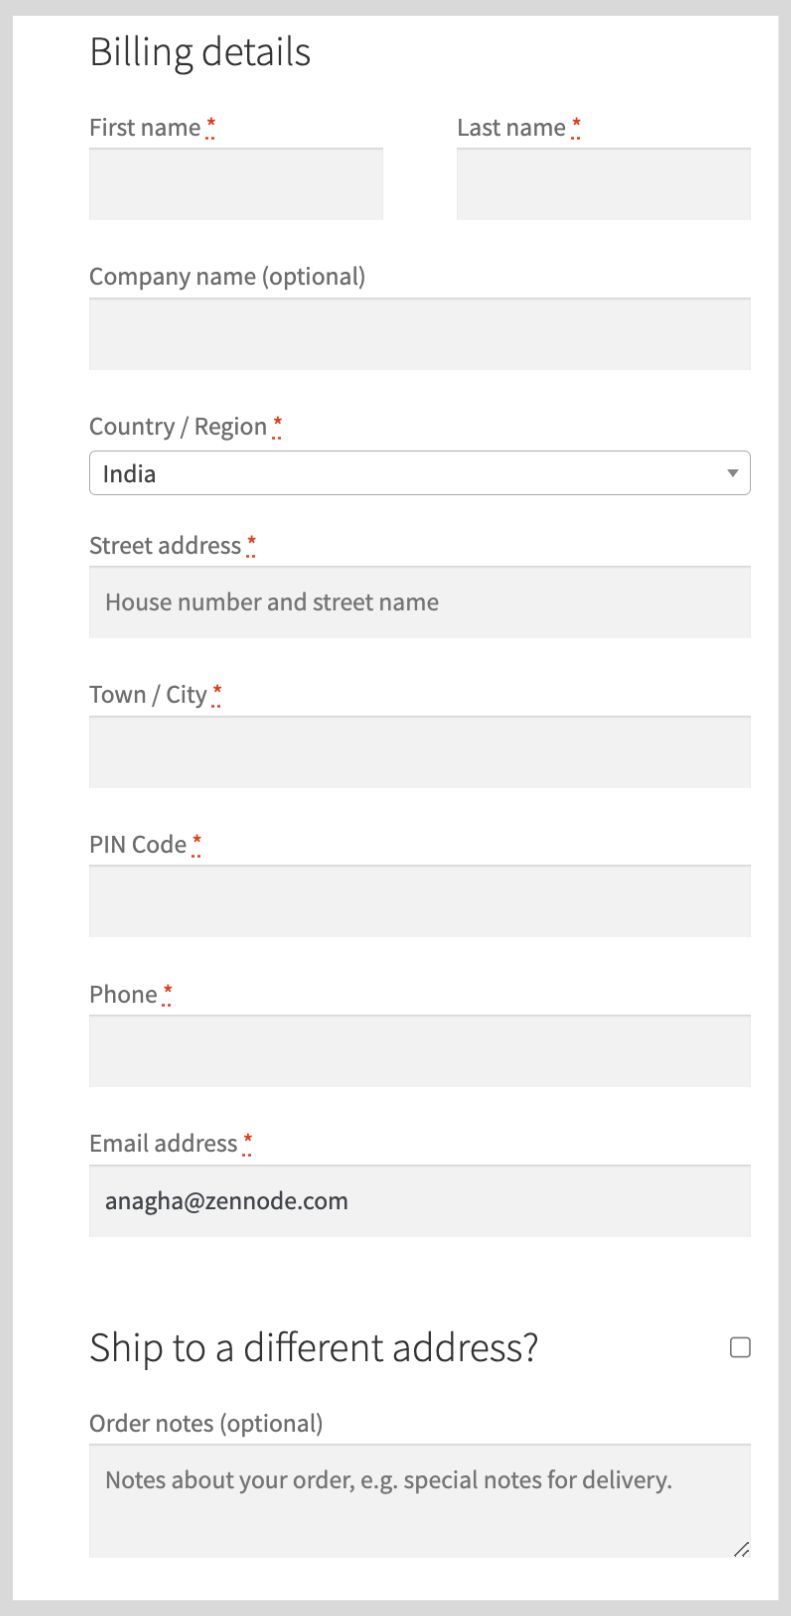
This is what a default WooCommerce checkout page looks like
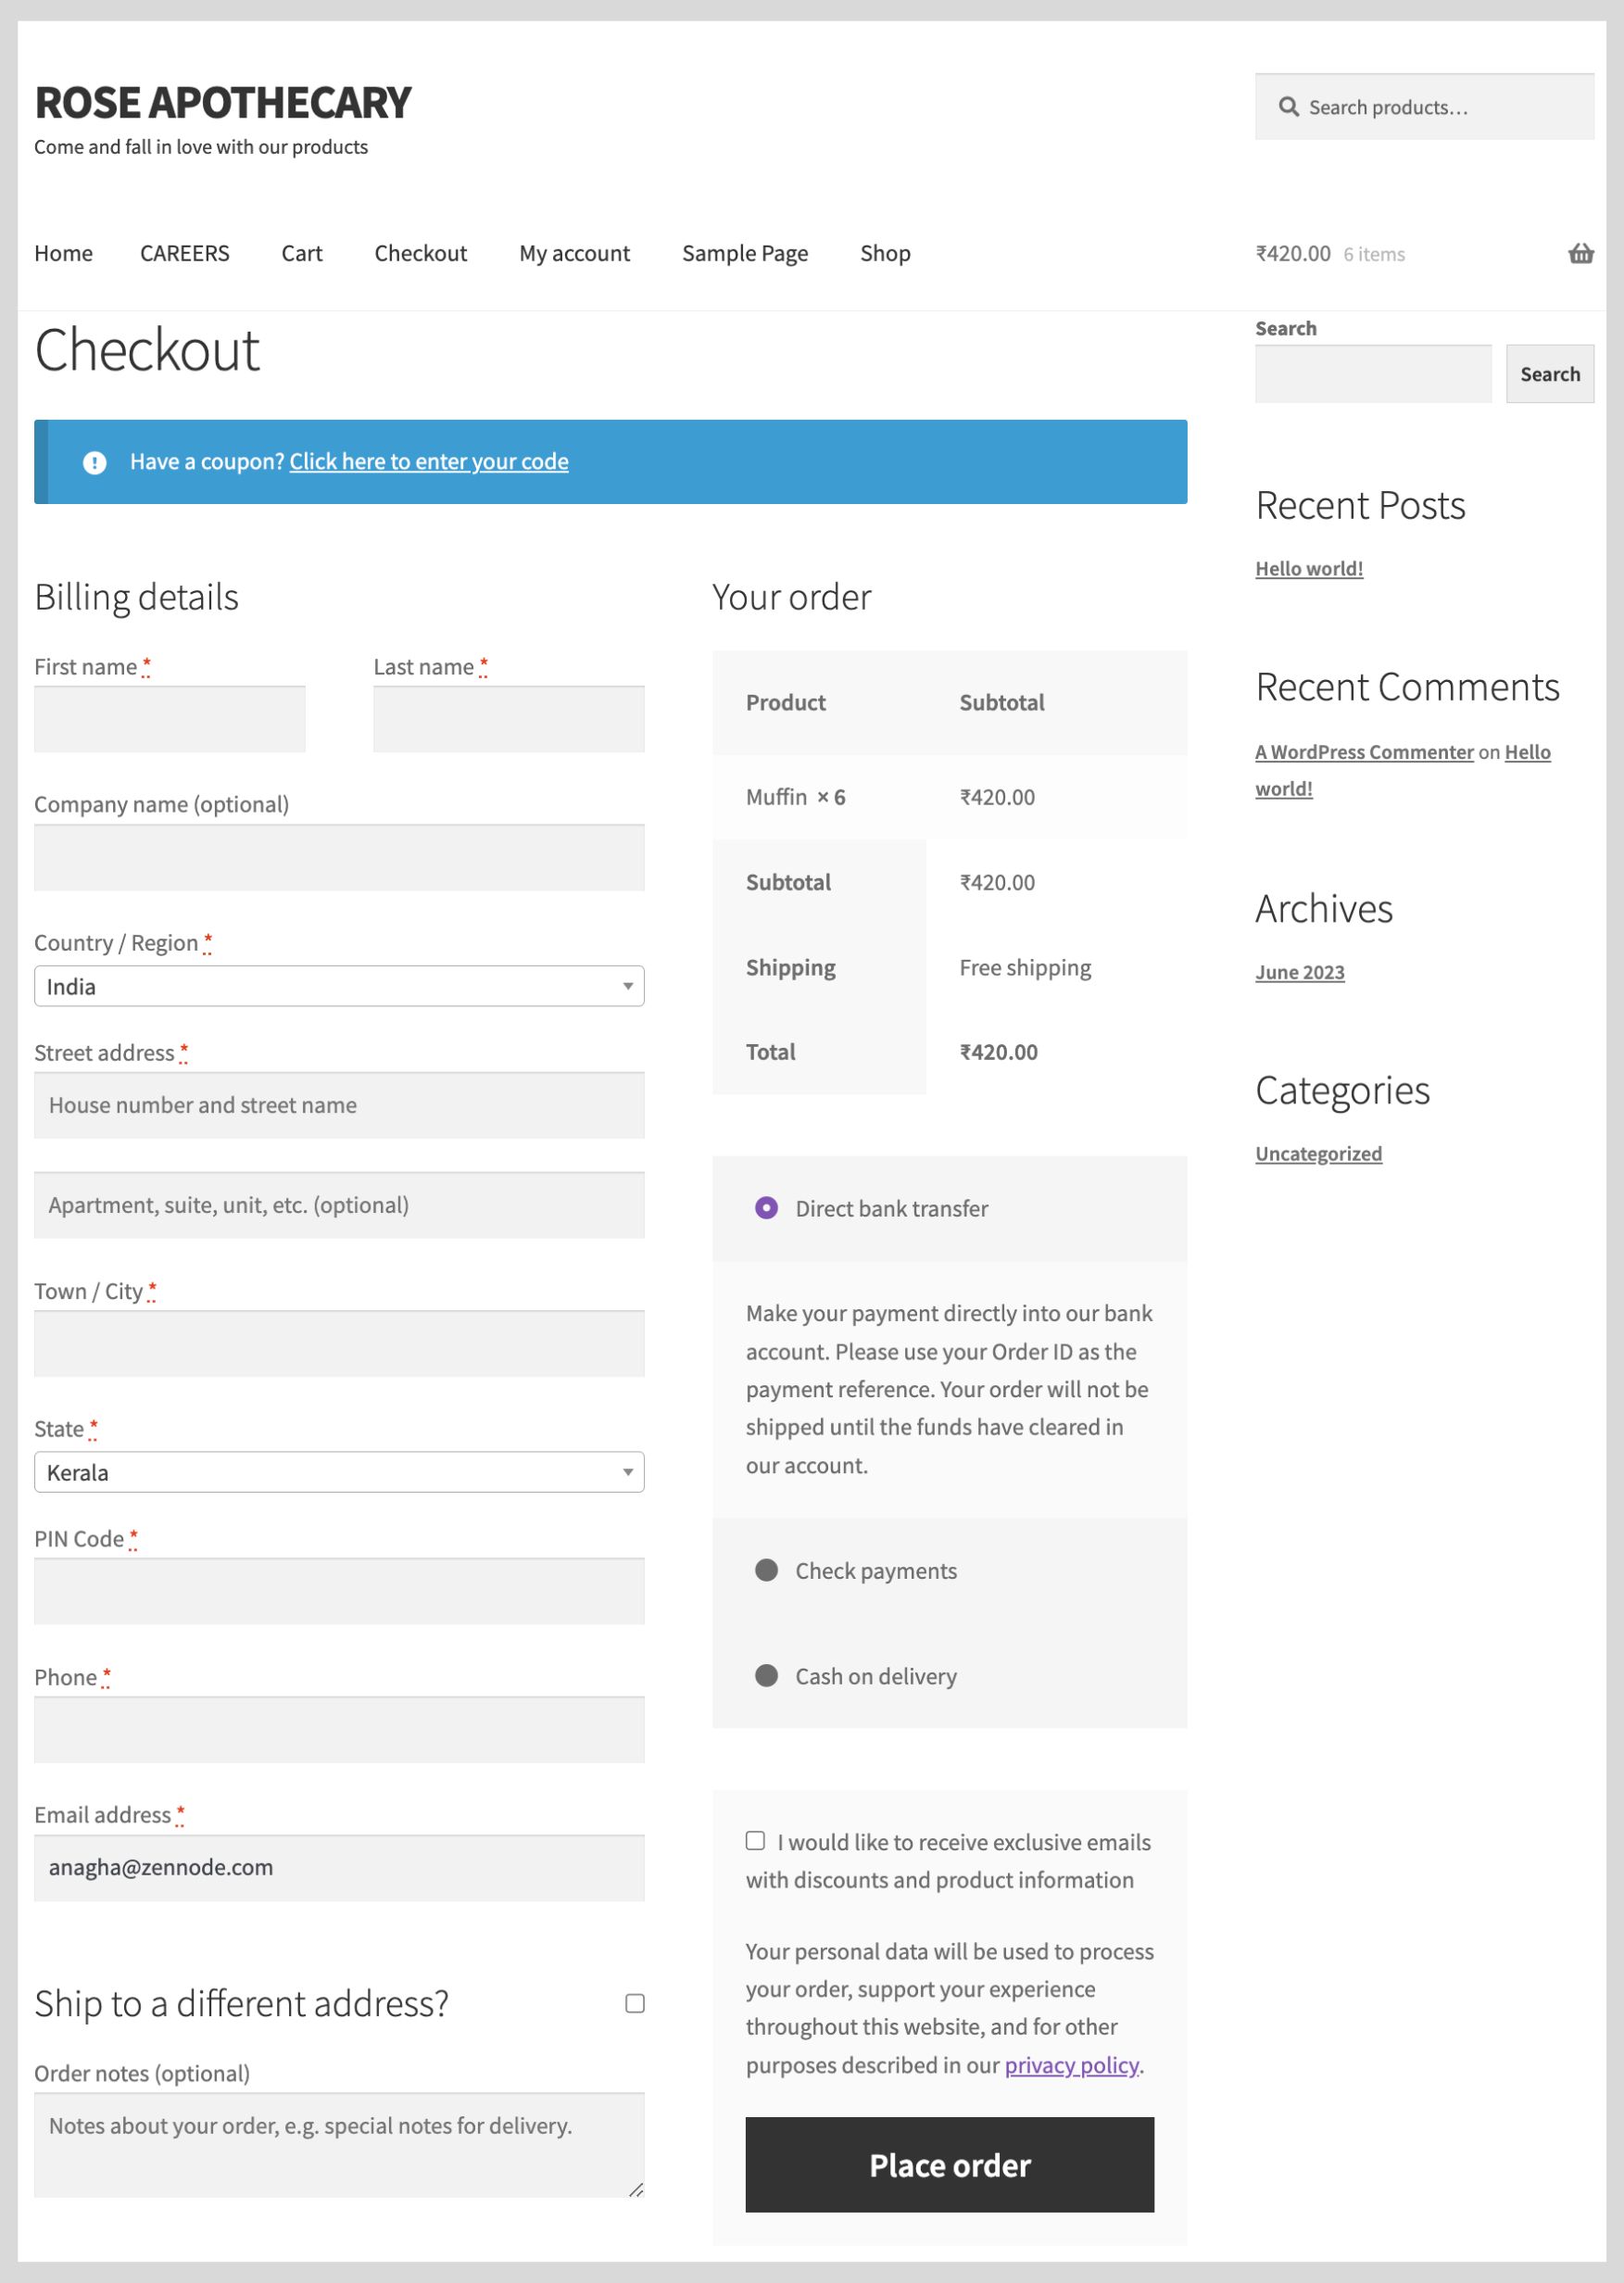
Default WooCommerce checkout page
To add new fields to this page, some of the essential parameters are:
- type – determines the type of field (text, email, password, etc.)
- label – contains the label of a particular field
- placeholder – contains a placeholder to be displayed inside a field
- class – class for the field
- required – indicates whether or not the field is required
- label_class – class for the label element
- priority – to decide the positioning of the fields within the checkout page
Now let’s look at the code to understand it better.
add_filter( 'woocommerce_default_address_fields', 'themehigh_add_field' );
function themehigh_add_field( $fields ) {

	$fields[ 'land_mark' ]   = array(
		'label'        => 'Flat Number',
		'required'     => true,
		'class'        => array( 'form-row-wide', 'my-custom-class' ),
		'priority'     => 65
		'placeholder'  => 'Enter your flat number',
	);

	return $fields;
}
Once you add the new field, this is how the checkout page will look like.
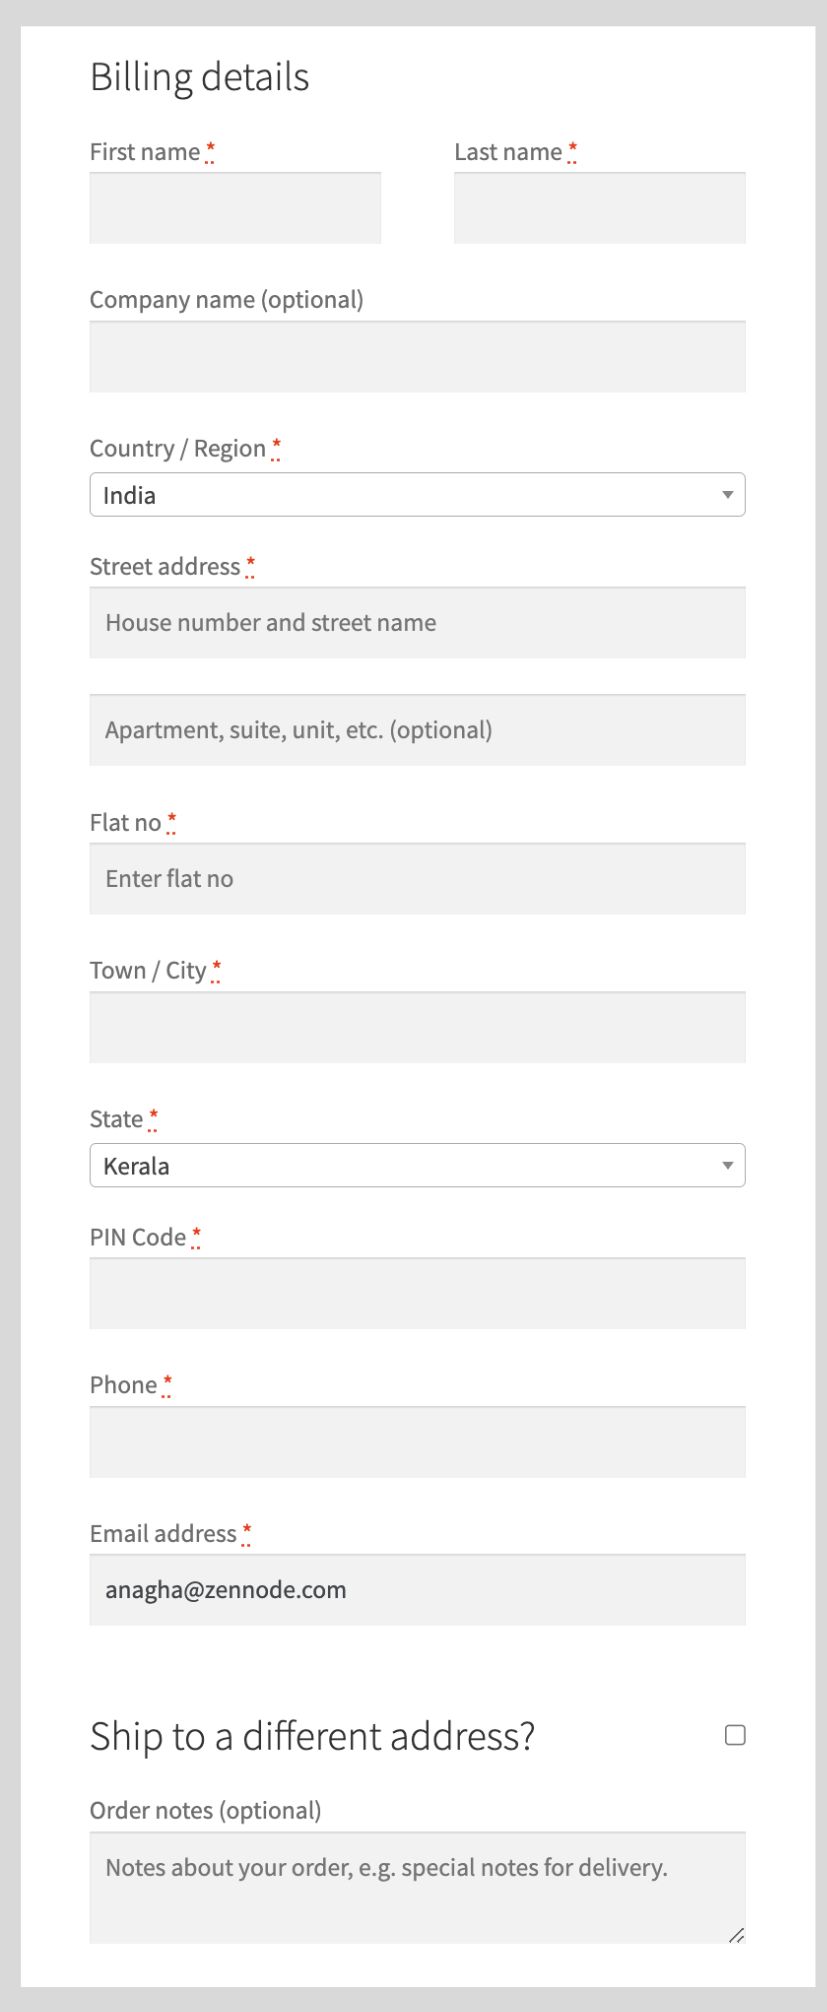
The exact position where the new field will appear is going to depend on the value you add as ‘priority.’ We will discuss a bit more about this later.
Edit fields
Let’s now look at how to make a few basic changes to the checkout page fields using WooCommerce code snippets.
Change label or placeholder name
To change these two field parameters, you will have to edit the ‘label’ and ‘placeholder’ parameters, respectively.
add_filter( 'woocommerce_default_address_fields', 'themehigh_add_field' );
function themehigh_add_field( $fields ) {

	$fields[ 'land_mark' ]   = array(
		'label'        => 'flat no.',
		'required'     => true,
		'class'        => array( 'form-row-wide', 'my-custom-class' ),
		'priority'     => 65,
		'placeholder'  => 'Enter flat no.',
	);

	return $fields;
}
Placeholder and name has been changed
Aligning fields
If you wish to change the width of a particular field, you can do so by adding any one of the strings below to the class attribute.
- form_row_wide
- form_row_first
- form_row_last.
As you might have already noticed, in the default WooCommerce checkout page, the first name and last name fields are the only two fields that are aligned side by side. The first name has a form_row_first value, while the last name has a form_row_last value. The rest of the fields fill the entire width, meaning they have the value form_row_wide. Here we align the field flat number to the left of the page by using the form_row_first attribute.
add_filter( 'woocommerce_default_address_fields', 'themehigh_add_field' );
function themehigh_add_field( $fields ) {

	$fields[ 'land_mark' ]   = array(
		'label'        => 'Flat Number',
		'required'     => true,
		'class'        => array( 'form-row-first', 'my-custom-class' ),
		'priority'     => 65,
		'placeholder'  => 'Enter your flat number',
	);

	return $fields;
}
Flat number aligned to the left
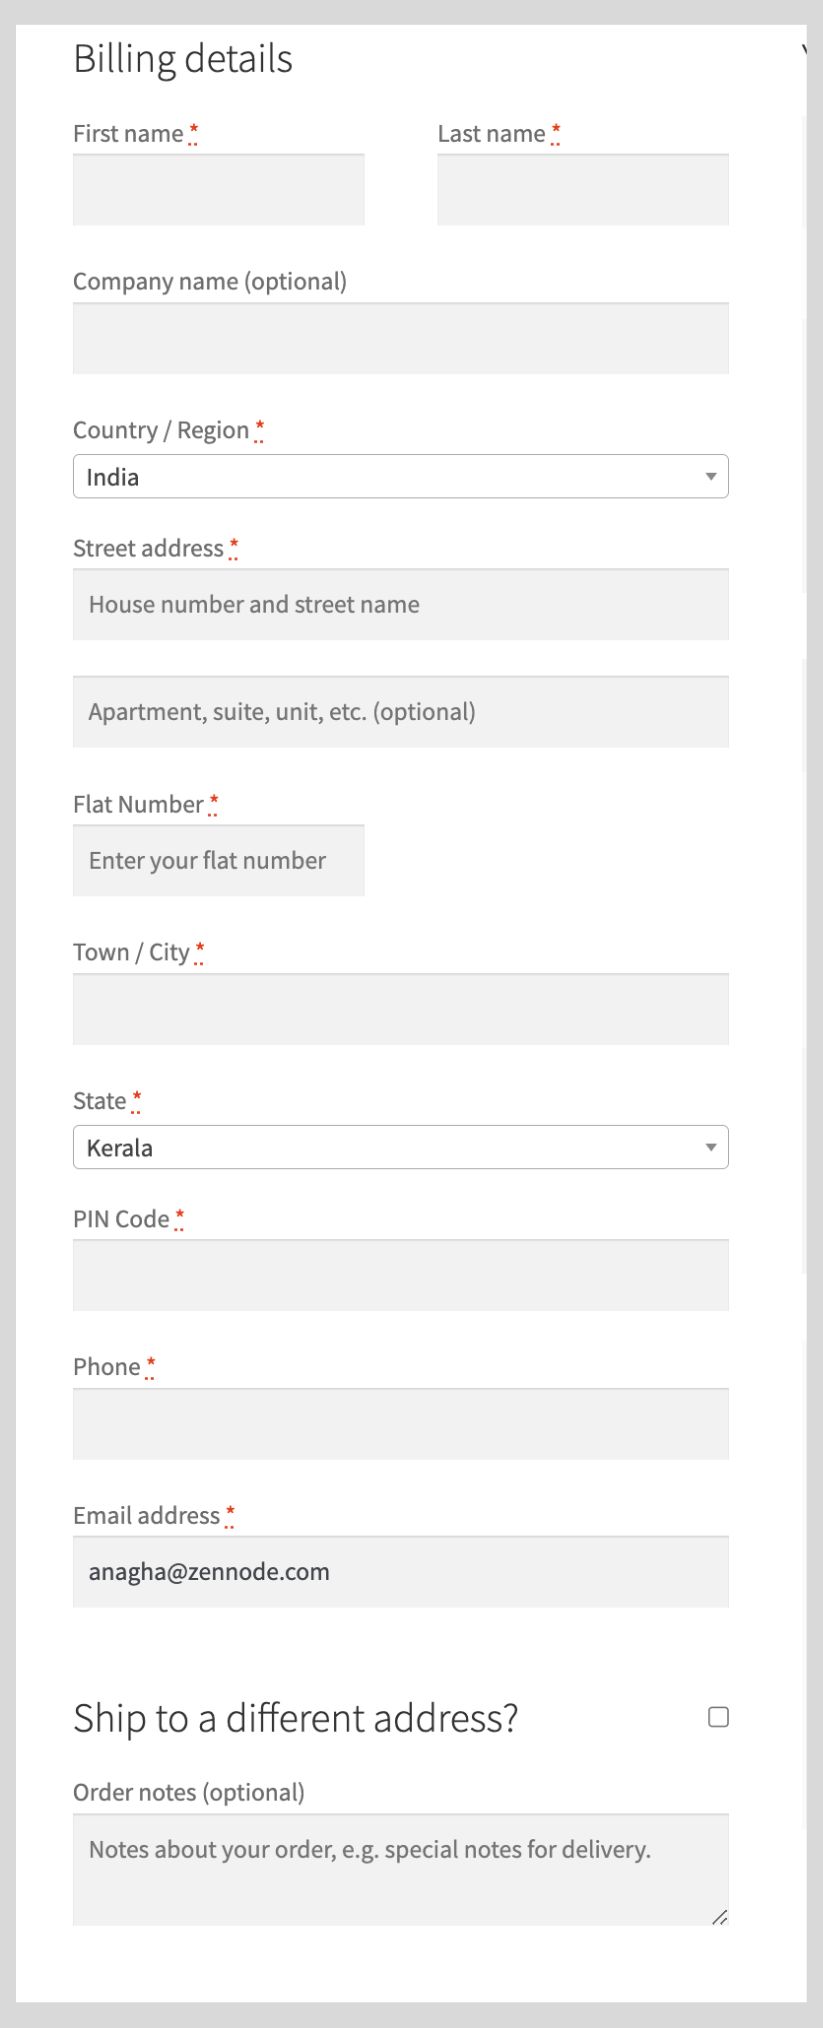
Change required fields to optional
To do this, you will have to change the parameter ‘required’ to ‘false.’
add_filter( 'woocommerce_default_address_fields', 'themehigh_add_field' );
function themehigh_add_field( $fields ) {

	$fields[ 'land_mark' ]   = array(
		'label'        => 'Flat Number',
		'required'     => false,
		'class'        => array( 'form-row-wide', 'my-custom-class' ),
		'priority'     => 65,
		'placeholder'  => 'Enter your flat number',
	);

	return $fields;
}
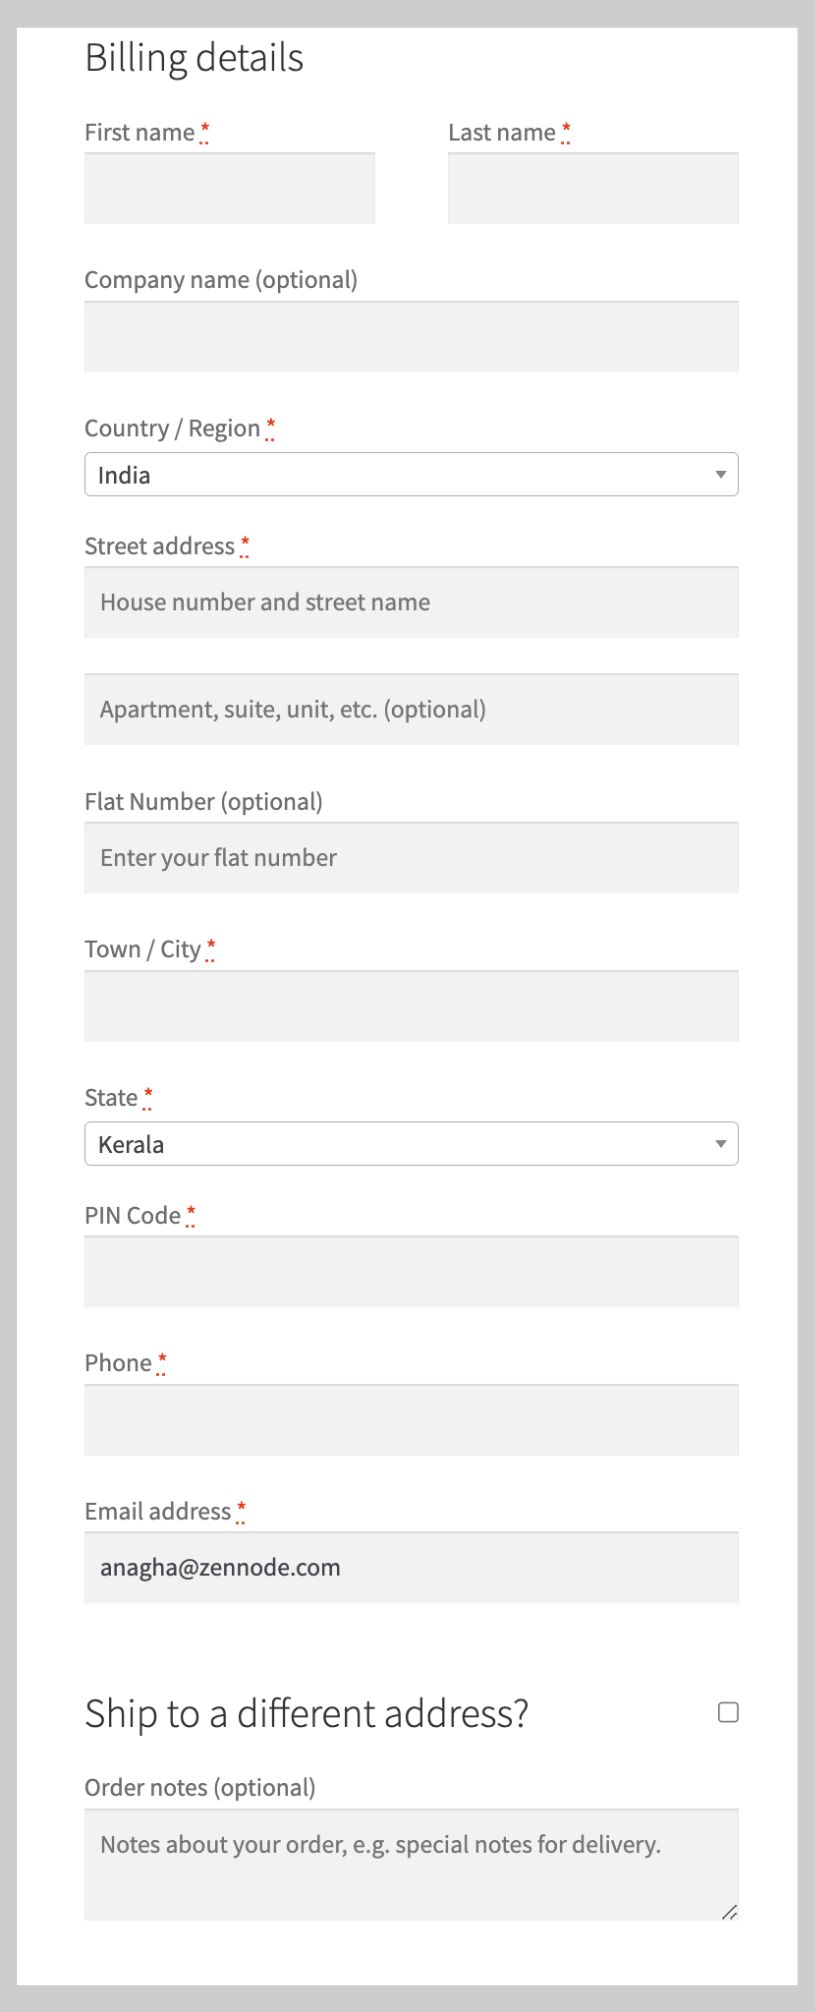
Flat number field is now optional
Repositioning fields
To change the order of displayed fields or move certain fields to the top or bottom of the checkout page, the parameter that needs to be changed is ‘priority.’ To place a particular field where you want, you need to know the priority of existing default fields. Here’s the list:
First name – 10
Last name – 20
Company name – 30
Country – 40
Street address – 50
Apartment, suite, unit, etc. (optional) – 60
Town / City – 70
State – 80
Postcode / ZIP – 90
Phone – 100
Email – 110
For example, if you want to place the flat number field before the field country, you should change its priority to a value less than 40.
add_filter( 'woocommerce_default_address_fields', 'themehigh_add_field' );
function themehigh_add_field( $fields ) {

	$fields[ 'flat_number' ]   = array(
		'label'        => 'Flat number',
		'required'     => true,
		'class'        => array( 'form-row-wide', 'my-custom-class' ),
		'priority'     => 35,
		'placeholder'  => 'Enter your flat number',
	);

	return $fields;
}
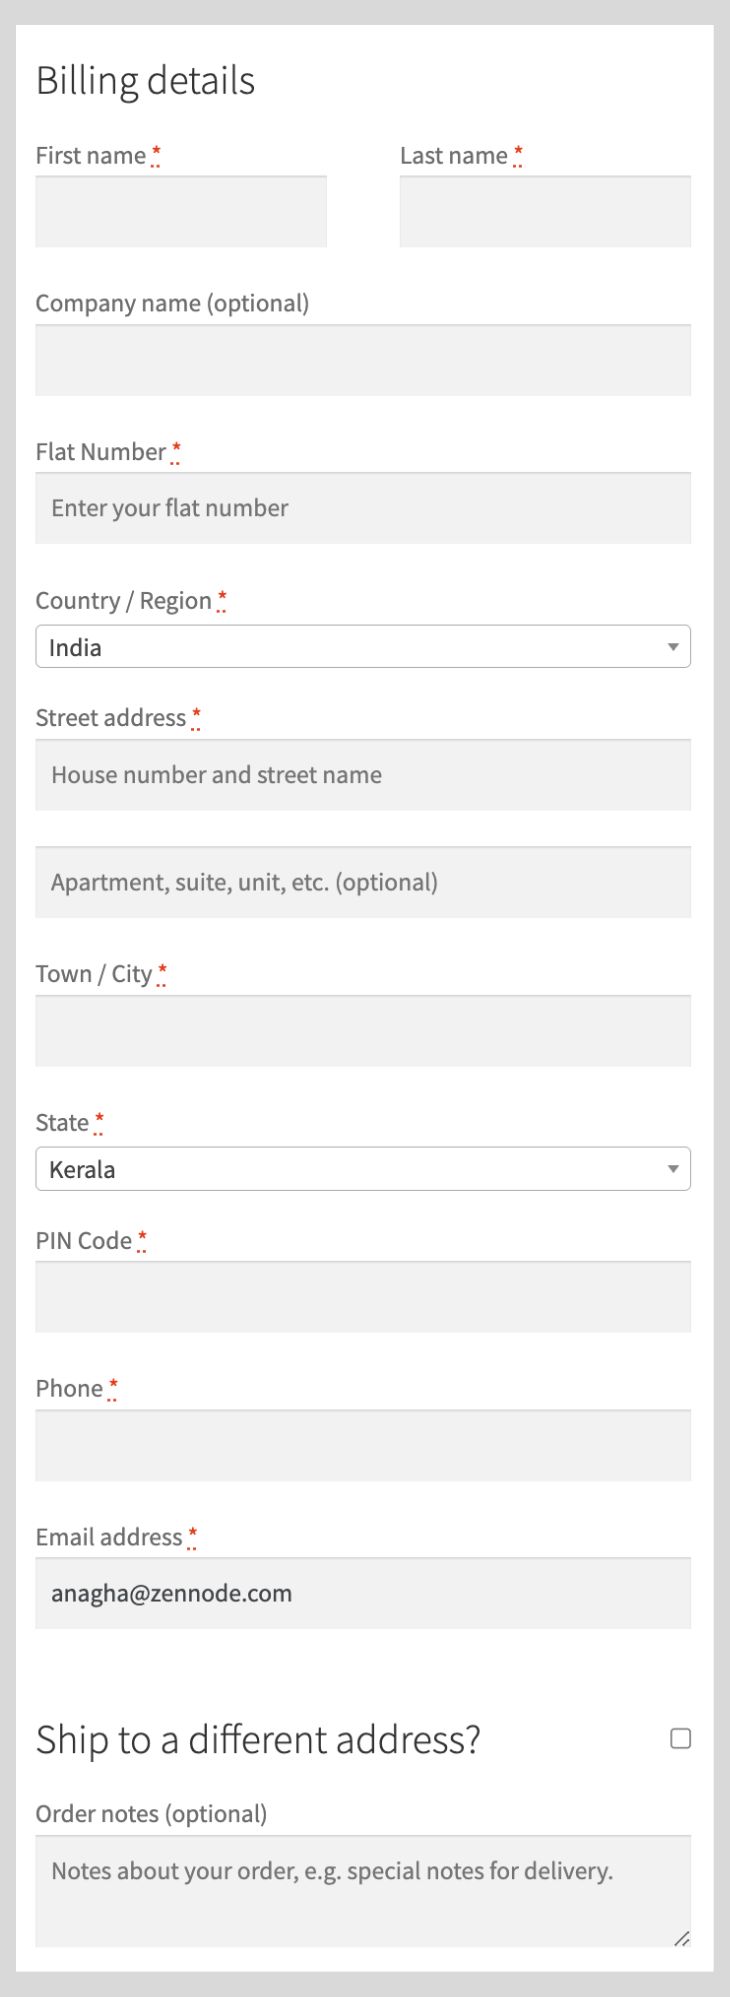
Flat number moved above country
Remove Fields
It’s quite easy to remove fields. You just have to use the following code. Let’s try removing address line 2 and the state field.
add_filter( 'woocommerce_default_address_fields', 'themehigh_remove_fields' );
function themehigh_remove_fields( $fields ) {
	unset( $fields[ 'address_2' ] );
	unset( $fields[ 'state' ] );
	return $fields;
}
Address line 2 and state field has been removed
However, you should know that the country field is a non-removable field. If you remove it, order completion will not happen, which is quite self-explanatory.
All this while, we have been discussing the customization of a single field. But while running a store, you will have to handle multiple fields and several such code snippets in the backend if you wish to effectively customize your checkout page. Further, the steps we discussed above aren’t enough for detailed customization, which will need far more complicated steps.
Imagine having to debug chunks of such code every time an error occurs. Sounds cumbersome, right? But guess what? You don’t have to take the hard, time-consuming way to achieve the desired results. WooCommerce gives you the option to deal with your requirements in a much simpler way. So, let’s quickly shift to the easier route.
Customize Your Checkout Page Effortlessly With Themehigh
If you are not well-versed in programming languages or lack the time to attend to the demanding task of managing the back end of your checkout page, then we have got you covered. The Checkout Field Editor (CFE) for WooCommerce by Themehigh is specifically designed to address your pain points and simplify the customization process. It’s one of the most popular plugins in the market and for all the right reasons. You can add, reorder, edit, remove fields, and do a lot more with just a few clicks and design a flawless checkout page that will make your customers come back for more. So, are you ready to find out how to make life easier with our plugins? Let’s look at how to do all the steps we discussed in the previous section using the CFE plugin.
Add/ edit new fields
Adding fields has never been easier. Let’s try adding a new field – flat number. To add a field, you should do the following steps:
- Navigate to the WooCommerce → Checkout Form → Checkout Fields page.
- Click on the Add field button.
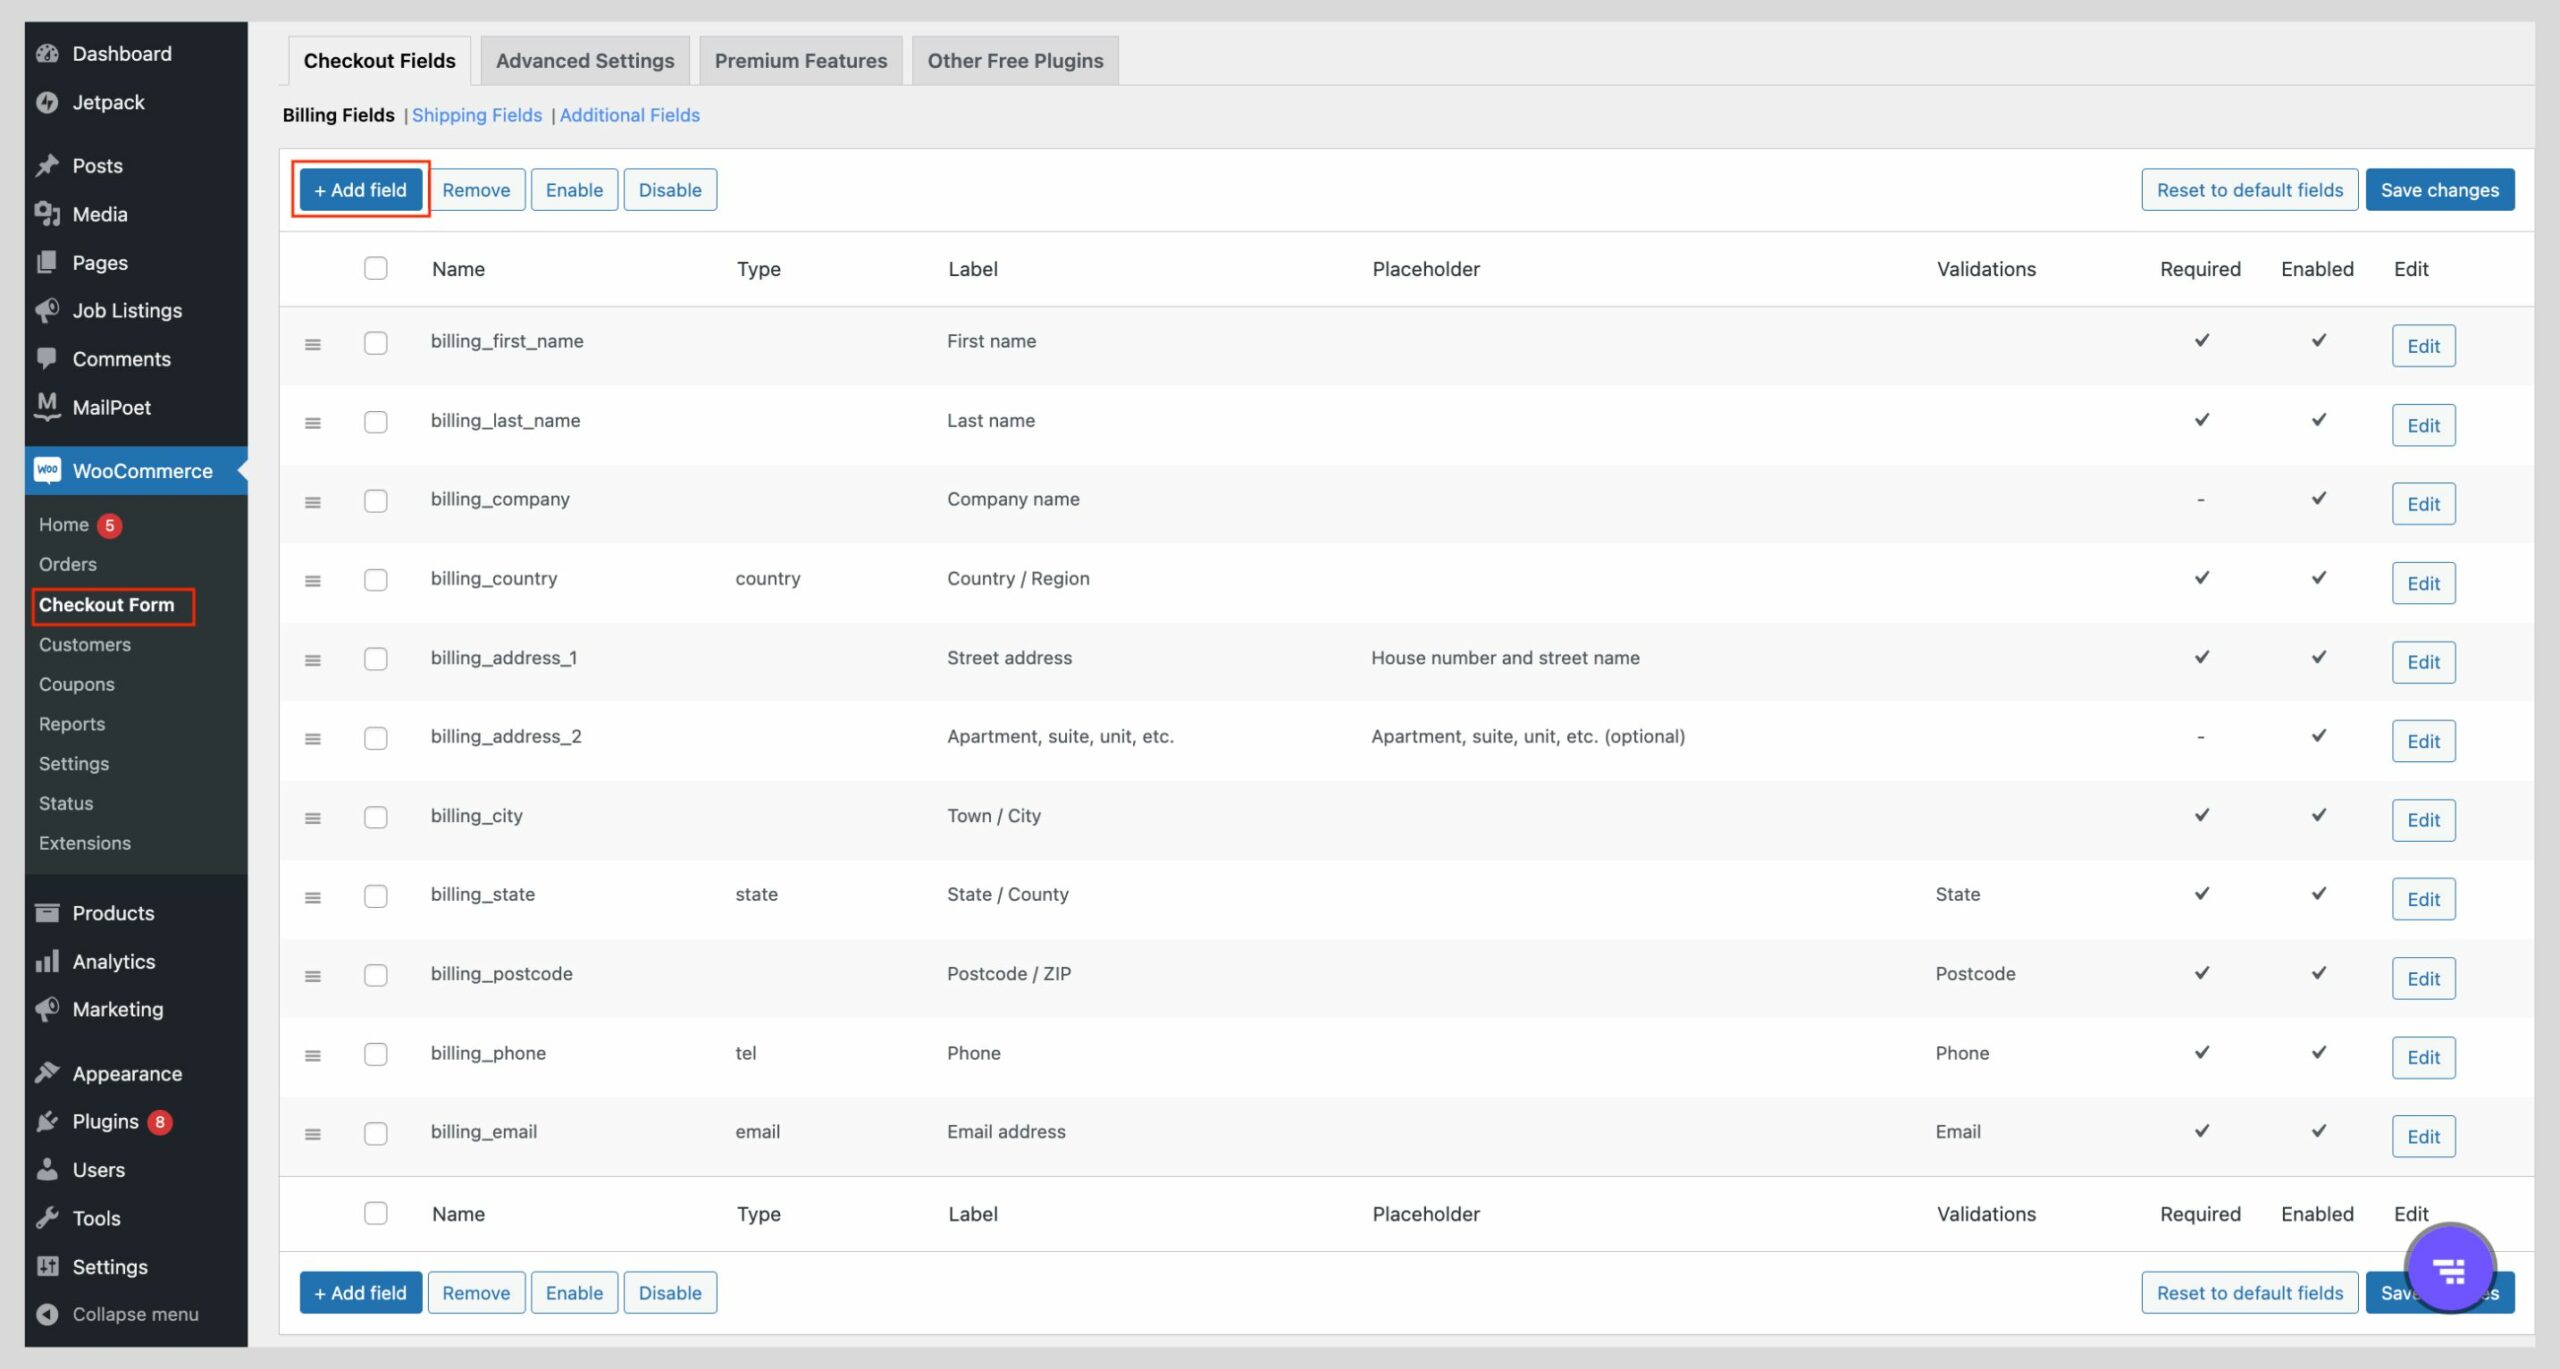
- Enter a Name, Field Type, Label, and other details of your field.
- Click on the Save and Close button.
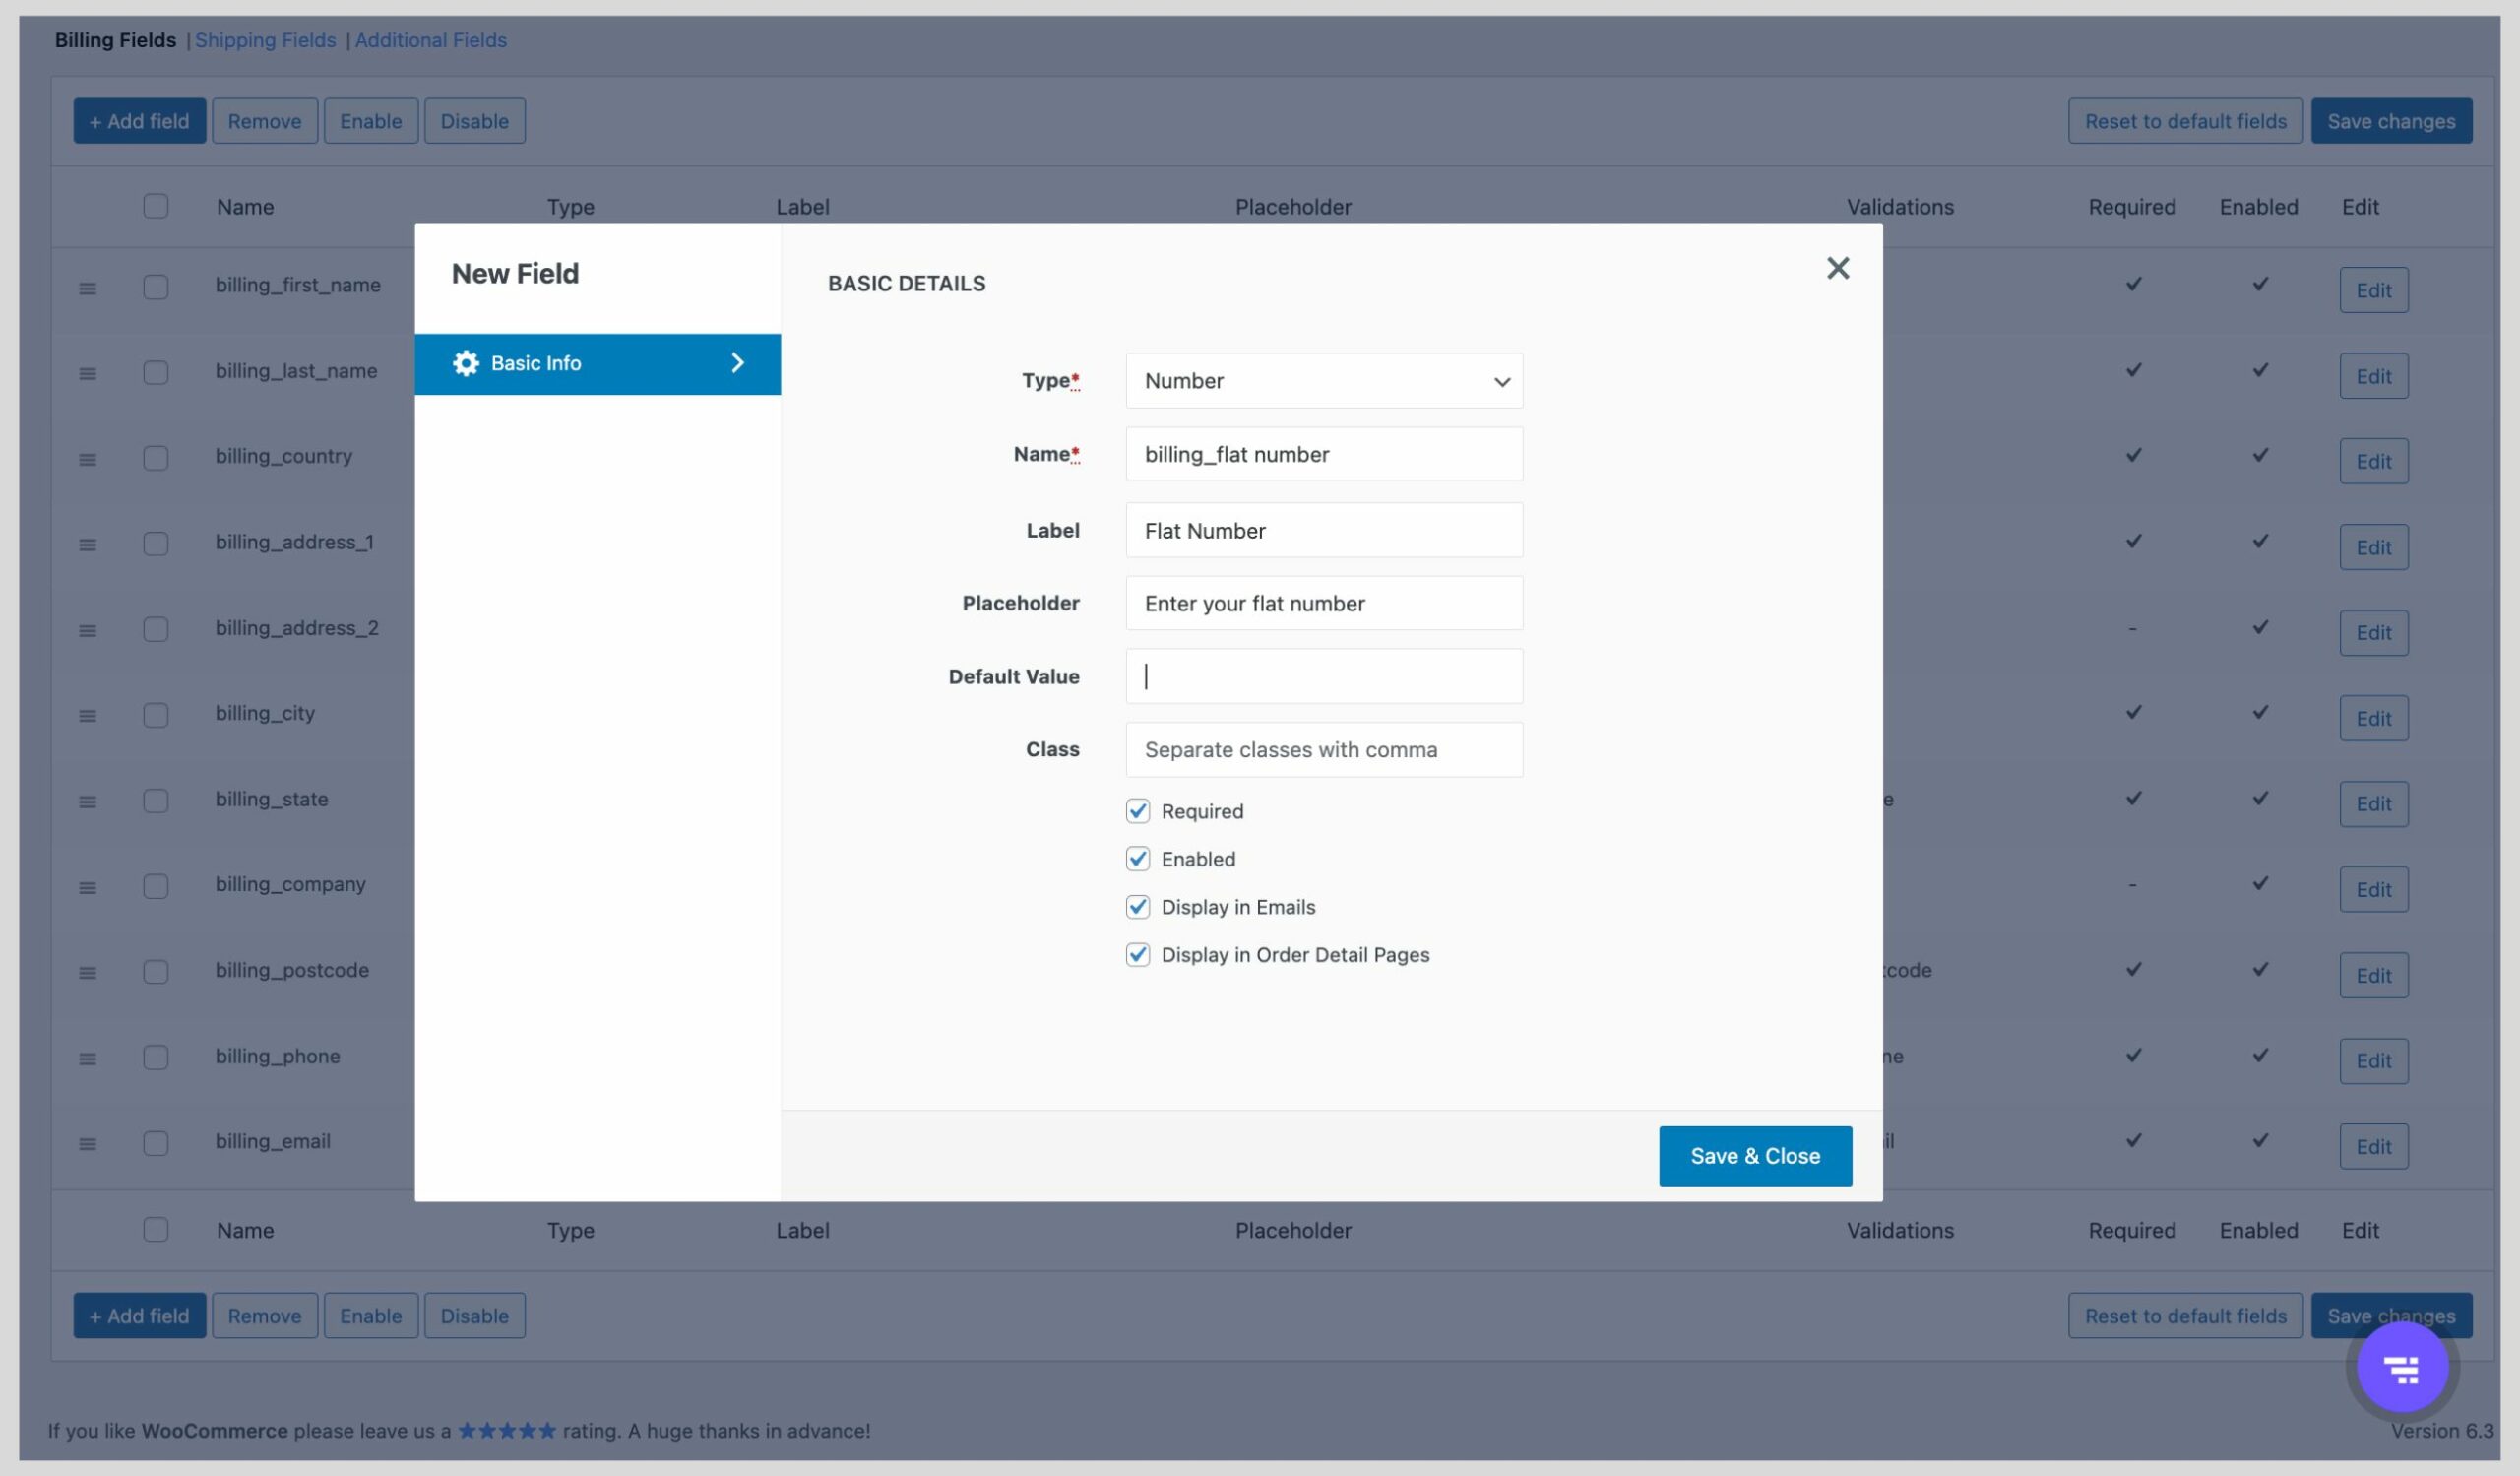
As you can see in the pop-up, all parameters passed to the custom code (in the previous section) can be entered here with zero hassles. No more lengthy codes. Just enter the parameters on the go and create fields of your choice! Marking a field as optional or required is also possible with just a click. Additionally, if needed, there is an option to display these fields in emails and order details pages. You can add billing, shipping, and other custom fields the same way.
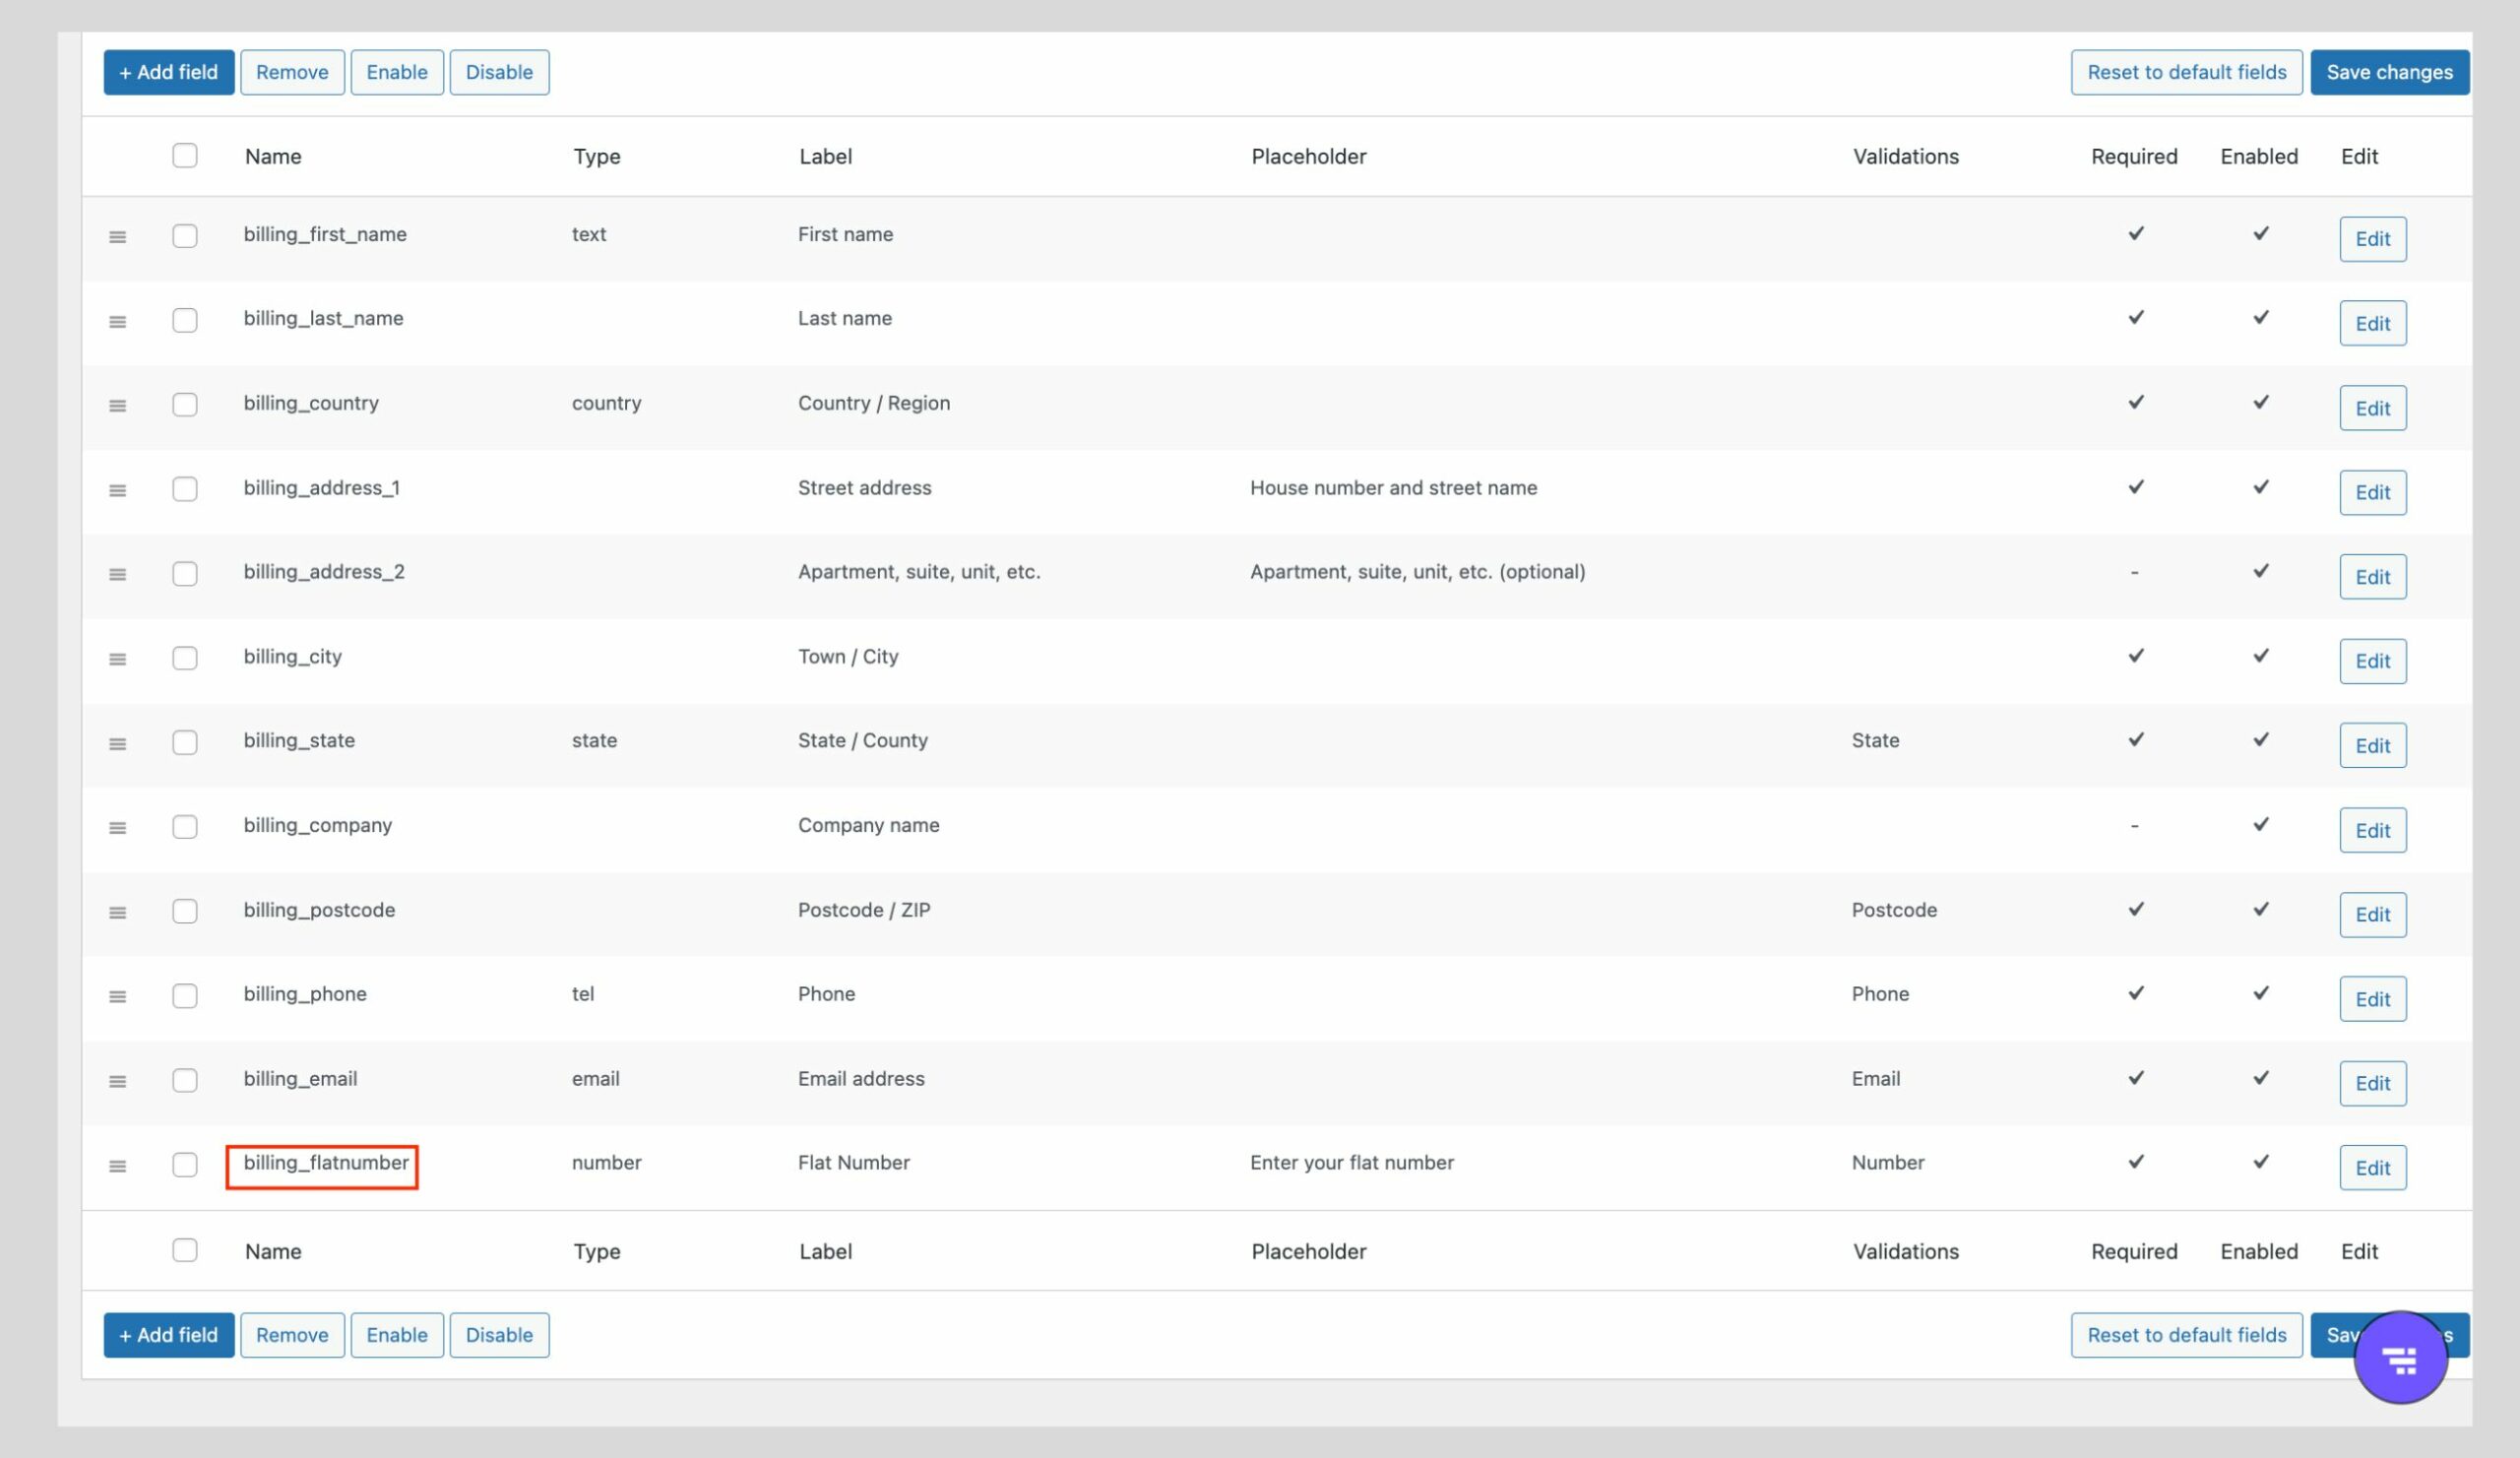
The new field has been added
To edit, you just have to click on the edit button on the right and repeat the same steps.
Reorder fields
To reorder fields, all you have to do is place the field in the desired position by dragging the two lines to the left of the field name. Here we have placed the field ‘flat number’ above the field ‘country.’
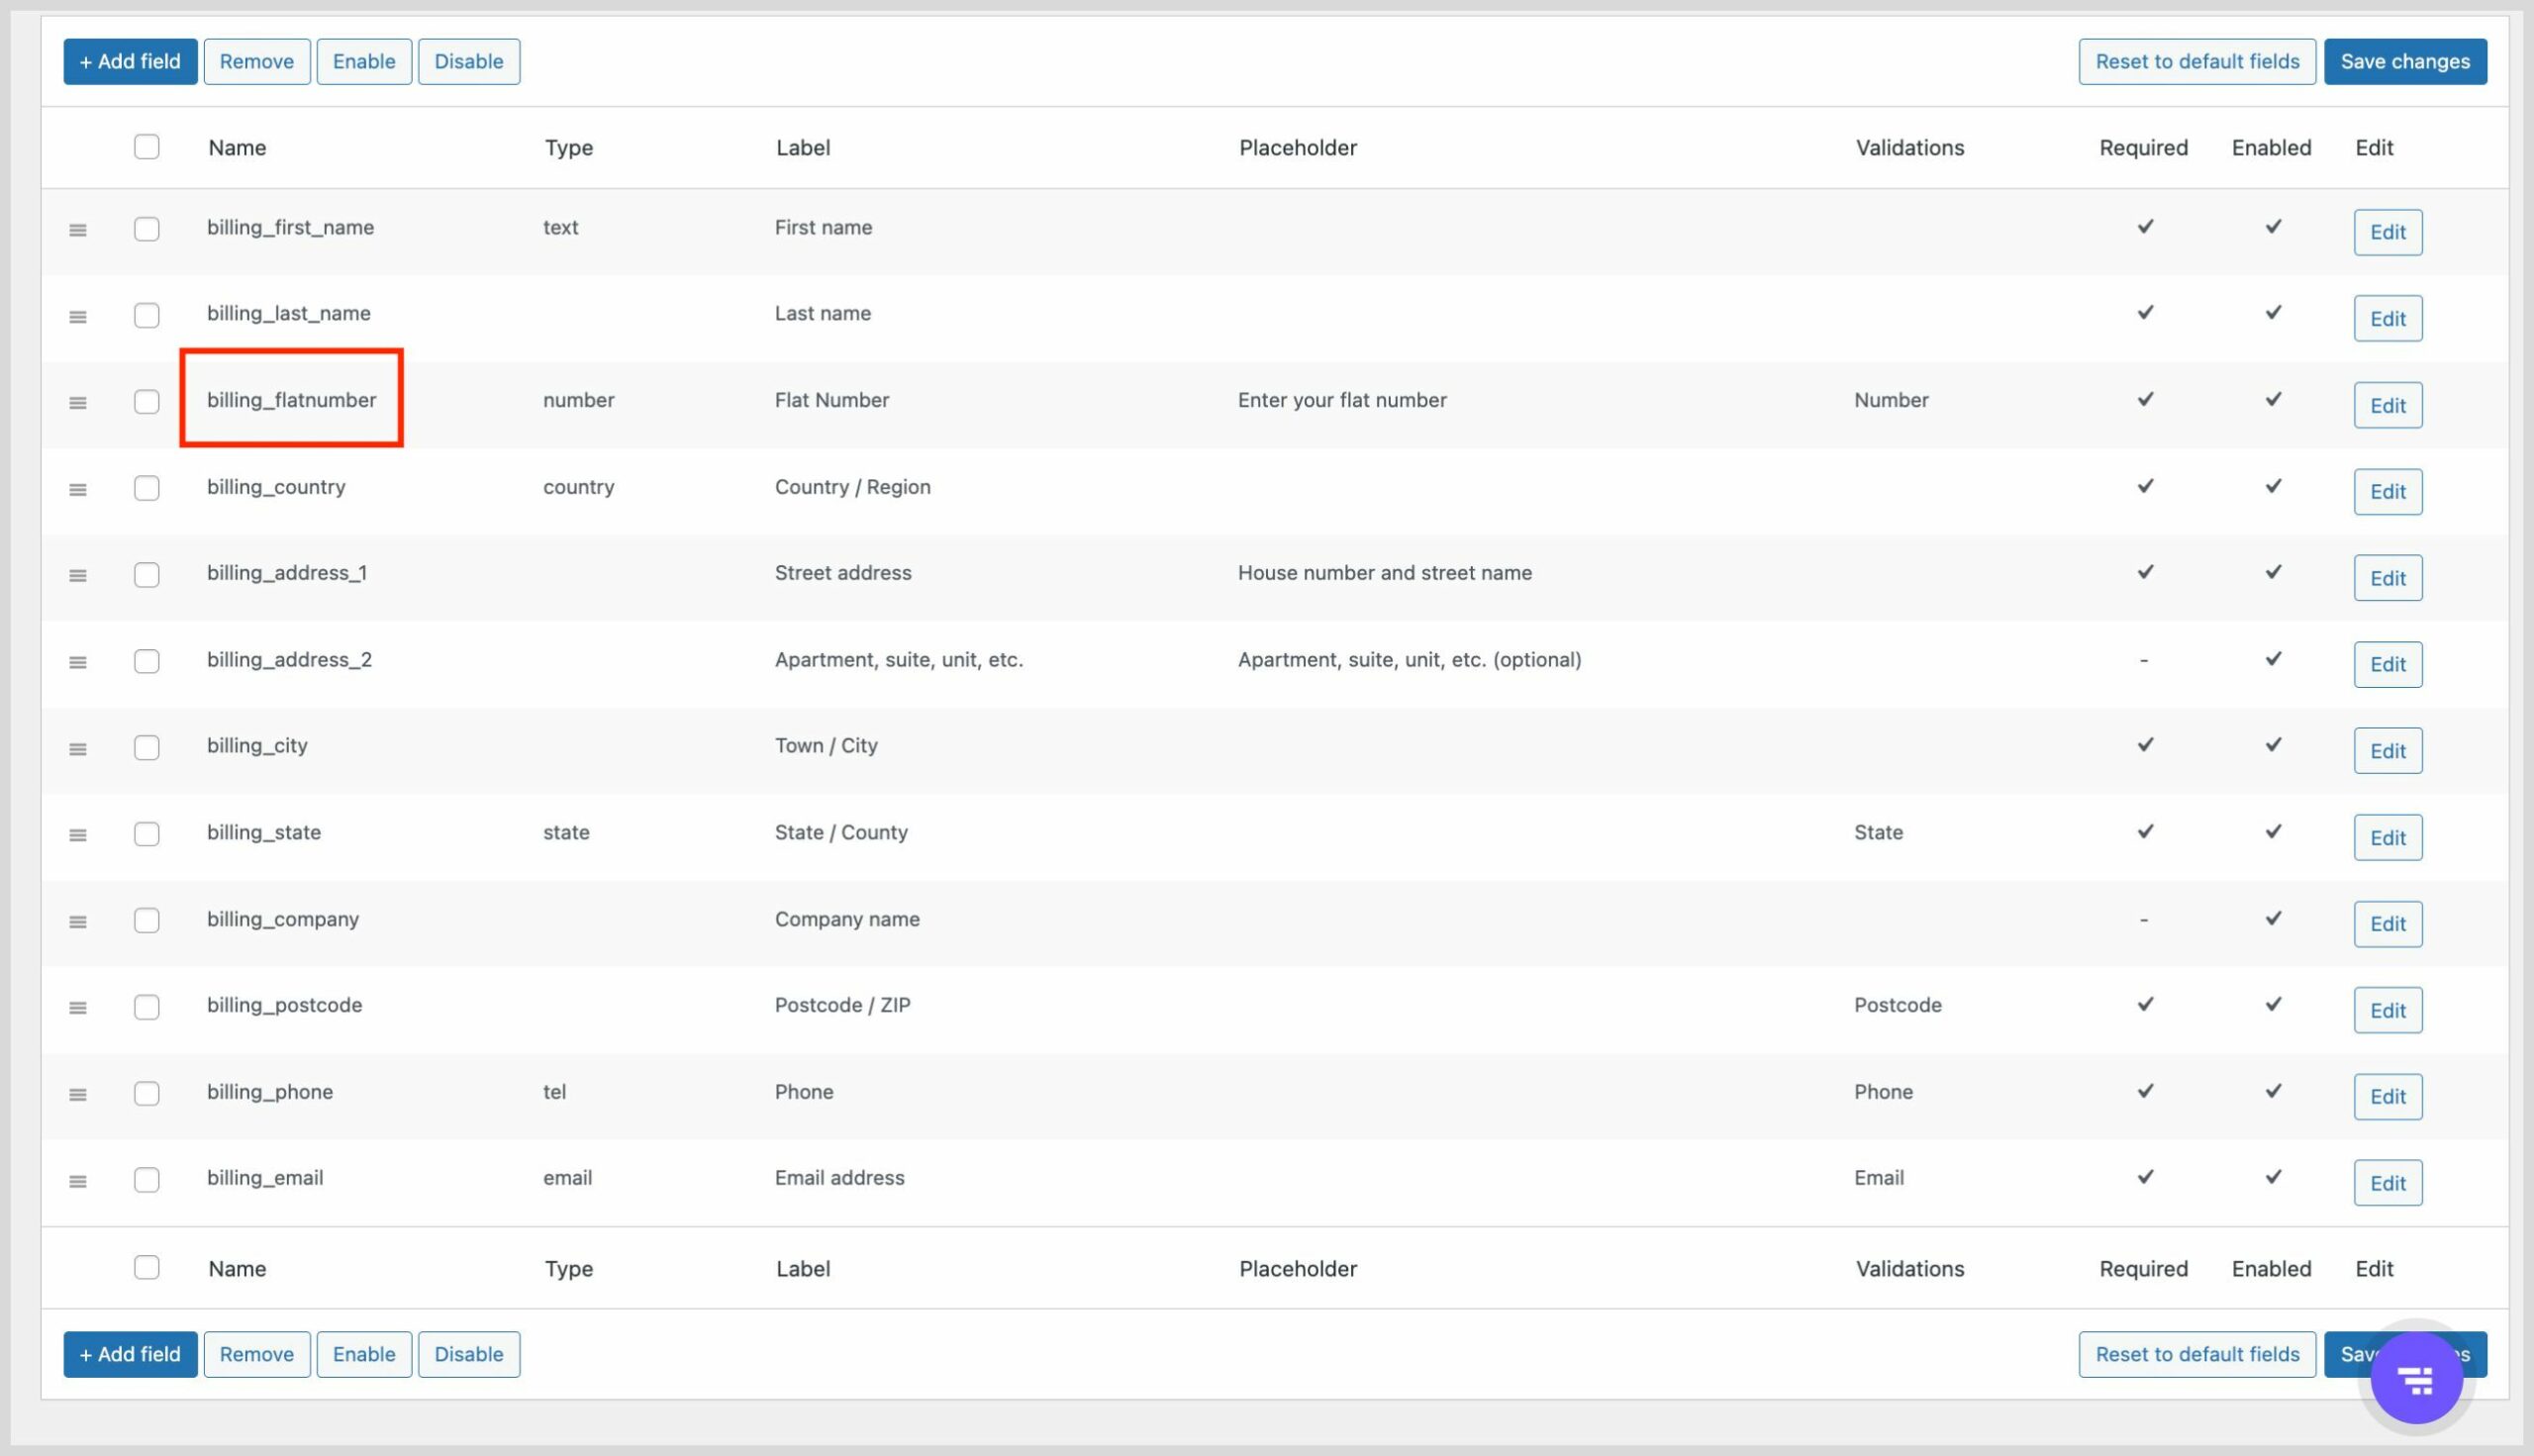
Flat number has been moved up
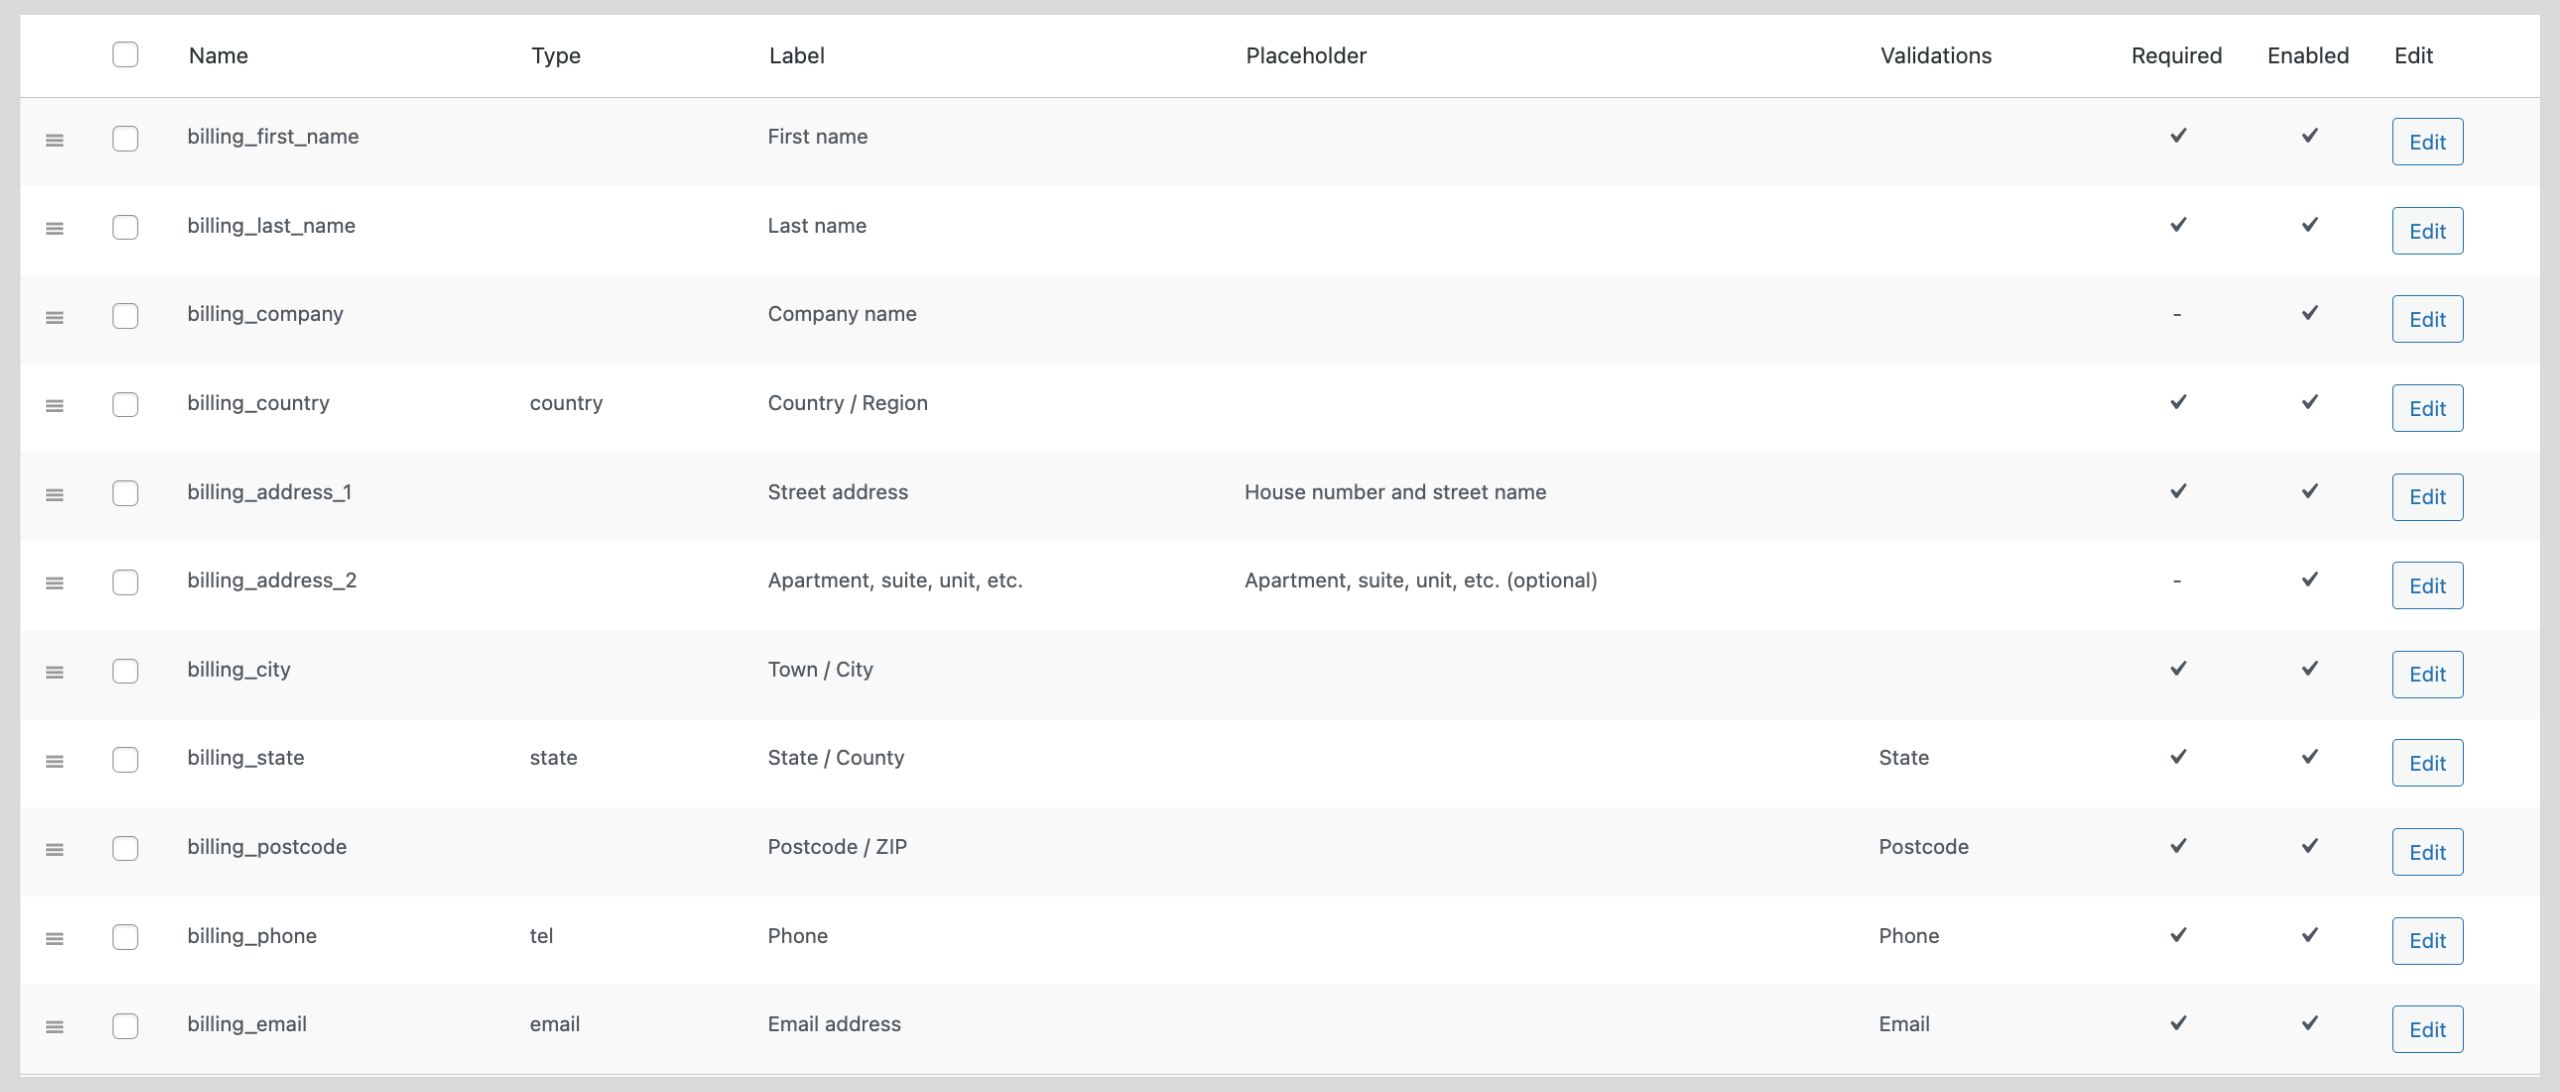
Remove fields
You can remove fields easily by clicking on the ‘Remove’ button.
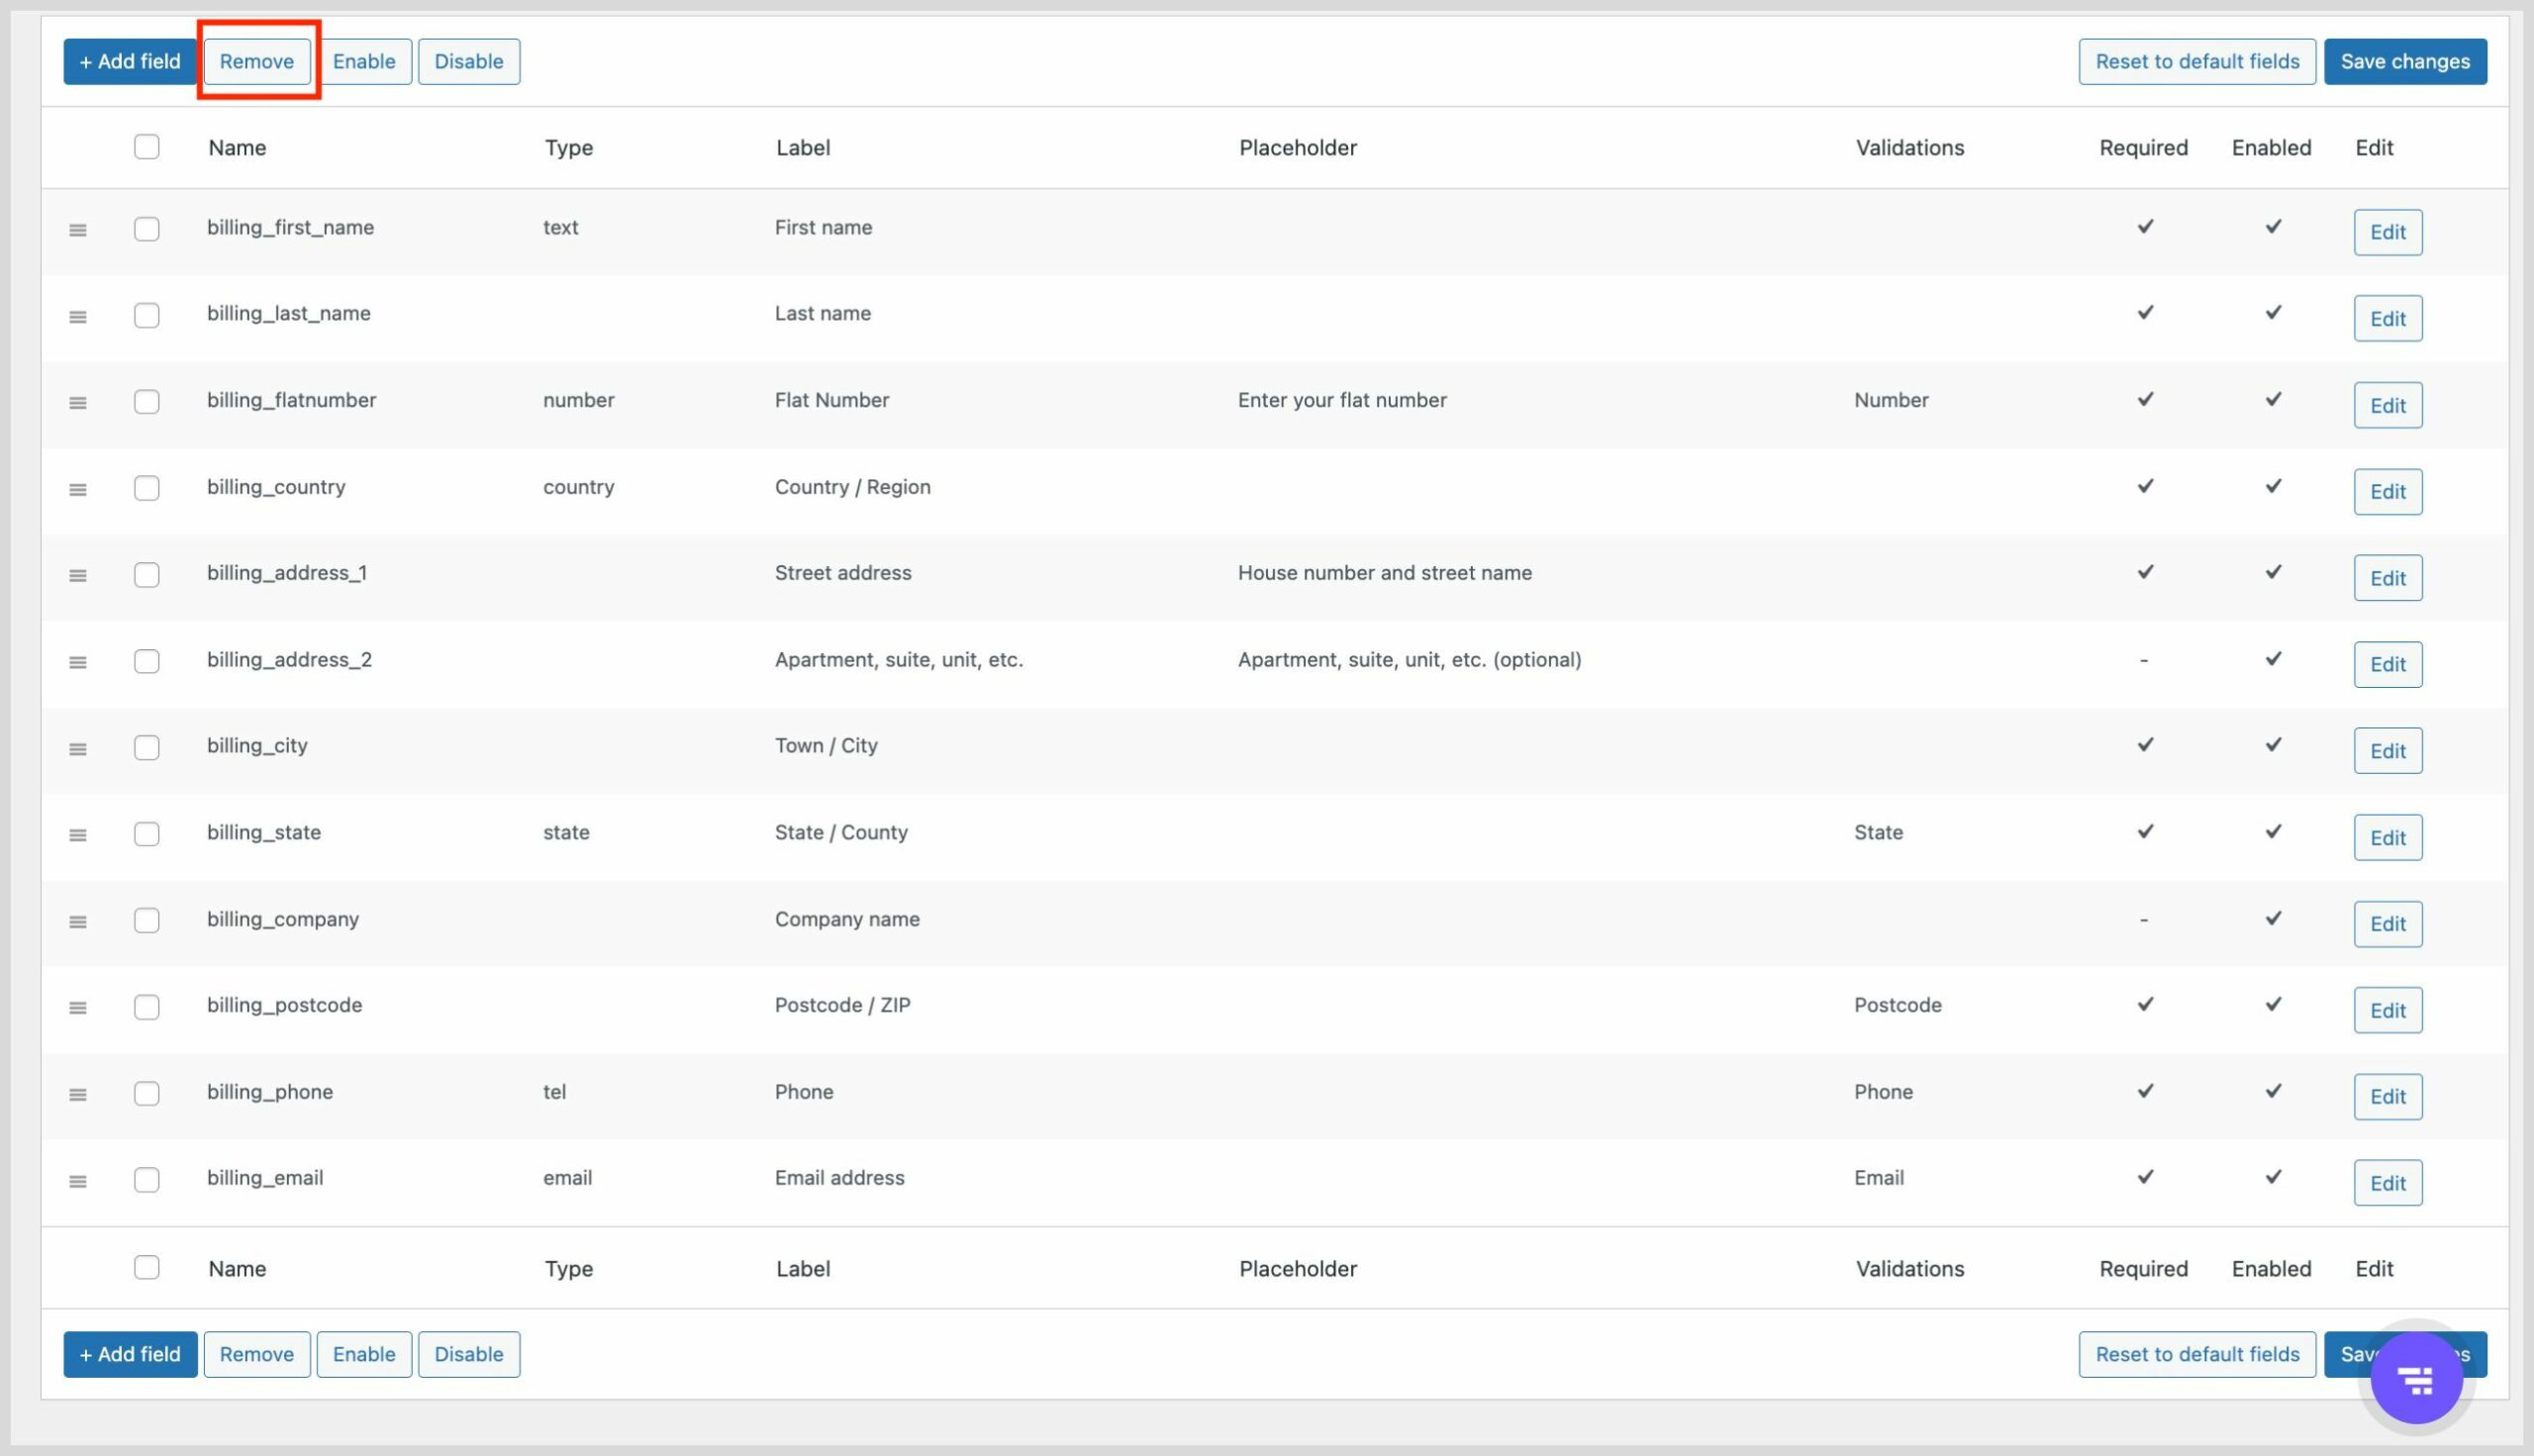
Once you click on remove fields, the field gets removed.
WooCommerce lets you customize your checkout page as per your choice. It could be through code snippets or with the help of plugins. Relying on plugins simplifies your task and allows quick customization with a few clicks. So whether you pick the easy way or the traditional way is entirely up to you. Either way, the whole idea behind customization is to provide your customers with a seamless checkout experience. So go ahead and create one the way you want. Happy customization!


 THANK YOU!