 Getting Started
 Advanced Settings
 FAQ
FAQ Compatible Plugin & Themes
Customize the title and subtitle on your product page by adding display styles.
Add or Edit Display Styles
You can add display styles for new fields/existing fields.
- Navigate to the Extra Product Options → Product Options.
- If you are setting display style for a new field, then navigate to Add field → Display Styles.
- If you are editing the display style of an existing field, click on the edit icon of the desired field and go to the Display Settings.
- Configure the settings based on your needs and save the changes made.
Align options vertically feature can only be set for a few specific field types like Radio Button, Checkbox Group, Colour Pallette, and Image Group.
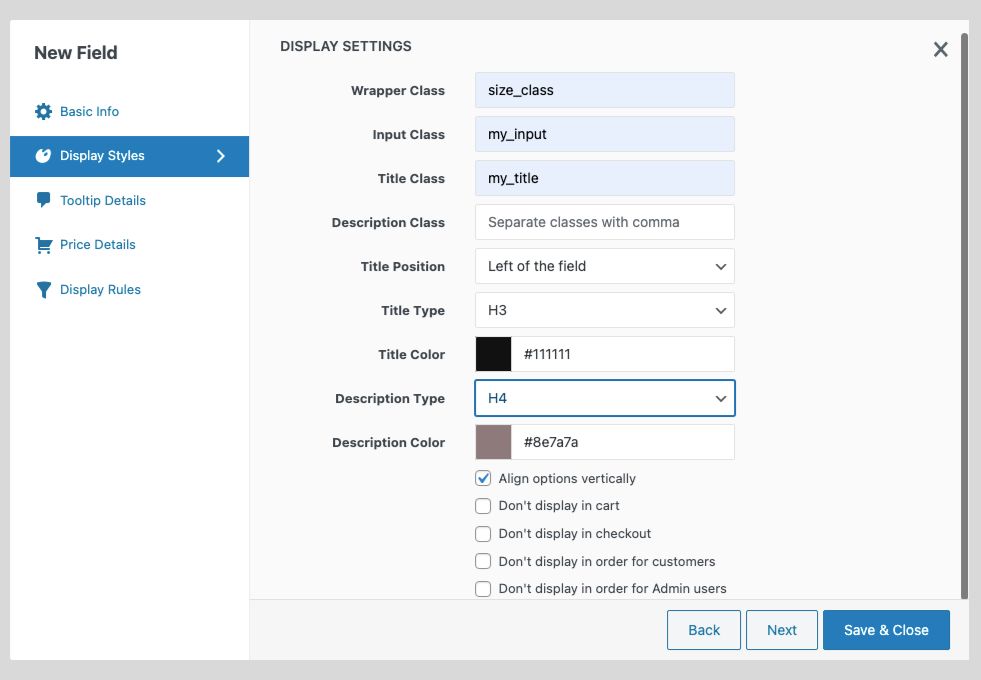
The Display Styles tab includes the option to add CSS class for title and subtitle. This is explained below.
| Wrapper Class | A wrapper class refers to a class used on an HTML element that functions as a container or wrapper for other elements. It is usually used to group or contain multiple elements within a parent container for styling or layout purposes on your product page. |
| Input Class | A comma-separated list of CSS classes which will be added to the input element. |
| Title Class | Add a custom class for the selected tag. To add multiple classes separate each class with a comma. |
| Description Class | Add a custom class for the selected subtitle tag. To add multiple classes separate each class with a comma. |
| Title Position | Choose the display position for your title, select from Left of the field, and Above field. |
| Title Type | Choose the title tag that you want to customize:
H1-H6 heading tag p – paragraph div – division tag span – span tag label – label tag |
| Title Color | Add custom color for the selected title tag. |
| Description Type | Choose the subtitle tag that you want to add:
H1-H6 heading tag p – paragraph div – division tag span – span tag label – label tag |
| Description color | Add custom color for the selected subtitle tag. |
| Align options vertically | Check the field to display the options vertically. |
| Don’t display in cart | Check this field if you don’t want it to be visible in Cart |
| Don’t display in checkout | Check this field if you don’t want it to be visible in checkout. |
| Don’t display in order for customers | Check the box if you don’t want to display it in the customer’s order pages. |
| Don’t display in order for Admin users | Check the box if you don’t want to display it to the admin. |
The field types Color Palette and Image Group have some additional display style options. They are:
| Option Text Position | Choose a text position for the option from the corresponding dropdown. |
| Image Border Radius | Enter the required border radius for the image. |
| Image Display Size | Enter the required display size for the image. |
| Align options vertically | Select the checkbox to display the created options vertically. |
| Enable Full Image View in Lightbox | Select the checkbox to get a full image view of the option image. |
To Set Display Styles for Existing Sections
- Go to the Extra Product Options → Product Options.
- To set the display style for the new section, navigate to the Add new section → Display Styles.
- If you are editing the display style of an existing section, click on the edit icon of the desired section and go to the Display Settings.
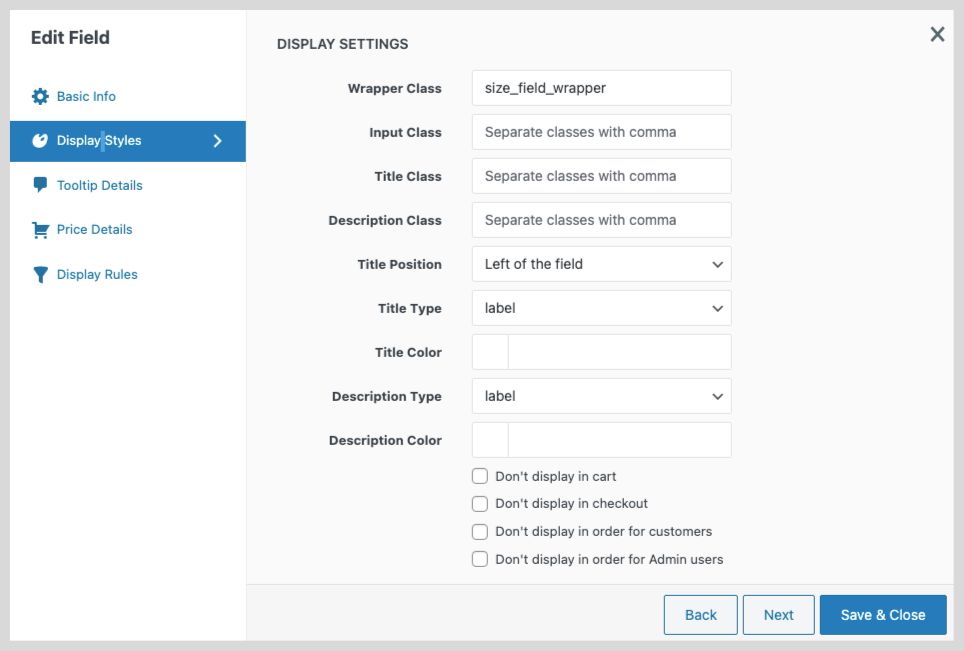
- Enter the below details and Save the changes made.
| CSS Class | A comma-separated list of CSS classes is to be added to the wrapper element. |
| Title Class | A comma-separated list of CSS classes for the title tag. |
| Subtitle Class | A comma-separated list of CSS classes for the subtitle tag. |
| Title Type | The type of title element. Ex. H1, H2, etc. |
| Title Color | The color of the title text. |
| Subtitle Type | The type of subtitle element. Ex. H1, H2, etc. |
| Subtitle Color | The color of the subtitle text. |
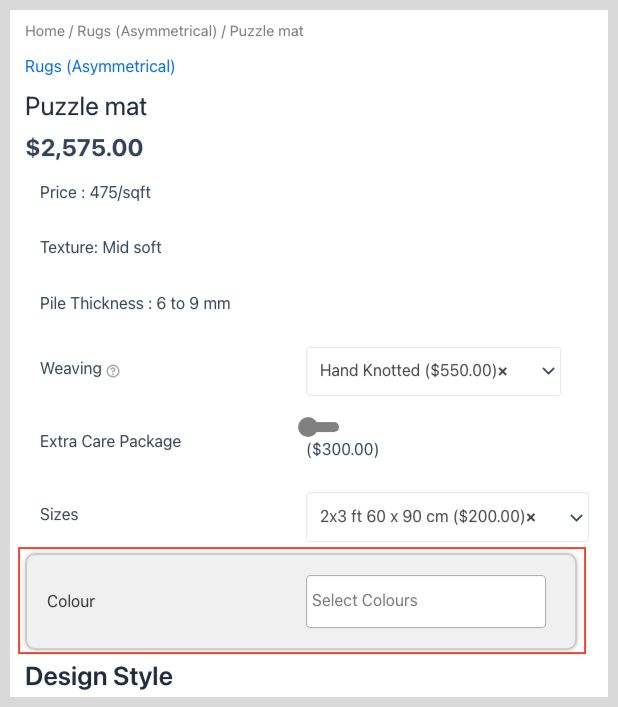
This is an example of how you can style a field using wrapper class:
.size_field_wrapper {
        background-color: #f0f0f0;
  	padding: 20px;
  	border: 2px solid #ccc;
  	border-radius: 10px;
  	box-shadow: 0 0 5px rgba(0, 0, 0, 0.2);
	font-size: 16px;
  	color: #333;
  	line-height: 1.5;
  	margin-bottom: 10px;
}