

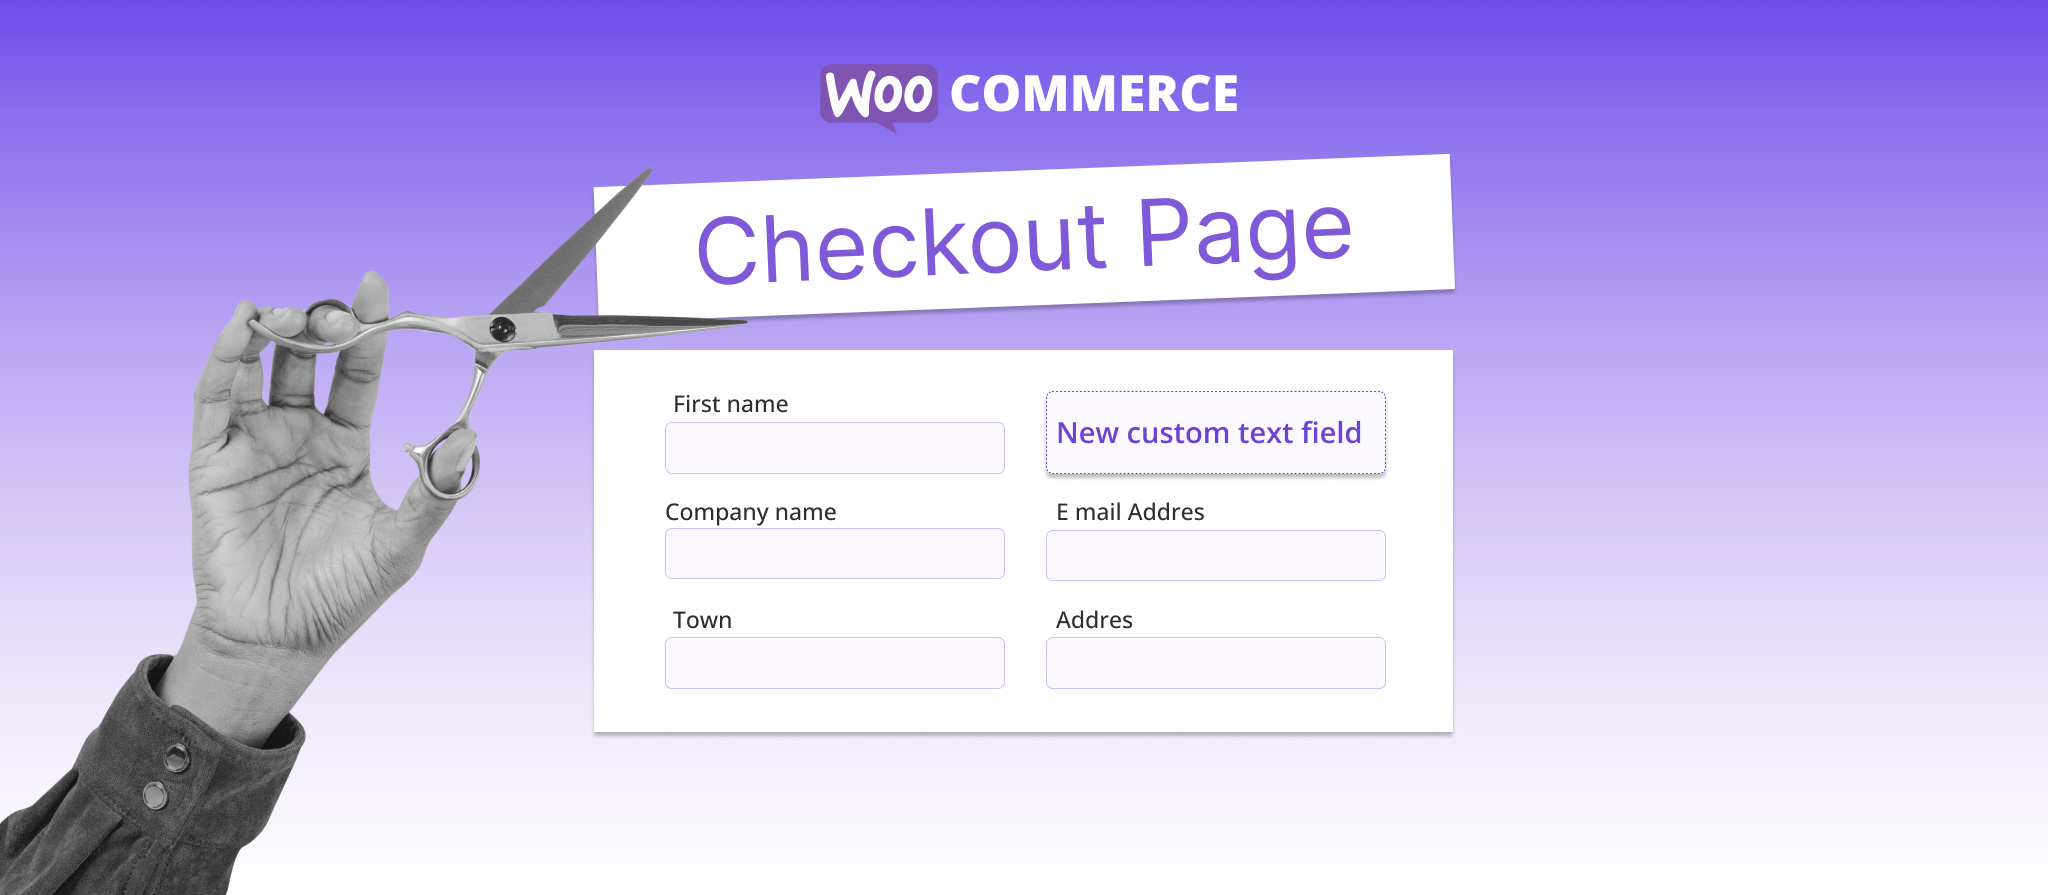
Setting up an e-commerce store itself can be nerve-racking as we go down the lane of detailing. But yet another daunting and time-consuming task is figuring out how you will customize your store. While customizing the store, most owners make sure to smooth the functionality and flow of the site without compromising the aesthetics and visual appeal of the site. In certain circumstances, some fields are added to your store’s checkout page to retrieve information or learn more about the customer. For any e-commerce store, creating a smooth segue from the product page to the checkout section is essential. While the checkout page largely deals with the address and billing information section, customizing it in a seamless way that enhances the user experience is pivotal. Checkout Field Editor for WooCommerce is a plugin developed by Themehigh that can customize the WooCommerce Checkout Fields of your checkout page efficiently.
As the plugin has a simpler interface, you can add, delete, modify, or alter the display order of the fields within a few clicks. The plugin lets you create and have custom sections in the checkout forms. Checkout Field Editor Plugin has an extensive feature set that is a must-have for store owners. Apart from just creating and customizing the checkout page, they come with 24 custom checkout fields, different price field types, WPML compatibility, and much more. So, here I am going to dissect some of the significant benefits of the Checkout field editor for WooCommerce themehigh.
Different Types of Fields Available In The Plugin
According to the image depicted above, 24 custom checkout field type options are listed inside the plugin. You can select any of them as per your requirements:
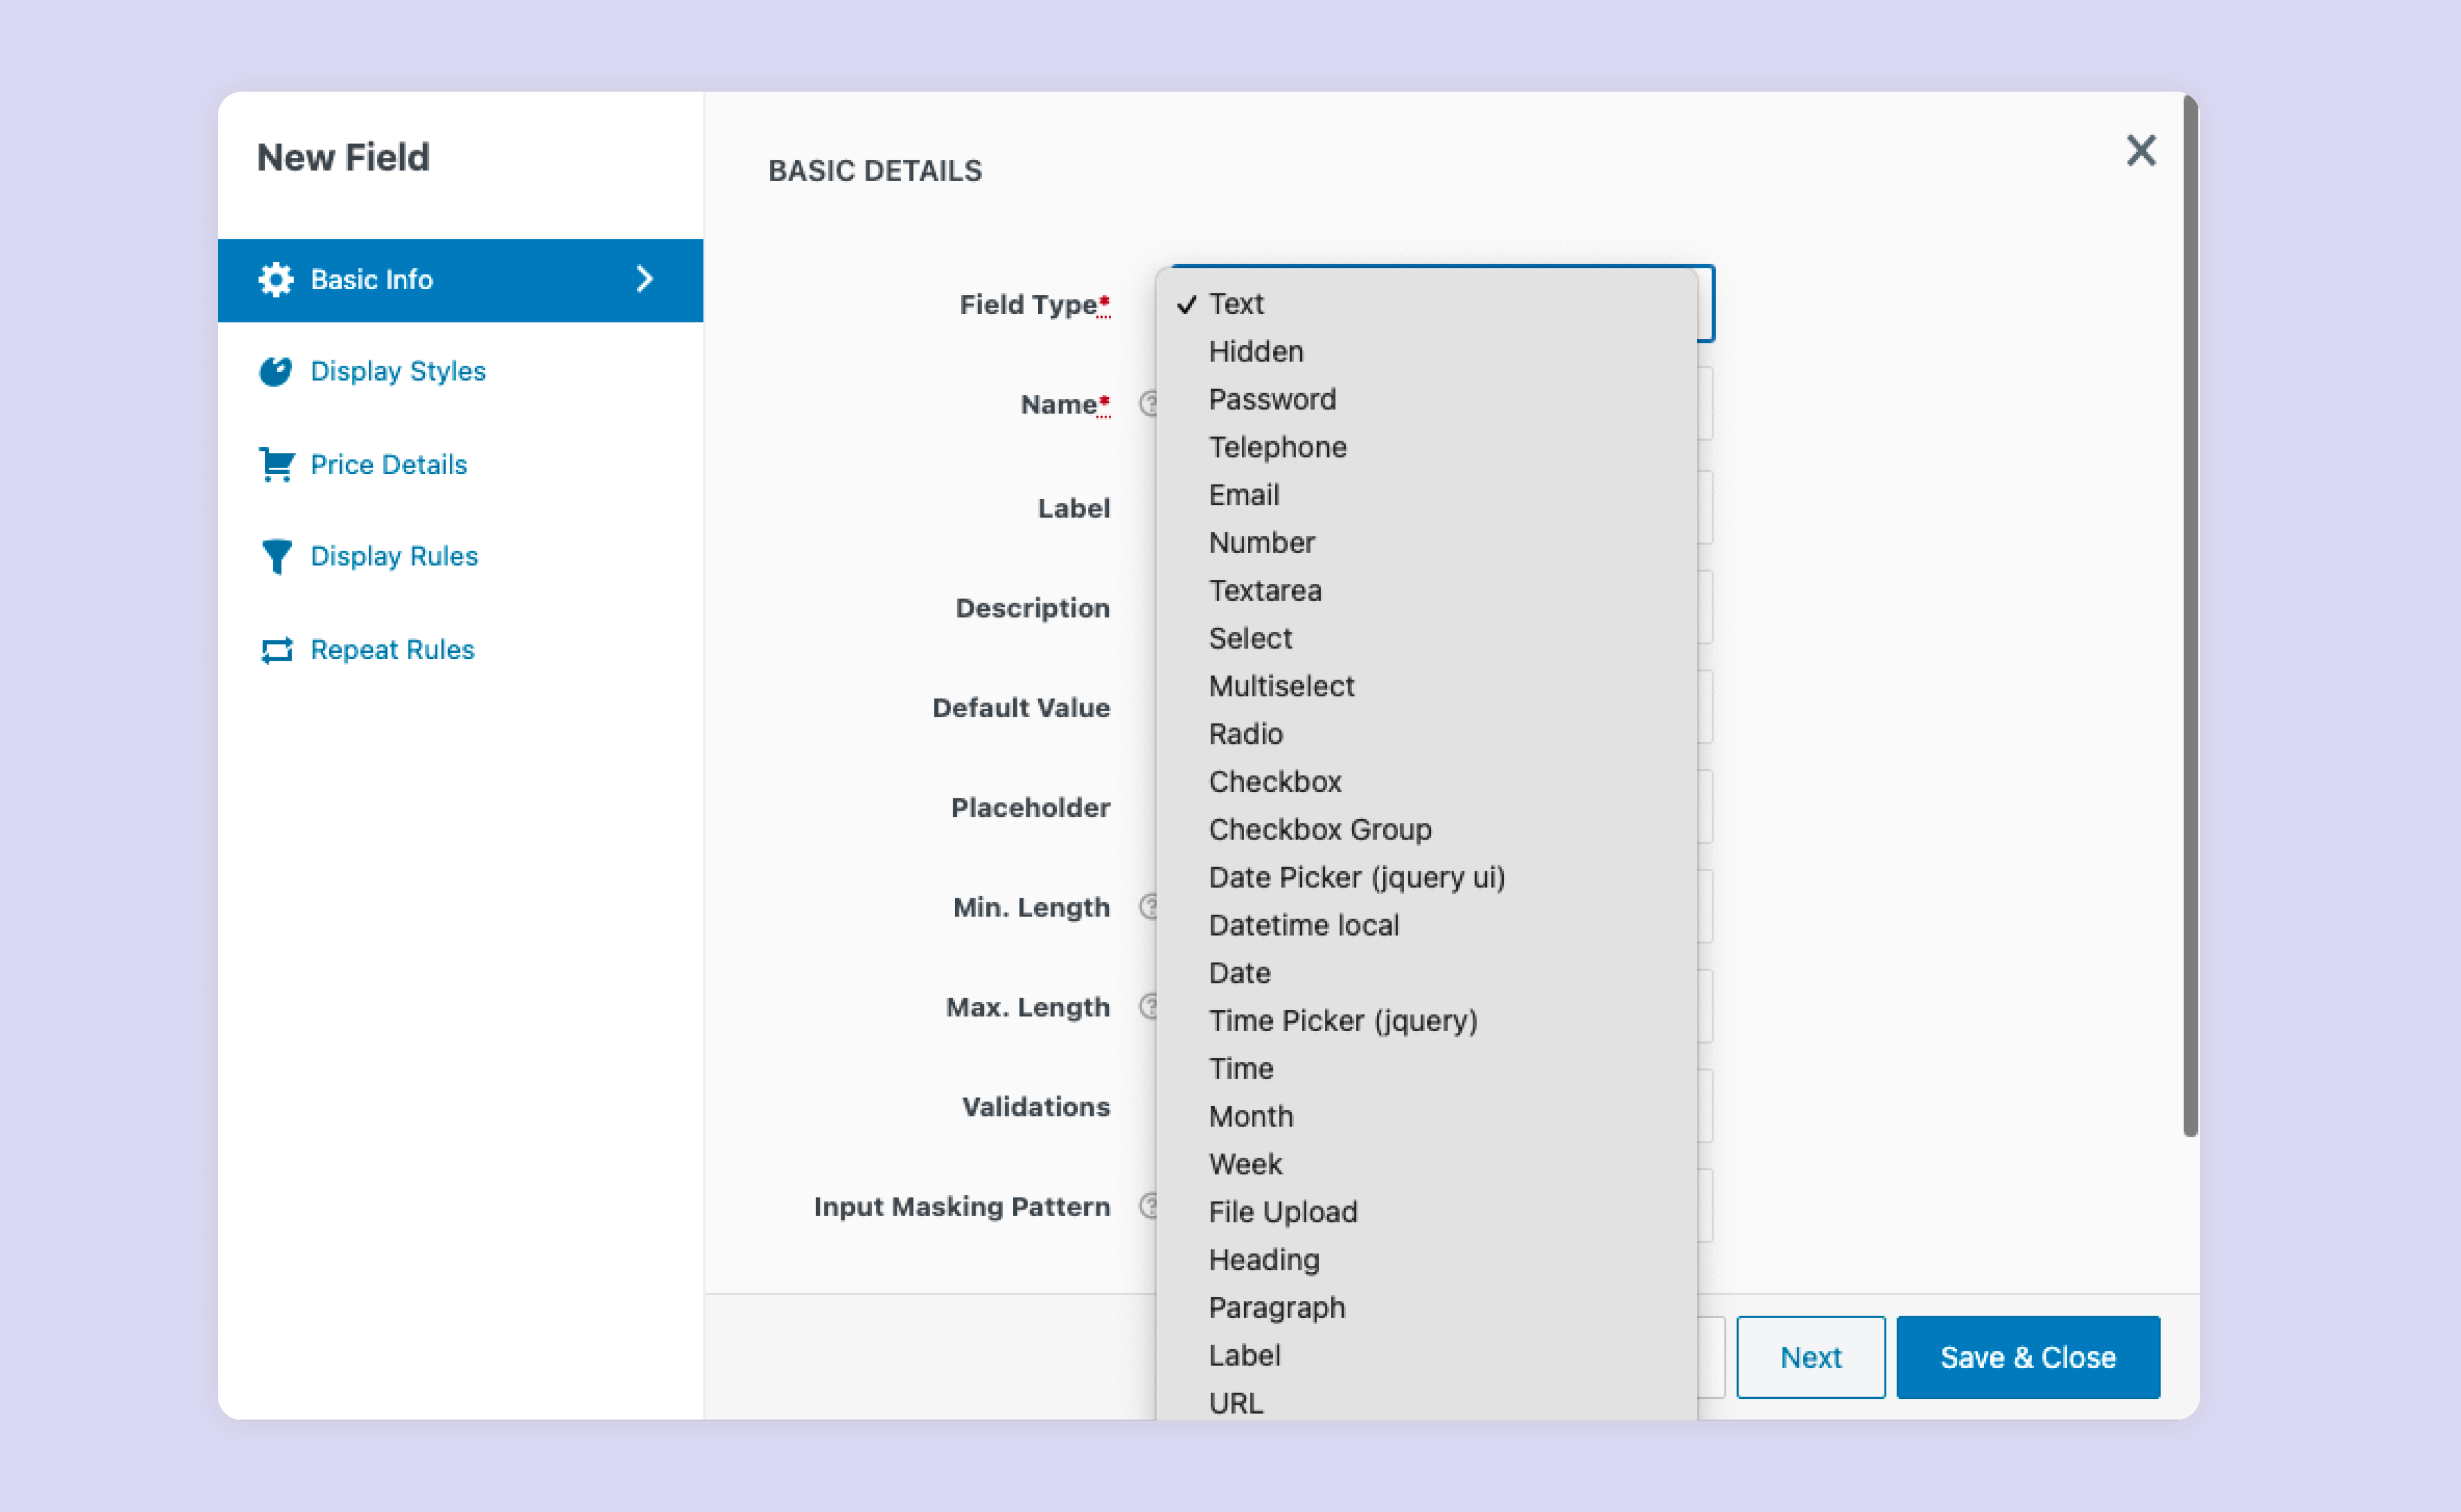
These are the different kinds of field types you can find in the checkout field editor plugin. Using the wrapper class, you can perform custom stylings like customizing the width of the textbox, changing the background color, etc. Additionally, with the input class and label class, you can do the stylings with CSS.
Managing Custom Fields Inside a Sections
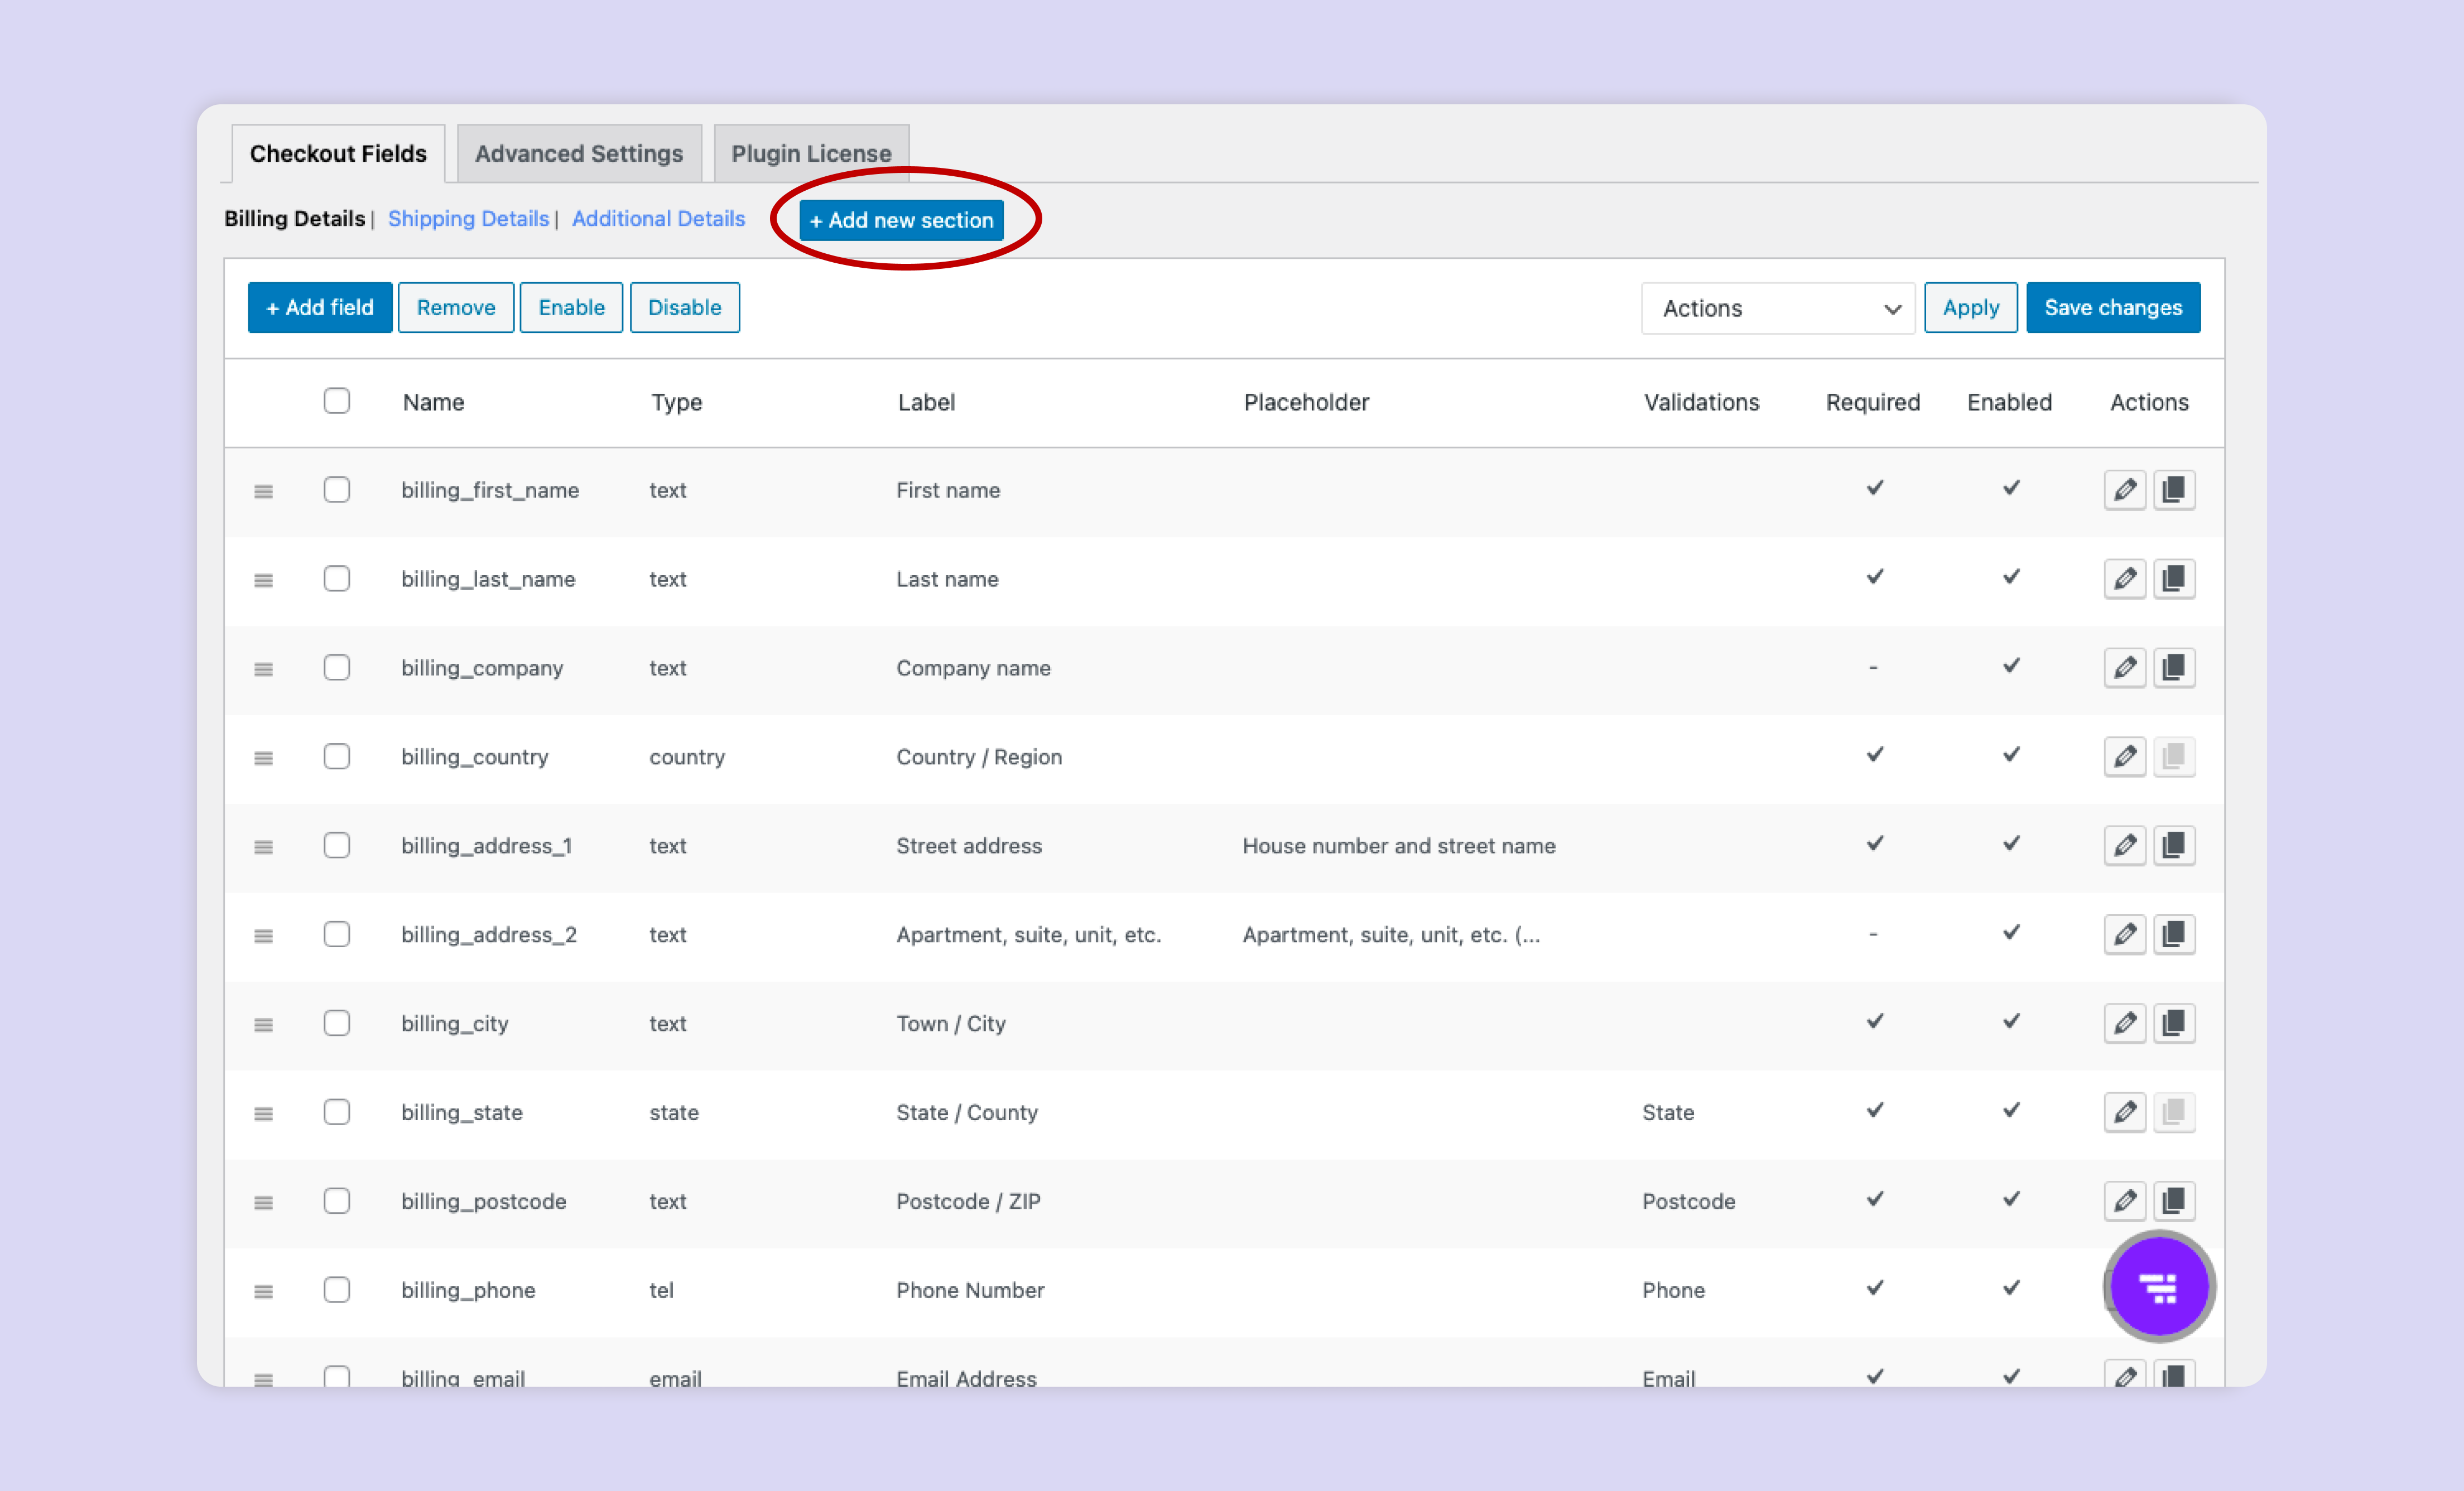
Based on the image above, the field can be handled with ease if it is in sections, you can use ‘Create New Section’ to make sections. The checkout field editor allows you to create new sections, along with providing the option to display or hide the section as per your preference.
With the checkout field editor, organizing and managing WooCommerce Checkout Fields is so much easier. If you analyze the image given, you can see that the plugin offers several options for setting the display position of the section. These simple customizations significantly enhance and optimize your website.
Display Sections And Fields Conditionally
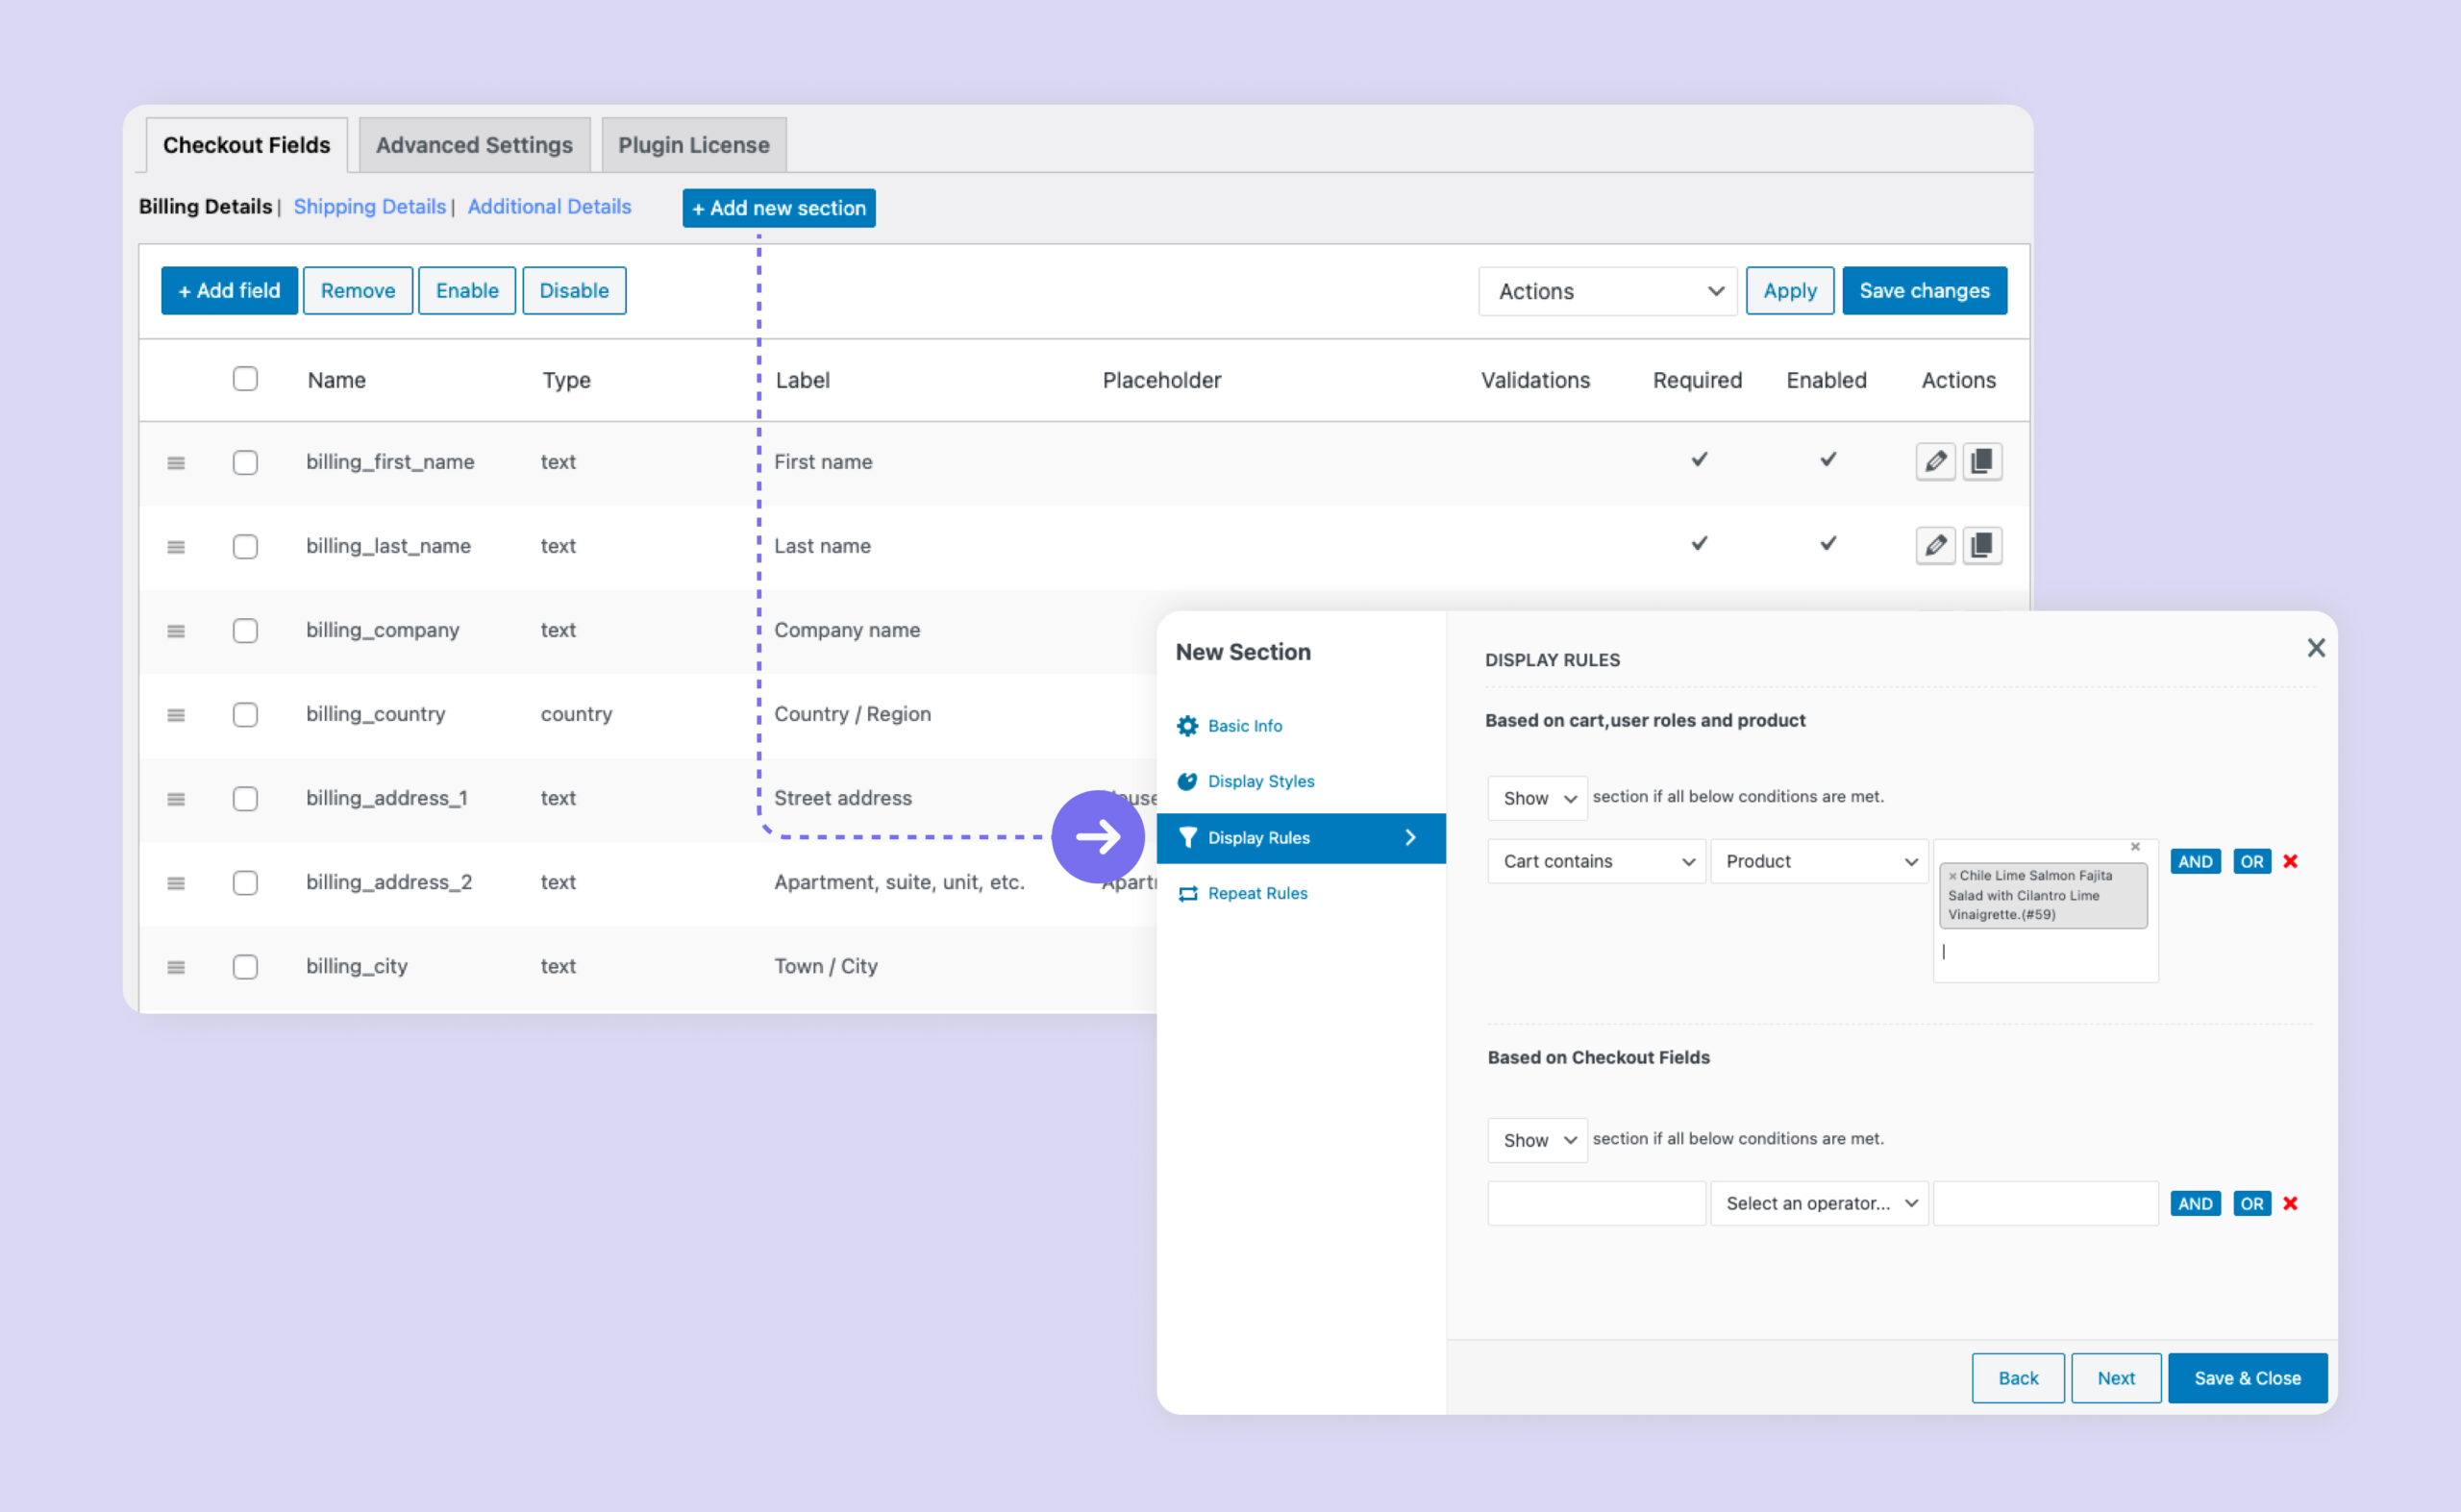
With the ‘Display Rules’ feature, you can customize the display or hide the section inside a checkout field editor. Display rule can be set to show the field based on the product, variations in the product, product tags, price, and so on. So you can “Show” or “Hide” the fields as per user roles.
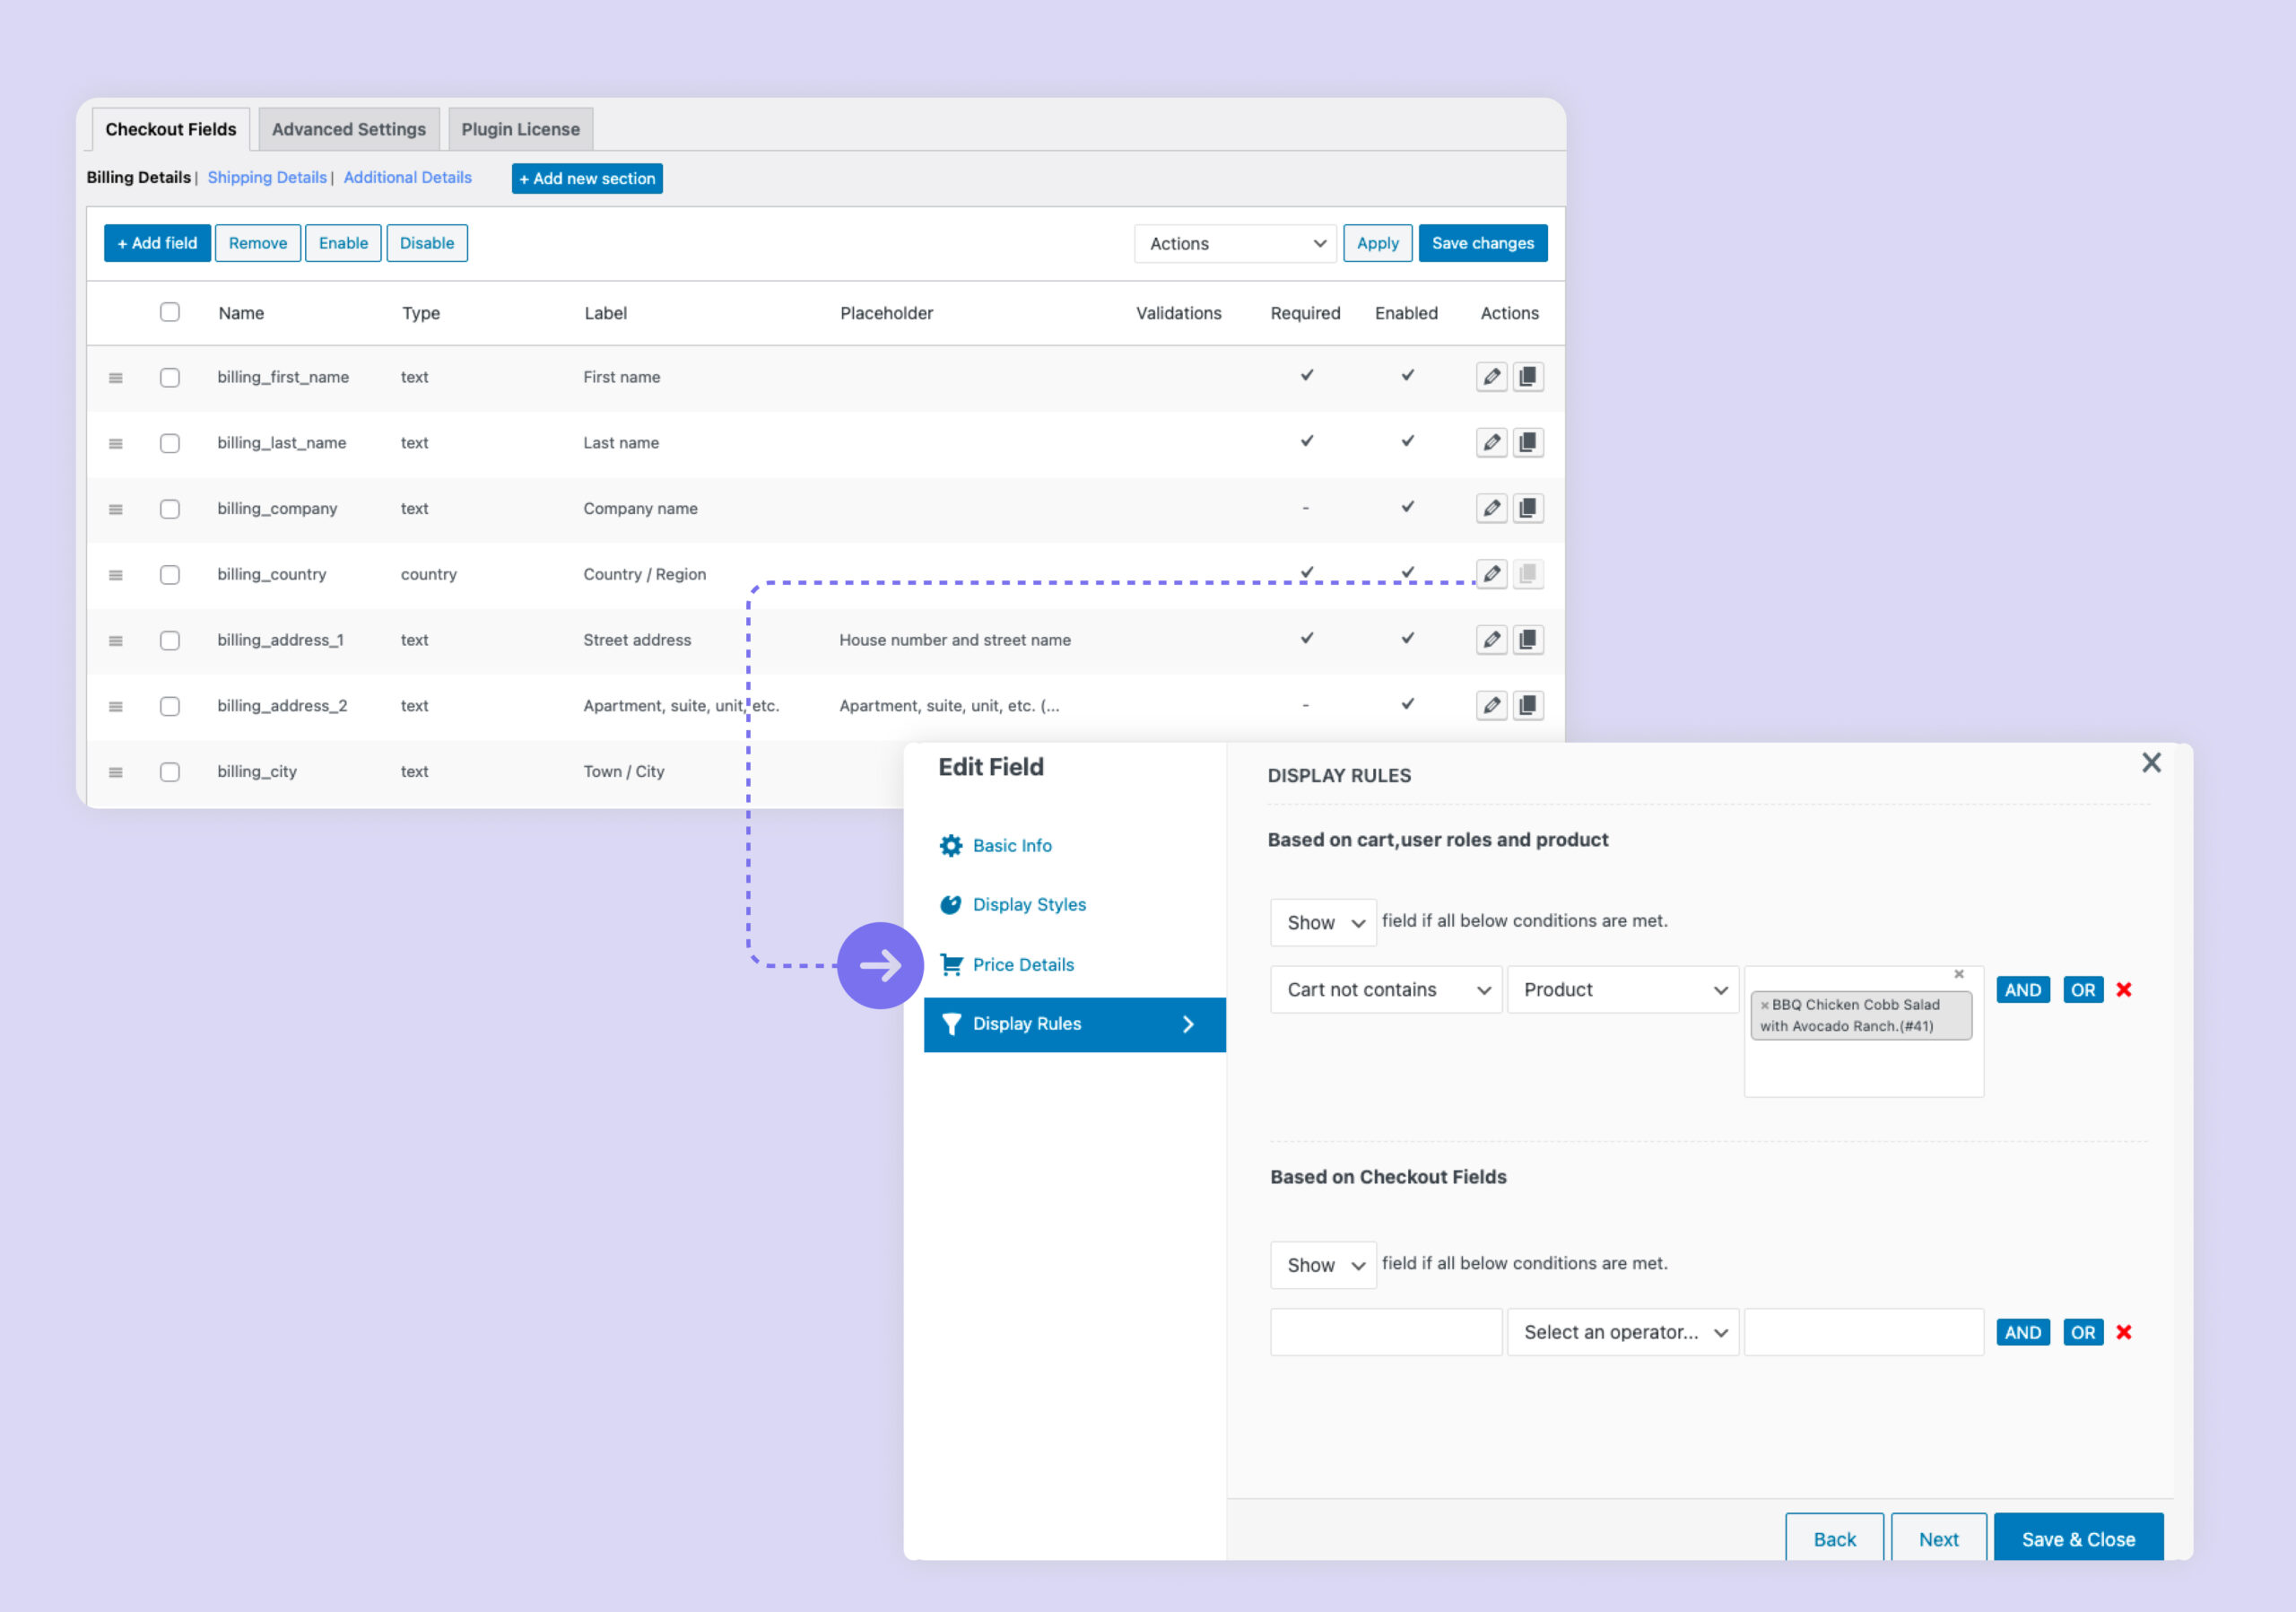
The plugin is a wide feature set to create conditional roles depending on the field types like check box, date picker, multi-select, etc. Now the plugin’s usability continues, they provide conditional display based on the payment and shipping methods.
Price fields based on Price Types
The Checkout Field Editor tool provides a wide variety of price options. There are five kinds of price types: fixed, custom, percentage of cart contents total, percentage of subtotal, percentage of subtotal excluding tax, and dynamic. The price types can vary depending on the field type you choose.
Show Custom Fields On My Account Page
To show the custom fields on the “My Account Page” as a prerequisite, you must first enable the “User Meta Data” by checking the checkbox. This will make the field visible on the My Account Page. In addition to the User Meta Data, a couple of other options allow you to determine where the field should be shown or hidden.
Validators For Checking The Field Input Value
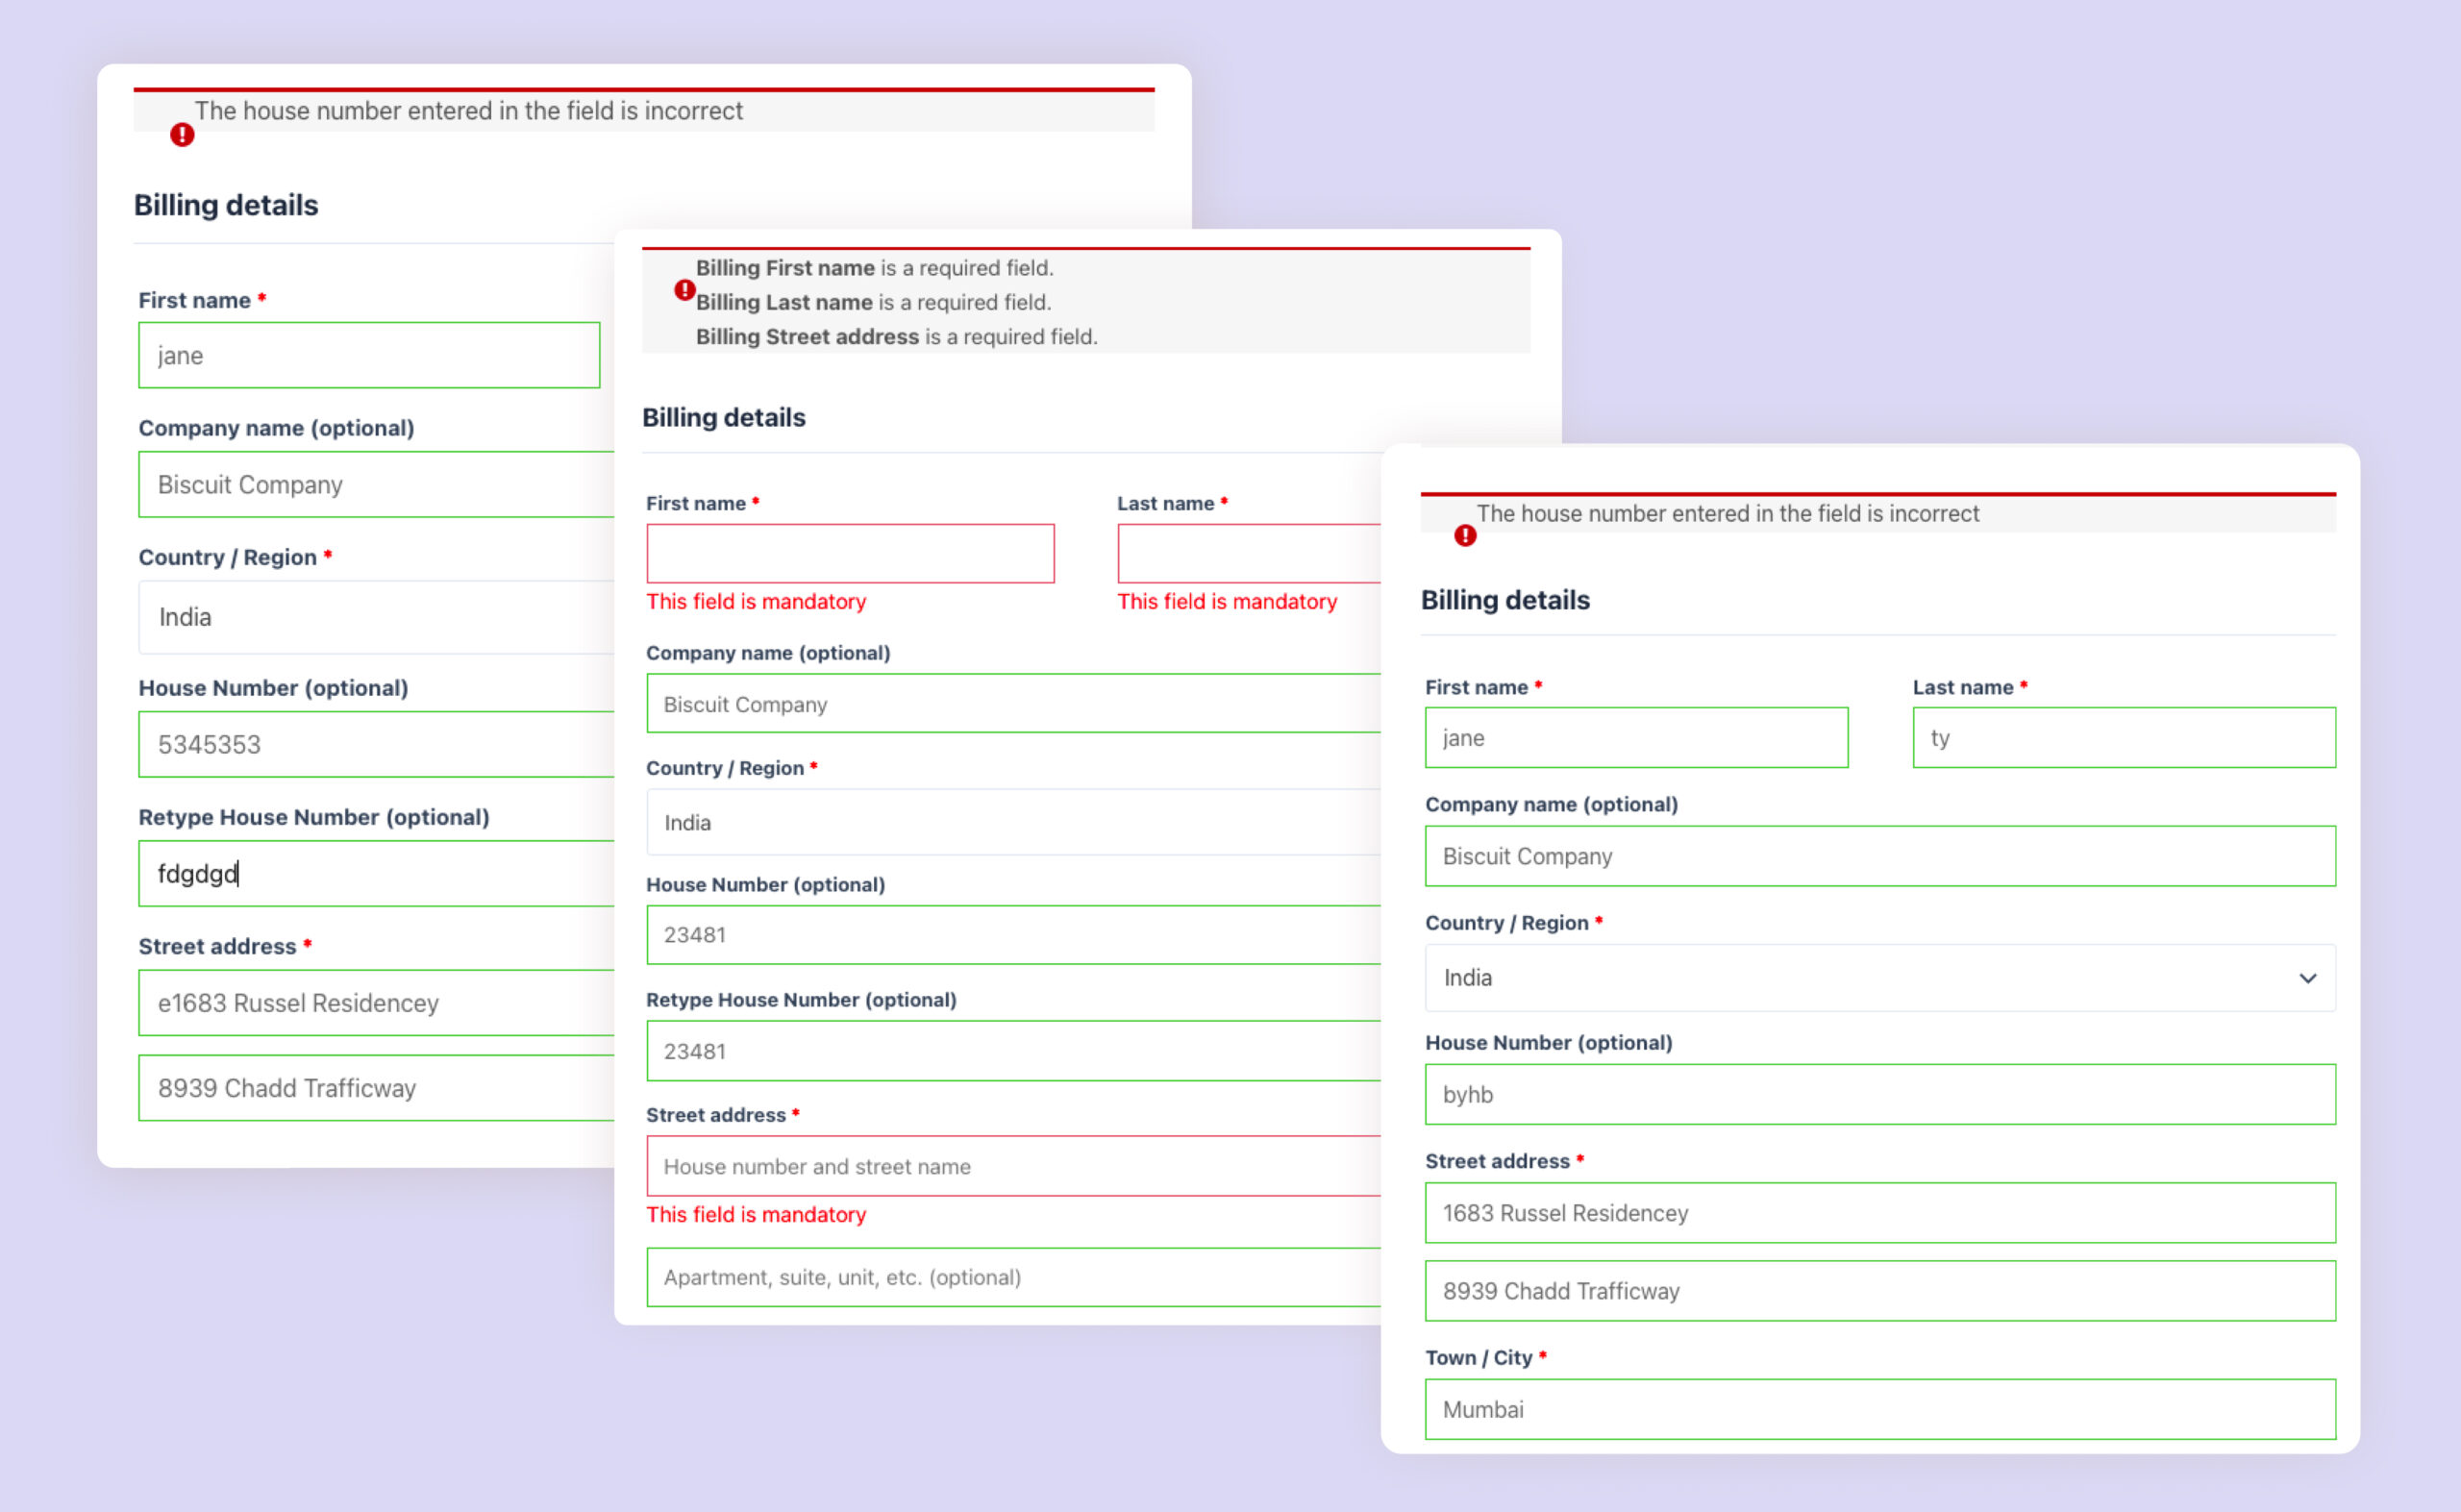
Validators have a simplest job to do: verify the input entered by the user is correct. Custom validators can be set to check whether the field’s input values can be validated. So, to begin with, go to ‘Advanced Settings’ of the checkout form, and there you can set validators. Create a custom validator by setting up the label and name for the validator. Now, set validation criteria by defining the permissible characters and numerals. Make sure that the validation rules you set are appropriate and comprehensive. Finally, set a notification message that should be displayed to the customers.
Confirm validators can be set in a similar way inside the “Advance setting” and then add the created confirm validator into the basic info by selecting the validation from the validator field. The process for setting confirm field validators and custom validators is similar, although the confirm field validators focus on verifying particular fields.
You can set in an inline validator using “ Enable inline validation in checkout page”. Inline validators can detect earlier on if the customer has made an error while entering information and inform the user at the earliest the message notification. If that is all done and dusted, you can set validators for checking the field input value.
Manage field available in Emails and Order Details Page.
By activating or deactivating the “Display in Admin Emails” option, you can easily adjust the visibility of WooCommerce Checkout Fields in your emails. Enabling the “Display in Customer Emails” checkbox lets you add the field to customer emails. Additionally, there are other options available, such as “Display in Order Detail Page,” “Display in Thank You Page,” and “Order MetaData,” which can be enabled or disabled based on your preferences. You can also mark a field as “Required” by checking the box, ensuring that customers cannot place an order without filling out the field. Finally, once you have selected it, click “Save” to make the changes live.
Repeat A Field Or A Group Of Custom Fields
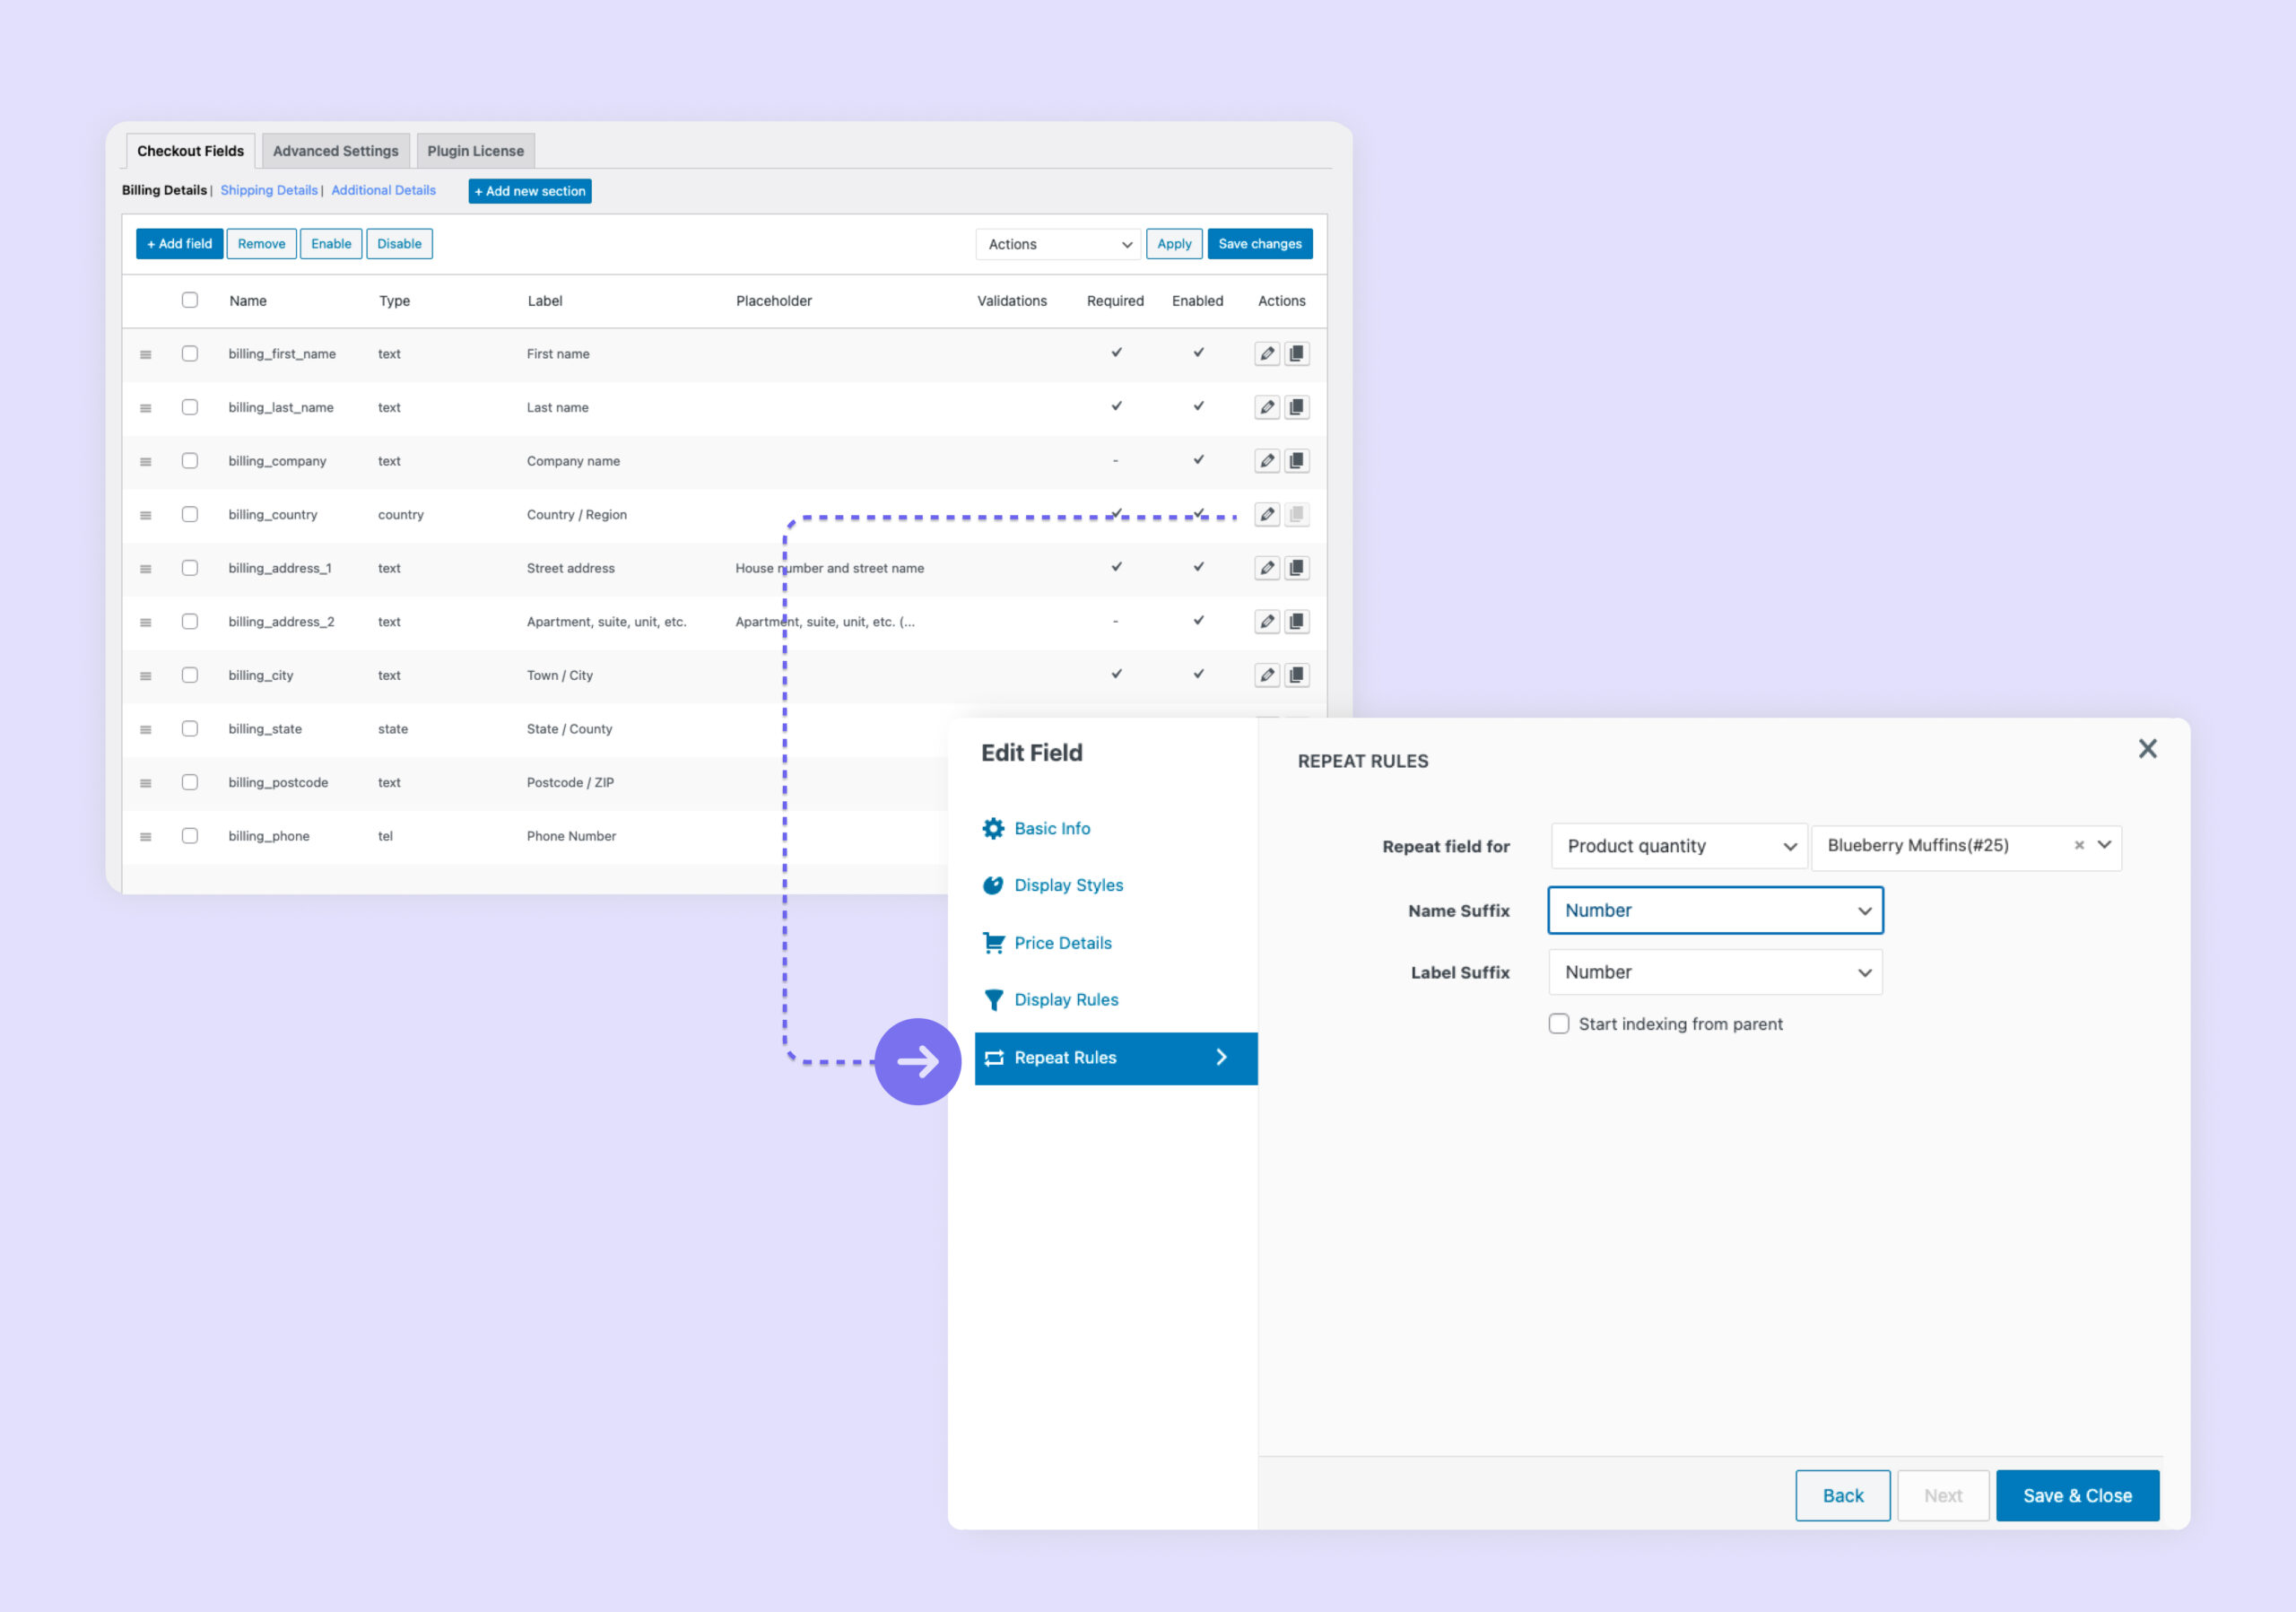
You can set a repeat rule for the cart quantity to repeat a field or a group of custom fields. If you check out the above image, you can figure out how to set a repeat rule. After setting the repeat rule to the fields, you can see that the fields are displayed multiple times. For an e-commerce website, it is constructive for the customers to enter the details of each product.
Other Key Features Of The Plugin
The Checkout Field Editor for WooCommerce plugin comprises of various additional features such as multilingual support and Zapier compatibility. It is highly customer-friendly and compatible with several popular plugins and numerous other features.
Final Words
When setting up an e-commerce store, there are numerous details to consider. However, customizing your store is vital in creating a seamless experience for your customers. While maintaining your site’s aesthetics and functionality, you may need to add extra fields to your checkout page to learn more about your customers. This is where the Checkout Field Editor for WooCommerce comes in. Developed by themehigh, this plugin is the perfect solution for customizing the WooCommerce Checkout Fields of your checkout page in a user-friendly and efficient manner. With its simple and professional features, it is an essential tool for any e-commerce store owner seeking to enhance the checkout experience for their customers. So don’t let the thought of customizing your store overwhelm you. Try the Checkout Field Editor for WooCommerce and watch your customers enjoy a smooth and hassle-free checkout process.


 THANK YOU!